Device Supervisor App User Manual
Device Supervisor App (Device Supervisor) allows users to collect and process data and upload data to the cloud conveniently and supports data parsing over multiple industrial protocols such as ISO on TCP and ModbusRTU. This manual takes collecting PLC data and uploading it to the ThingsBoard cloud platform as an example to describe how to collect PLC data and upload it to the cloud through Device Supervisor App. Hereinafter, InGateway501 is referred to as IG501 , InGateway502 is referred to as IG502 and InGateway902 is referred to as IG902.
- Overview
- 1. Prepare the hardware and data collection environment
- 2. Configure data collection for Device Supervisor
- 3. Report and monitor the PLC data
- Appendix
- FAQ
Overview
Prepare the following items:
- Edge computing gateway IG501/IG502/IG902
- PLC
- Network cable/serial port cable
- *Firmware, SDKs, and apps required for software version update
- Firmware version: V2.0.0.r12622 or later
- SDK version: py3sdk-V1.3.7 or later
- App version: 1.1.2 or later
- *ThingsBoard demo account
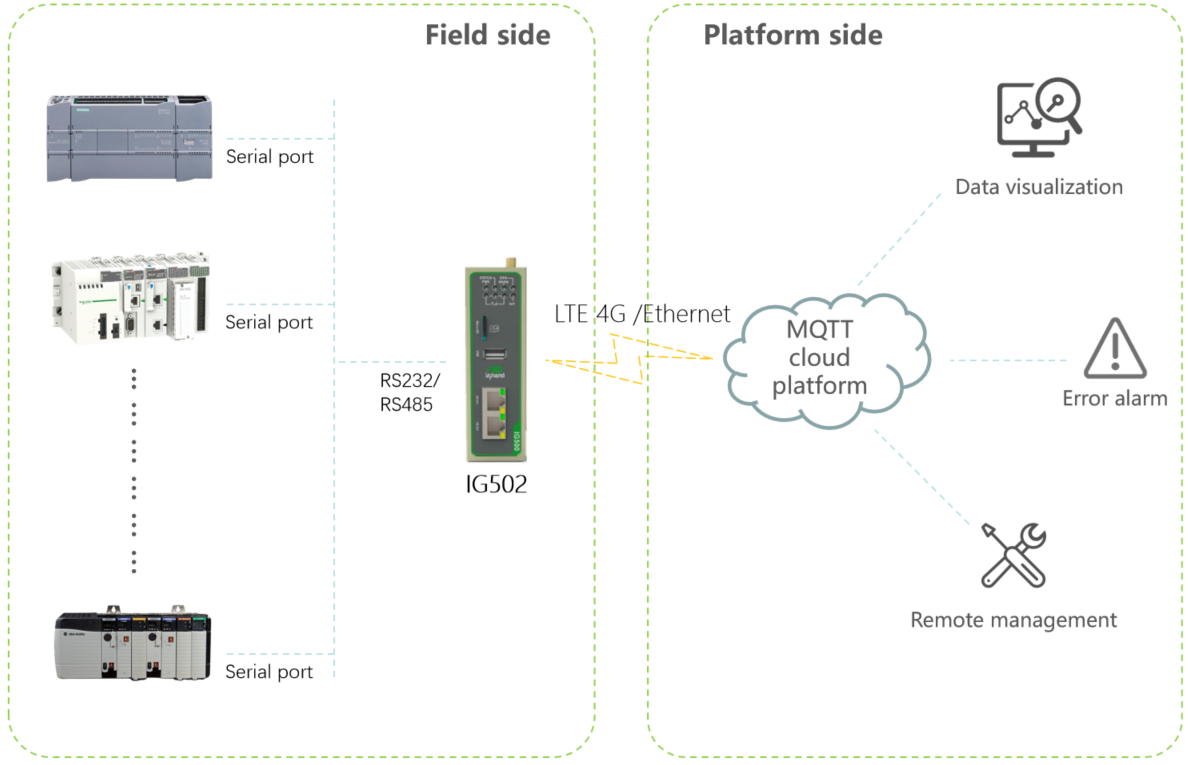
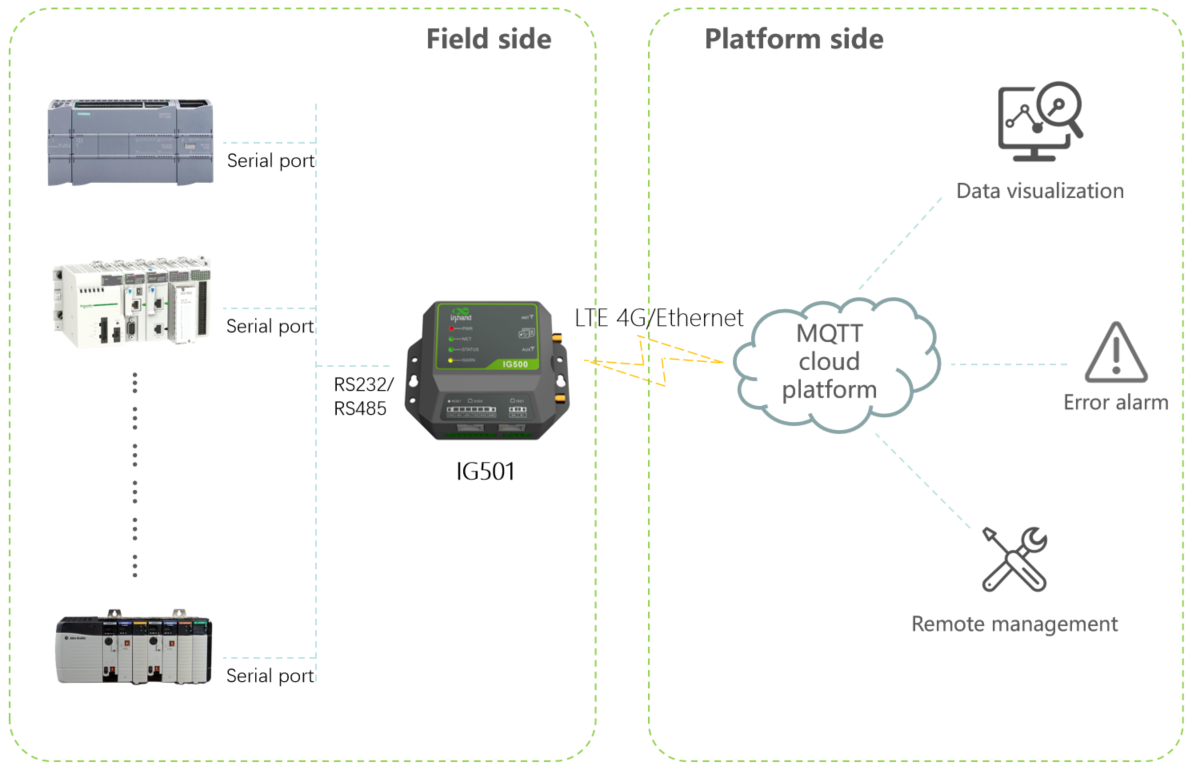
The whole process is shown in the figure below:
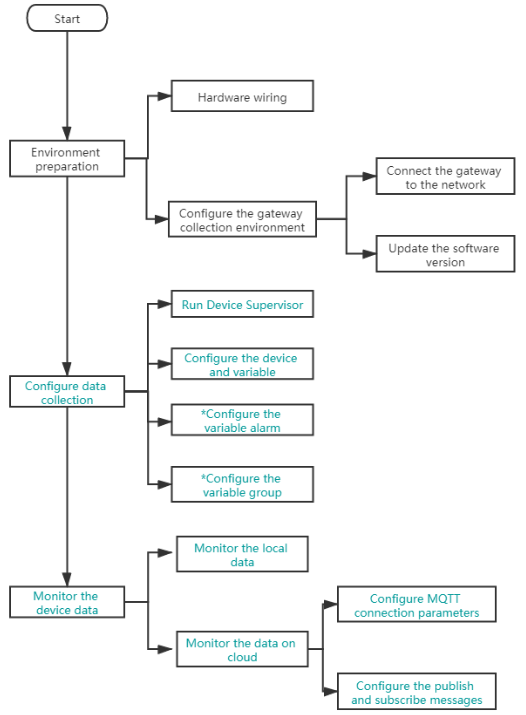
1. Prepare the hardware and data collection environment
- 1.1 Hardware wiring
- 1.2 Configure InGateway to access PLC
- 1.3 Configure InGateway to connect Internet
- 1.4 Update the InGateway software version
1.1 Hardware wiring
1.1.1 Ethernet wiring
Ethernet wiring for IG902
Power on IG902 and connect IG902 and the PLC through an Ethernet cable according to the topology.

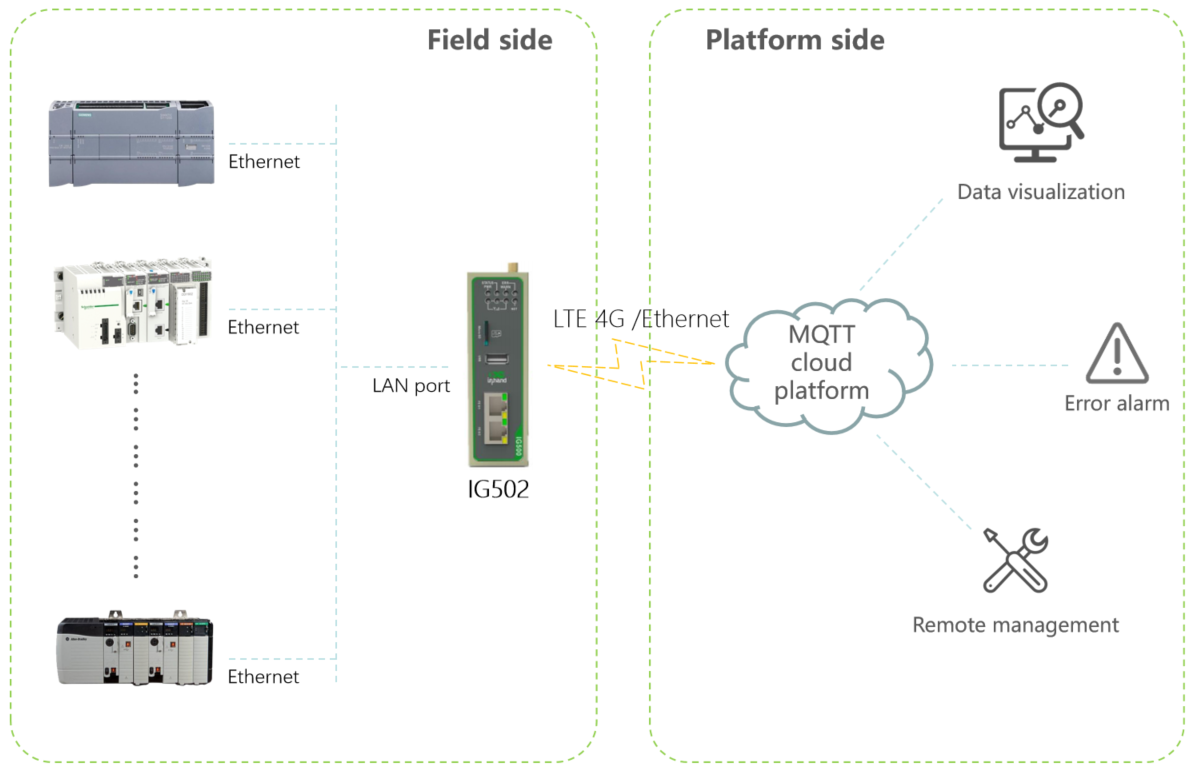
Ethernet wiring for IG502
Power on IG502 and connect IG502 and the PLC through an Ethernet cable according to the topology.
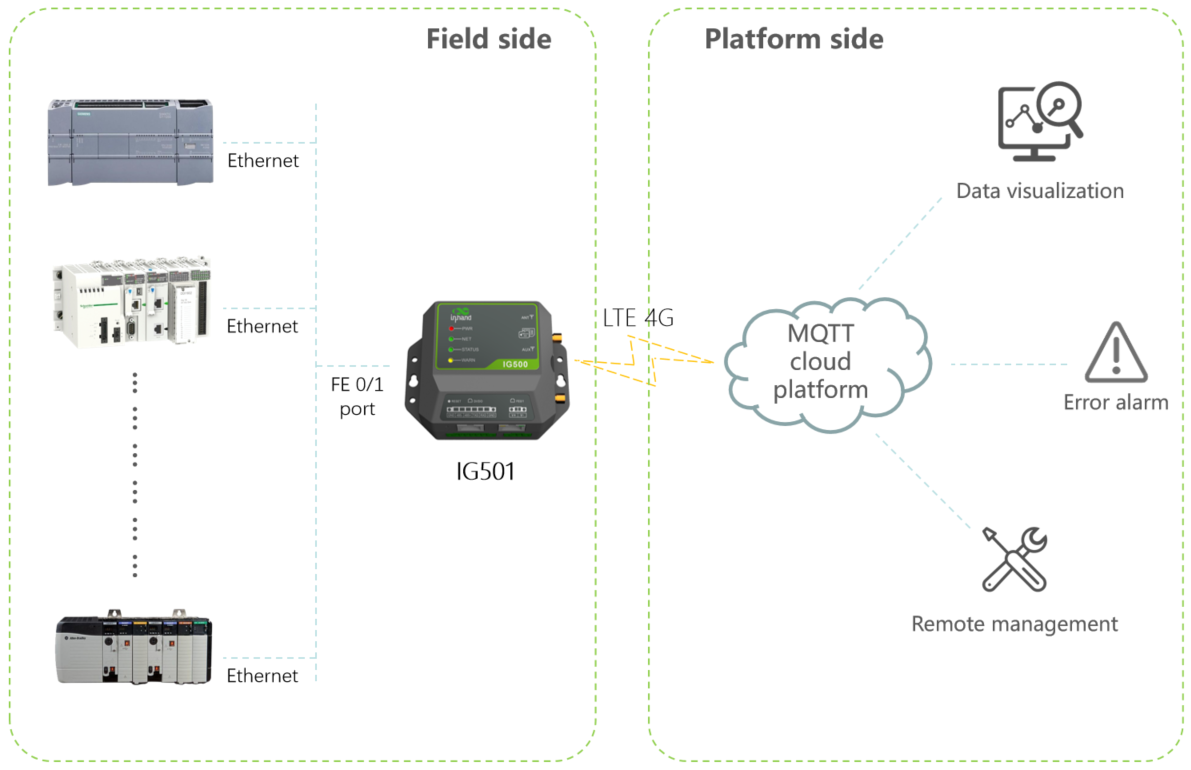
Ethernet wiring for IG501
Power on IG501 and connect IG501 and the PLC through an Ethernet cable according to the topology.
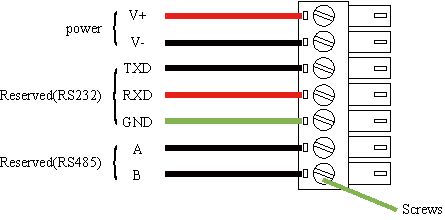
1.1.2 Serial port wiring
Serial port wiring for IG902
Power on IG902 and connect IG902 and the PLC according to the topology.
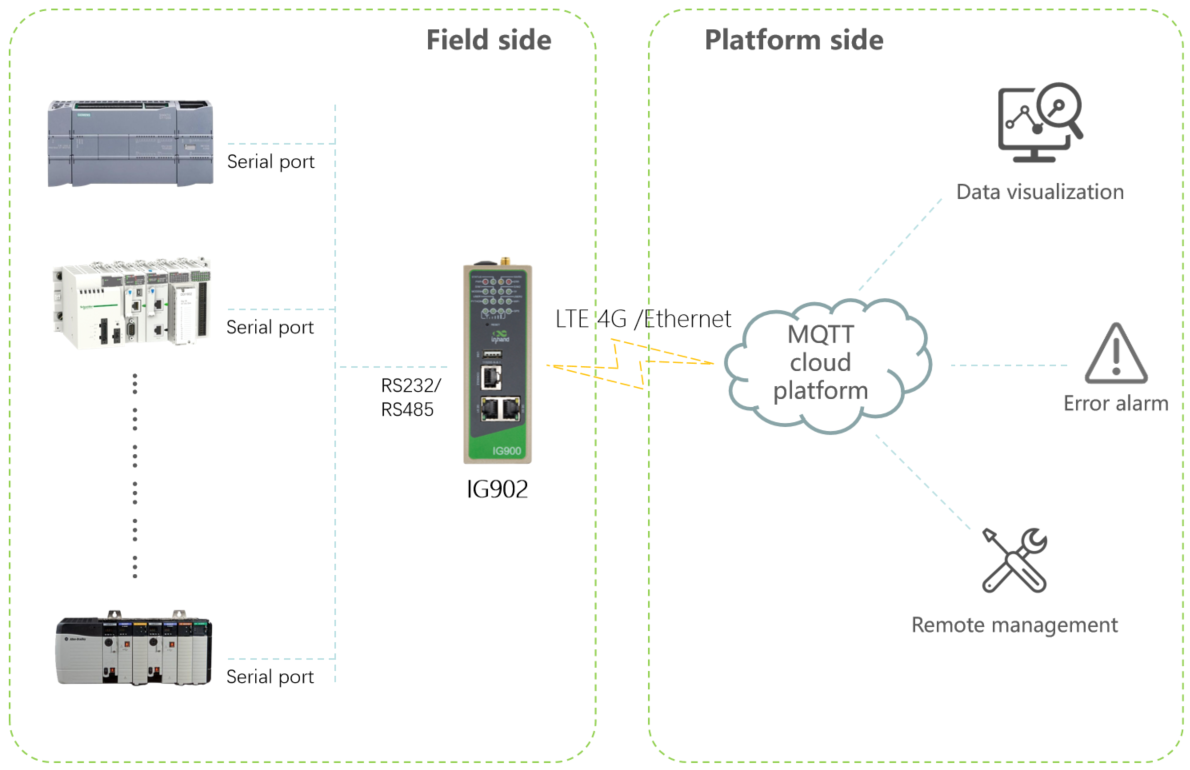
The following figure describes how to connect serial port terminals of IG902:
Serial port wiring for IG502
Power on IG502 and connect IG502 and the PLC according to the topology.
The following figure describes how to connect serial port terminals of IG502:
Serial port wiring for IG501
Power on IG501 and connect IG501 and the PLC according to the topology.
The following figure describes how to connect serial port terminals of IG501:

1.2 Configure InGateway to access PLC
- The default IP address of IG902’s GE 0/2 port is
192.168.2.1. To enable IG902 to access the Ethernet-based PLC over the GE 0/2 port, you need to set the GE 0/2 port to be in the same network segment of the PLC. For more information about the setting method, see Access the IG902. - The default IP address of IG502’s LAN port is
192.168.2.1. To enable IG502 to access the Ethernet-based PLC over the LAN port, you need to set the LAN port to be in the same network segment of the PLC. For more information about the setting method, see Access the IG502. - The default IP address of IG501’s FE 0/1 port is
192.168.1.1. To enable IG501 to access the Ethernet-based PLC over the FE 0/1 port, you need to set the FE 0/1 port to be in the same network segment of the PLC. For more information about the setting method, see Access the IG501.
1.3 Configure InGateway to connect Internet
- Configure the IG902 to connect Internet by referring to Connect IG902 to the Internet.
- Configure the IG502 to connect Internet by referring to Connect IG502 to the Internet.
- Configure the IG501 to connect Internet by referring to Connect IG501 to the Internet.
1.4 Update the InGateway software version
If you want to get the latest InGateway and its functional characteristics, please visit the Resource. To update the software version, see the following links:
- Update the IG902 software version To use Device Supervisor, IG902’s firmware version must be
V2.0.0.r12537or later, and the SDK version must bepy3sdk-V1.4.2or later. - Update the IG502 software version To use Device Supervisor, IG502’s firmware version must be
V2.0.0.r13595or later, and the SDK version must bepy3sdk-V1.4.2or later. - Update the IG501 software version To use Device Supervisor, IG501’s firmware version must be
V2.0.0.r12884or later, and the SDK version must bepy3sdk-V1.4.0or later.
2. Configure data collection for Device Supervisor
2.1 Install and run Device Supervisor
Install and run Python apps on IG902 by referring to Install and run Python apps on IG902. To download Device Supervisor, please visit the Resource. After Device Supervisor runs normally, the following figure is displayed:
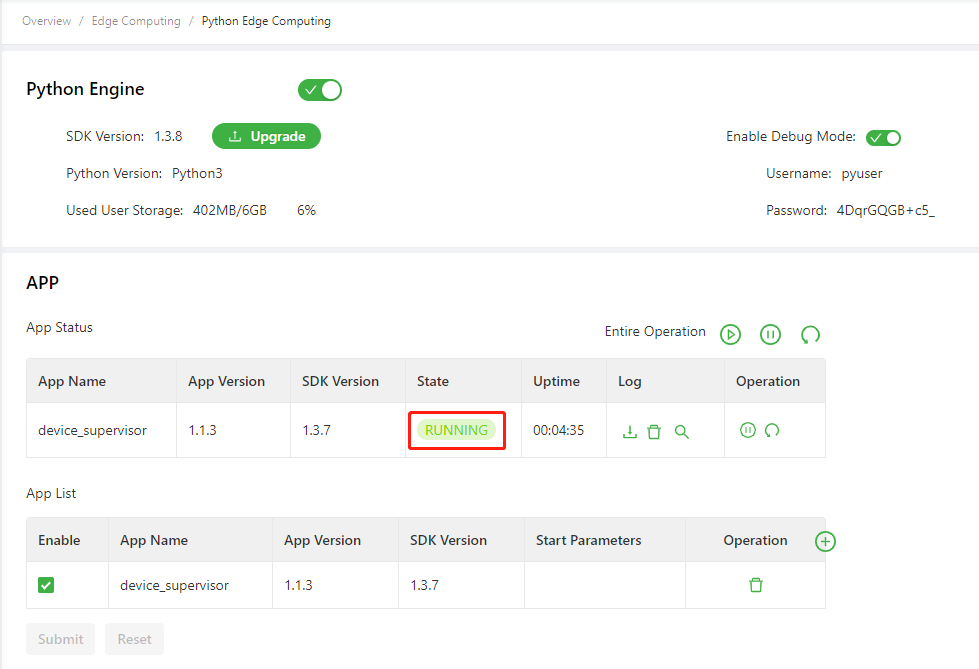
Install and run Python apps on IG502 by referring to Install and run Python apps on IG502. To download Device Supervisor, please visit the Resource. After Device Supervisor runs normally, the following figure is displayed:
Install and run Python apps on IG501 by referring to Install and run Python apps on IG501. To download Device Supervisor, please visit the Resource. After Device Supervisor runs normally, the following figure is displayed:
2.2 Configure data collection
2.2.1 Add a PLC
Add a PLC that communicates over ISO on TCP
Choose Edge Computing > Device Supervisor > Device List, and click Add PLC. On the device adding page, select ISO on TCP as the PLC protocol and configure the PLC communication parameters. Note: The device name must be unique.
The following are examples of adding PLCs S7-1500, S7-1200, S7-400, and S7-300(the mode is
Rack/Slot). Configure the rack number and slot number to 0 and 1 respectively.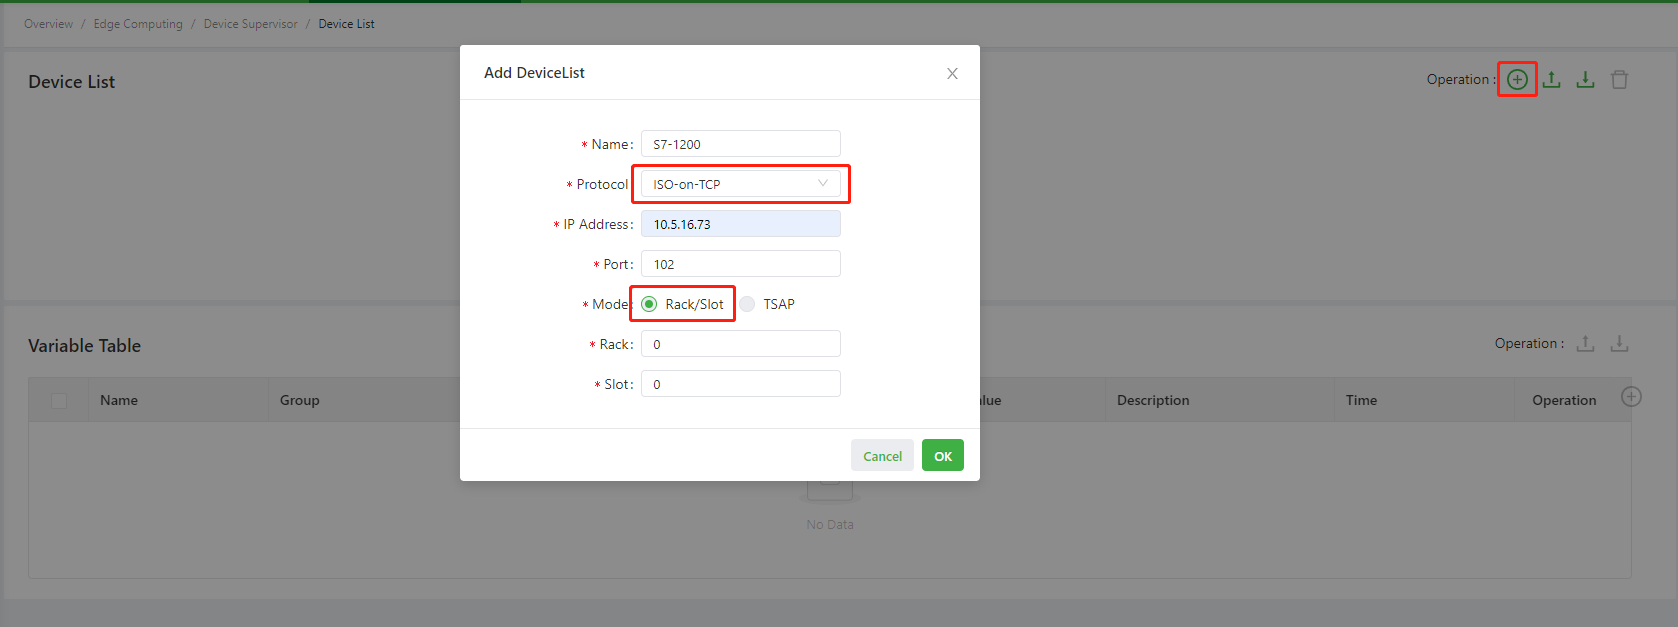
The following are examples of adding S7-200, S7-200 Smart and Siemens LOGO series PLCs (the mode is
TSAP). Note: When adding S7-200 Smart, the Client TSAP configuration is 02.00, and the Server TSAP configuration is 02.01; the rest of the series are configured according to the actual situation.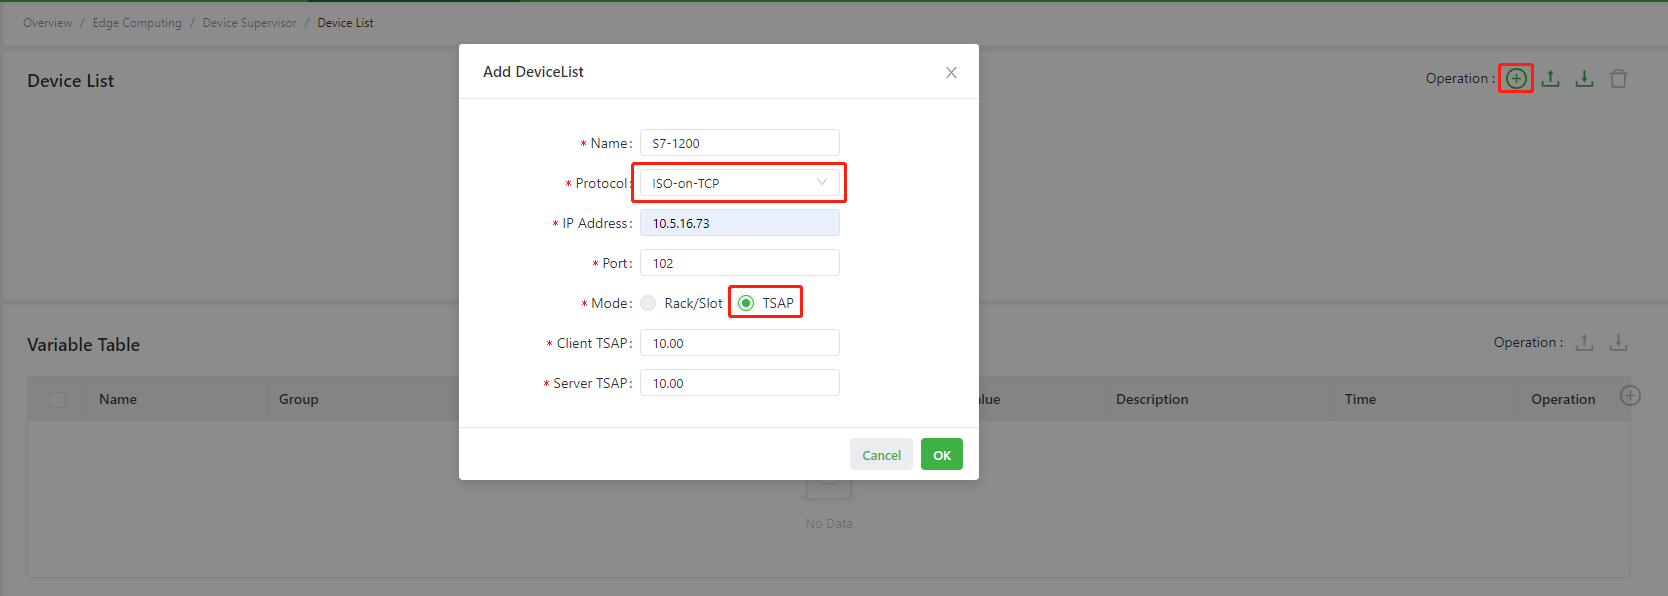
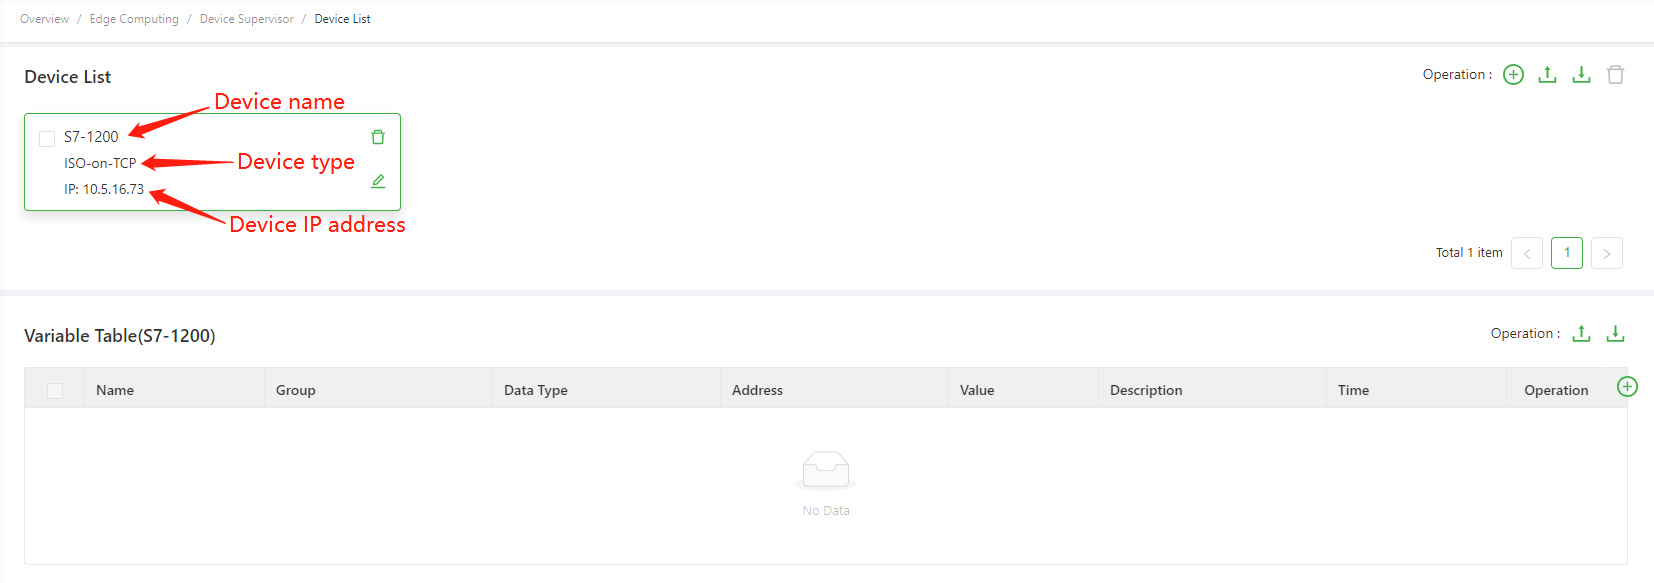
After the PLC is added, the page is as follows:
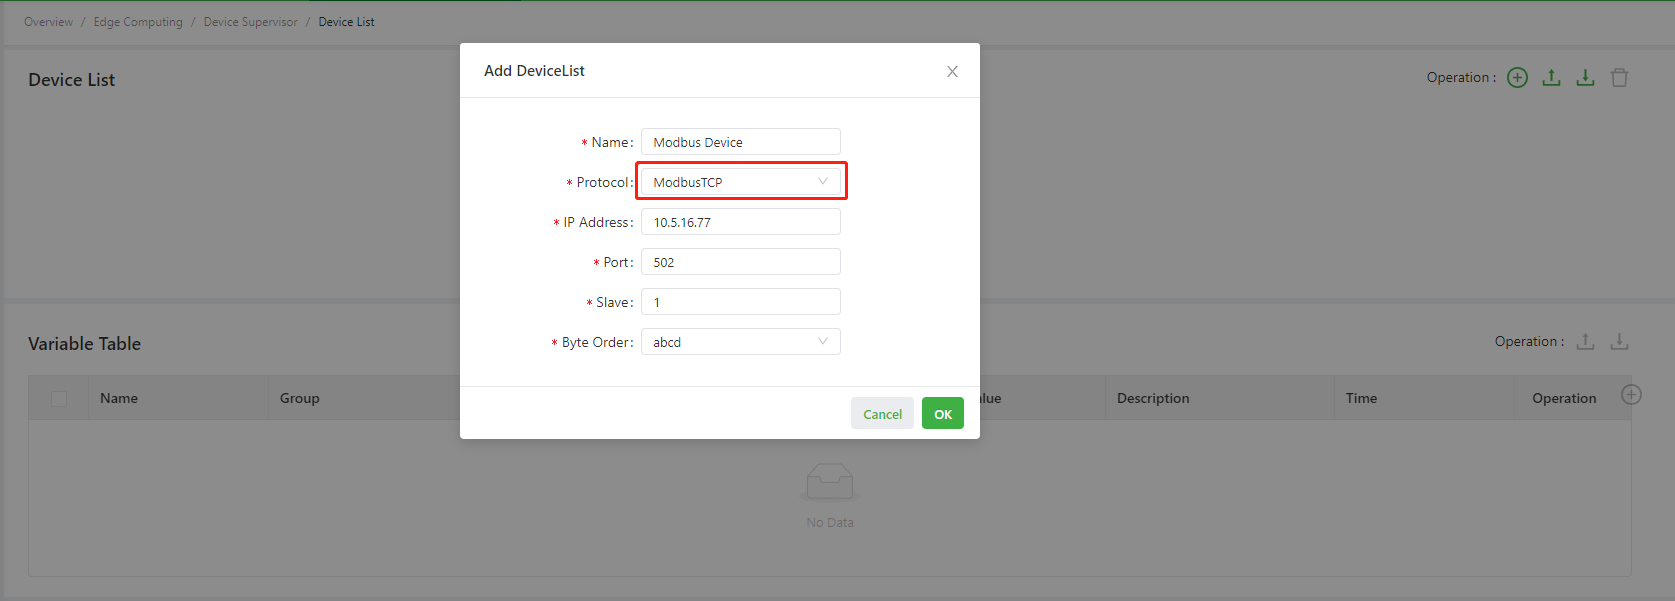
Add a PLC that communicates over ModbusTCP
Choose Edge Computing > Device Supervisor > Device List, and click Add PLC. On the device adding page, select ModbusTCP as the PLC protocol and configure the PLC communication parameters. (The default port number and byte order are 502 and abcd respectively. Adjust them as needed.) Note: The device name must be unique.
After the PLC is added, the page is as follows:
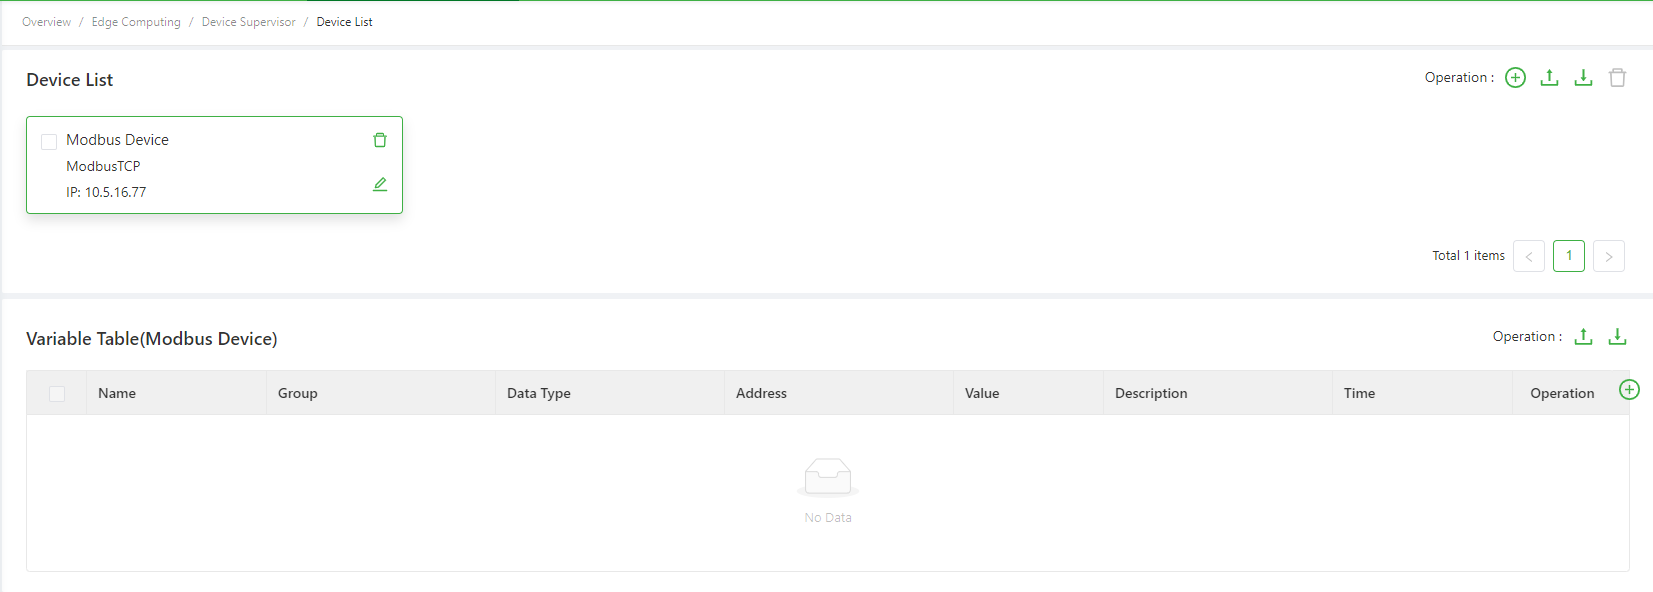
Add a PLC that communicates over ModbusRTU
Choose Edge Computing > Device Supervisor > Device List, and click Add PLC. On the device adding page, select ModbusRTU as the PLC protocol and configure the PLC communication parameters. Note: The device name must be unique.
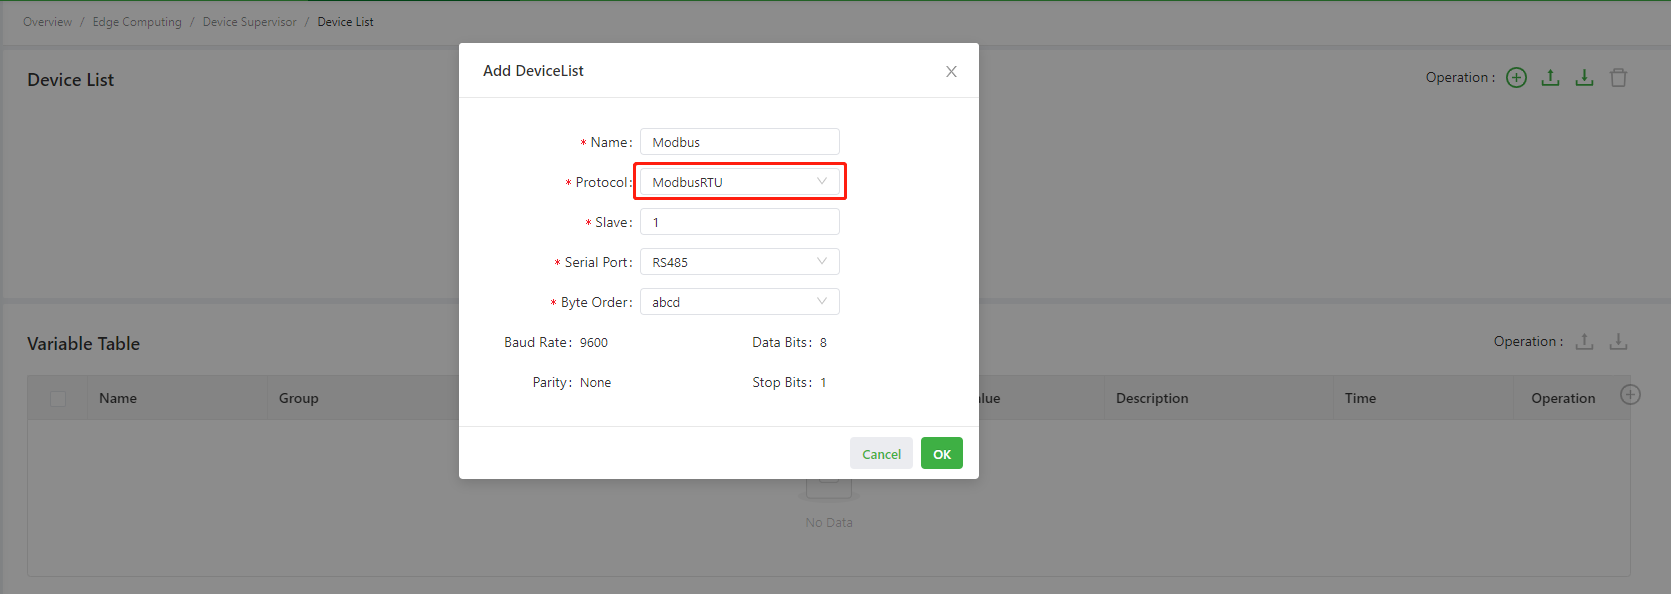
After the PLC is added, the page is as follows:
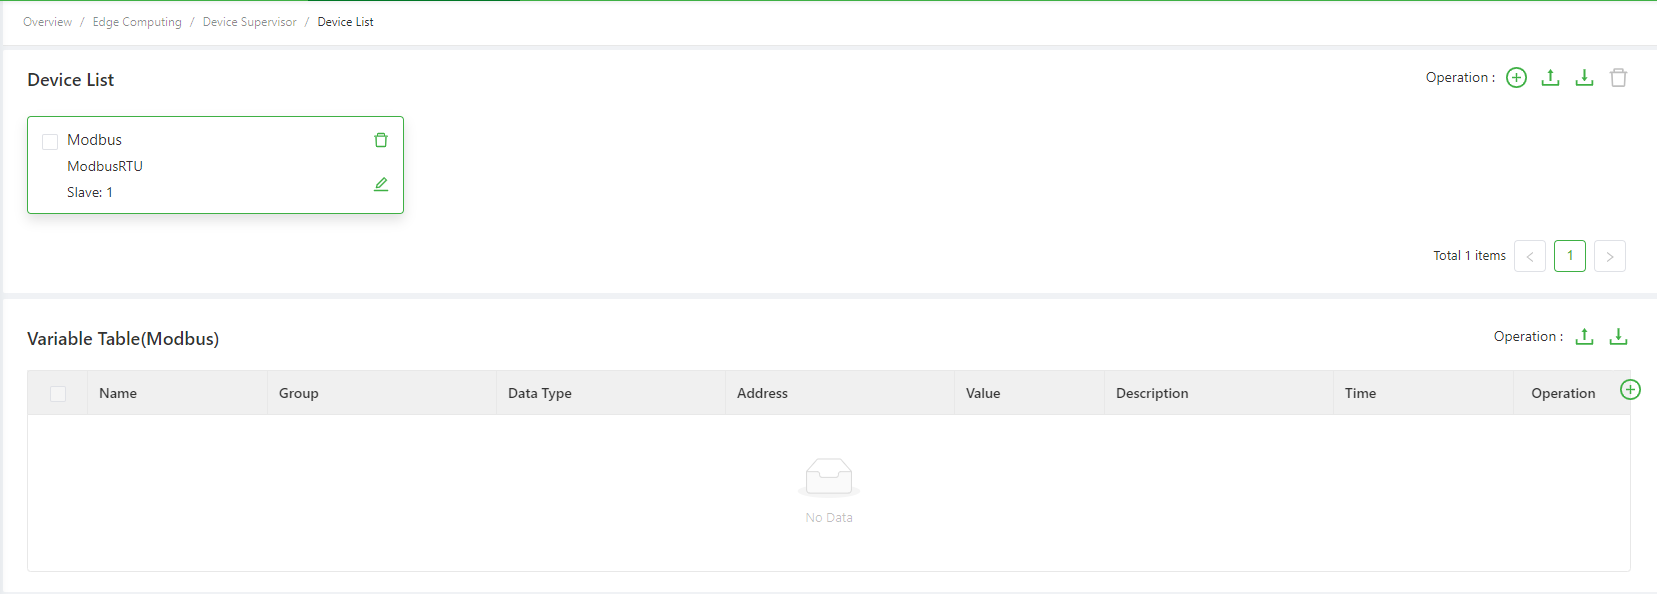
To modify communication parameters for the RS232/RS485 serial port, choose Edge Computing > Device Supervisor > Parameter Settings, and modify them on the page. After modification, communication parameters of all serial ports are automatically updated to the modified ones.
Add EtherNET/IP device (App version 1.2.5 or above is required)
Choose Edge Computing > Device Monitoring > Device List, and click on Add PLC. Select EtherNET/IP as the PLC protocol on the Add Device page, and then configure the communication parameters of the PLC. Note: The device name must be unique.

2.2.2 Add a variable
Add the ISO on TCP variable
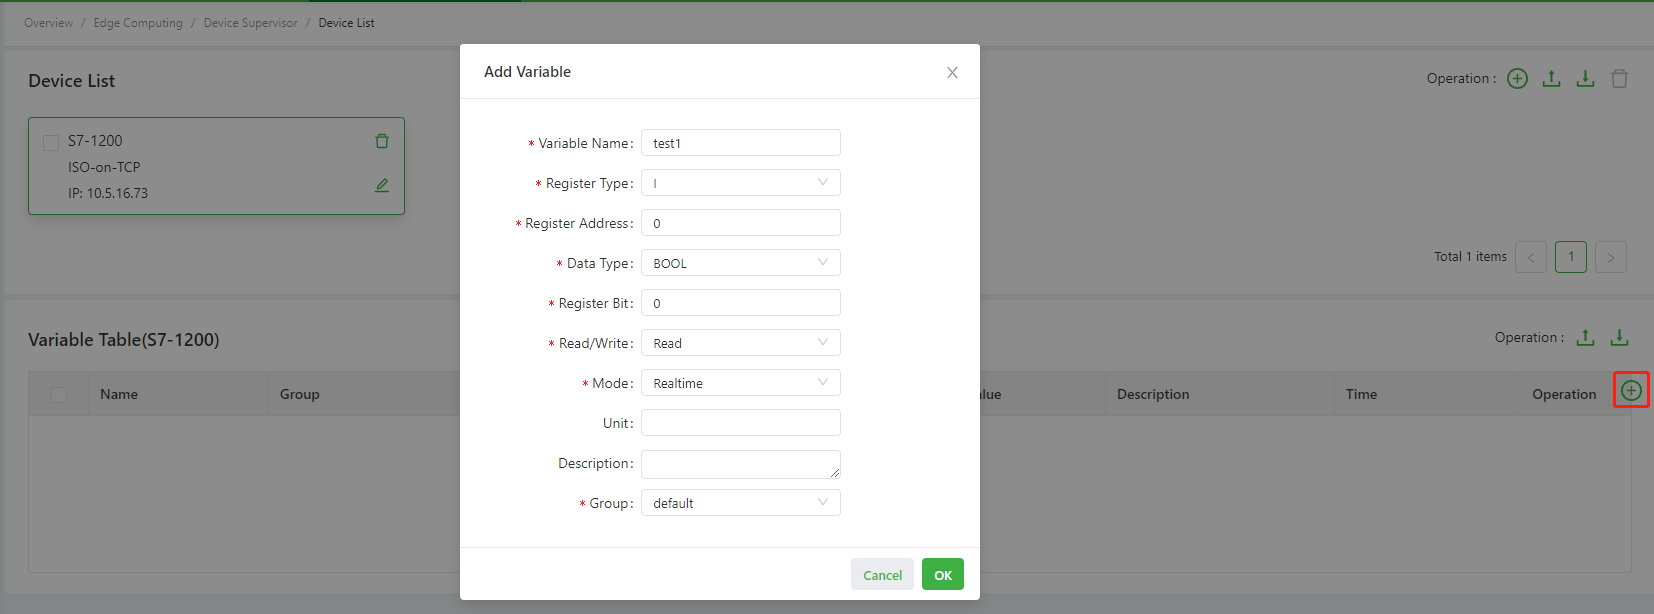
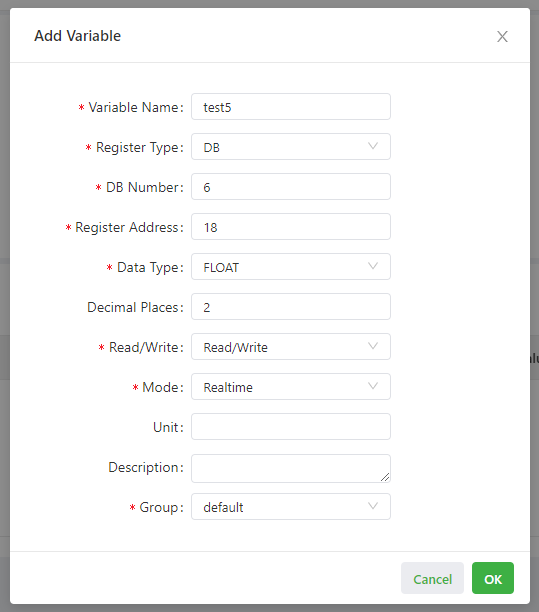
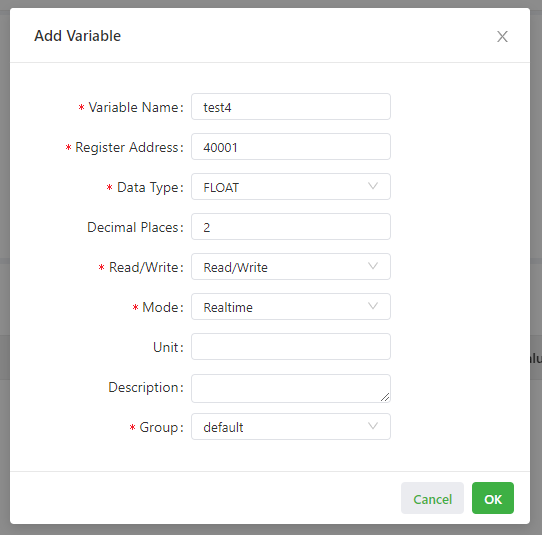
On the Device List page, click Add variable, and configure the variable parameters in the pop-up box.
Variable Name: The variable name. (The variable name must be unique in the same device.)Register Type: The variable register type. Four types are supported:I/Q/M/DB.DB Number: The variable DB number when the register type is DB.Register Address: The variable register address.Data Type: The variable data type, including:BOOL: True or False.BIT: 0 or 1.BYTE: An 8-bit unsigned character.SINT: An 8-bit signed character.WORD: A 16-bit unsigned character.INT: A 16-bit signed character.DWORD: A 32-bit unsigned character.DINT: A 32-bit signed character.FLOAT: A 32-bit floating point.STRING: An 8-bit string.BCD: A 16-bit BCD code.
Decimal Places: The number of decimal places of the variable when the data type is FLOAT. The maximum value is 6.Size: The length of one read string is 1 when the data type is STRING.Register Bit: The bit offset of the variable when the data type is BOOL or BIT. Any integer from 0 to 7 is supported.Read/Write:Read: Read only.Write: Write only.Read/Write: Read and write.
Mode:Realtime: Collect the variable data at the collection interval of the group it belongs and report the data at the report interval.Onchange: Collect the variable data only when the data changes and report the data at the report interval.
Unit: The variable unit.Description: The variable description.Group: The collection group to which the variable belongs.
The following figure is an example of adding a switch variable with the address %I0.0:
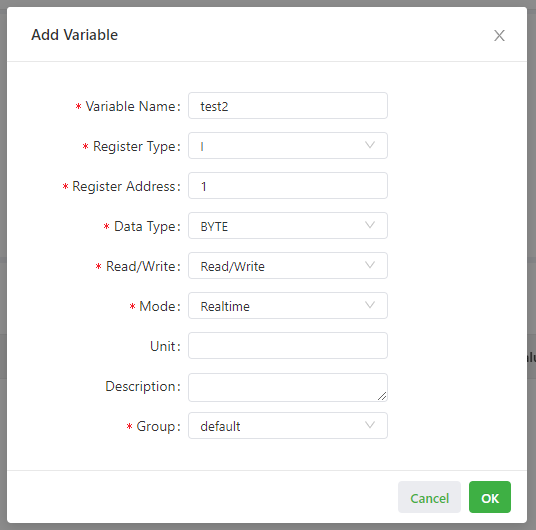
The following figure is an example of adding a byte variable with the address %IB1:
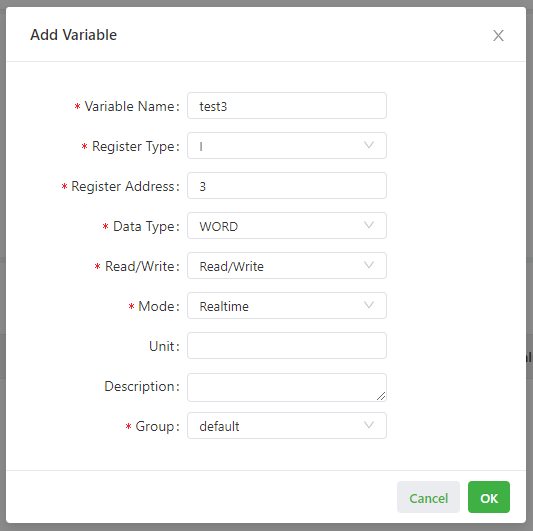
The following figure is an example of adding a word variable with the address %IW3:
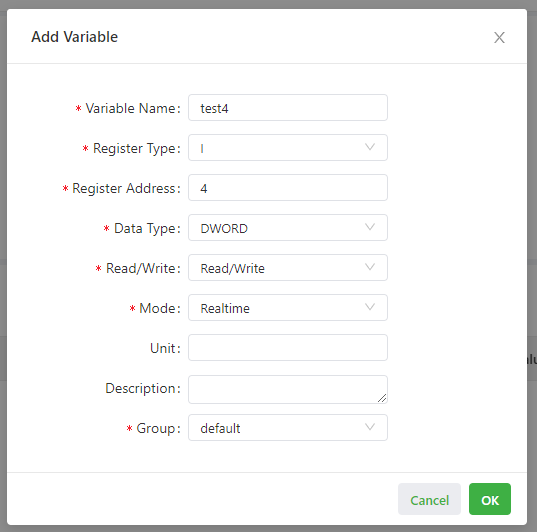
The following figure is an example of adding a dual-word variable with the address %ID4:
The following figure is an example of adding a floating point variable with the address %DB6.DBD18:
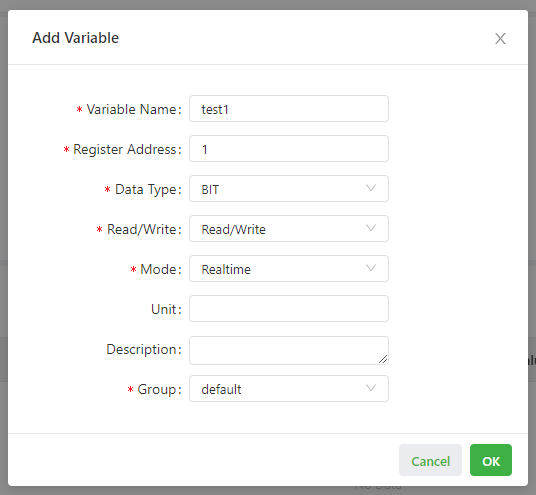
Add the Modbus variable
On the Device List page, click Add variable, and configure the variable parameters in the pop-up box for adding variables.
Variable Name: The variable name. (The variable name must be unique in the same device.)Register Address: The variable register address.Data Type: The variable data type, including:BOOL: True or False.BIT: 0 or 1.WORD: A 16-bit unsigned character.INT: A 16-bit signed character.DWORD: A 32-bit unsigned character.DINT: A 32-bit signed character.FLOAT: A 32-bit floating point.STRING: An 8-bit string.
Decimal Places: The number of decimal places of the variable when the data type is FLOAT. The maximum value is 6.Size: The string length when the data type is STRING.Register Bit: The bit offset of the variable when the address is30001~40000,310001~365535,40001~50000, and410001~465535and the data type is BOOL or BIT. Any integer from 0 to 15 is supported.Read/write:Read: Read only.Write: Write only.Read/Write: Read and write.
Mode:Realtime: Collect the variable data at the collection interval of the group it belongs and report the data at the report interval.Onchange: Collect the variable data only when the data changes and report the data at the report interval.
Unit: The variable unit.Description: The variable description.Group: The collection group to which the variable belongs.
The following figure is an example of adding a coil variable with the address 00001:
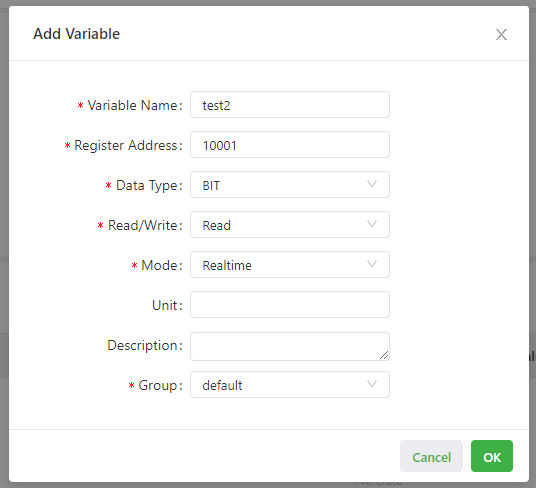
The following figure is an example of adding a switch variable with the address 10001:
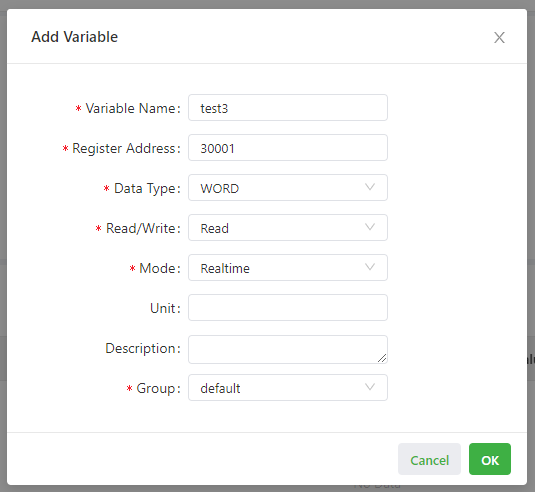
The following figure is an example of adding an integer variable with the address 30001:
The following figure is an example of adding a floating point variable with the address 40001:
Add EtherNETIP variable (App version 1.2.5 and above required)
Click Add Variable button on the Device List page. To configure the parameters of EtherNET/IP variablse in the add variable pop-up box. It is unnecessary to configure the data type. The Device Supervisor will judge the data type by itself. (Currently supported EIP data types include ‘BOOL’ ‘SINT’ ‘INT’ ‘DINT’ ‘REAL’ ‘STRING’):
- Variable name: the name of the variable. (variable name cannot be repeated under the same device)
- Label: The label of the variable.
- Decimal: The length of data after the decimal point of a variable when the data type is a floating point number up to 6 bits.
- Read-write access permission:
- Read: Read only, not writable
- Write: Write only, not readable
- Read/Write: Read and write
- Collection mode:
- Realtime: Collect variables at fixed collection intervals and report data at reporting intervals.
- Onchange: The data is collected and reported according to the reporting interval after the variable value changes.
- Unit: Unit of a variable.
- Description: Variable description.
- Group: The collection group where the variable belongs.
The following is an example of adding a variable with the label name
ZB.LEN.16:
2.2.3 Configure an alarm policy
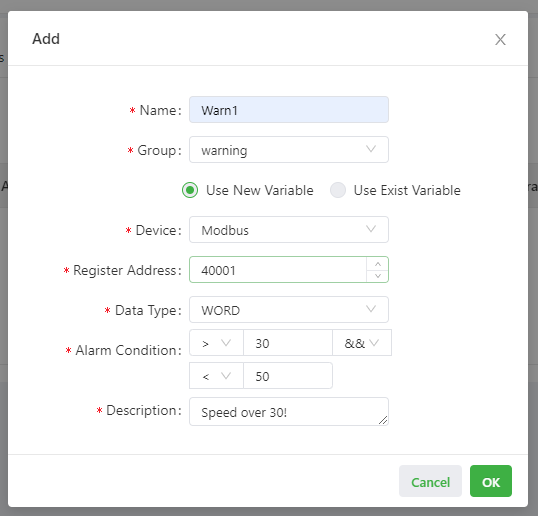
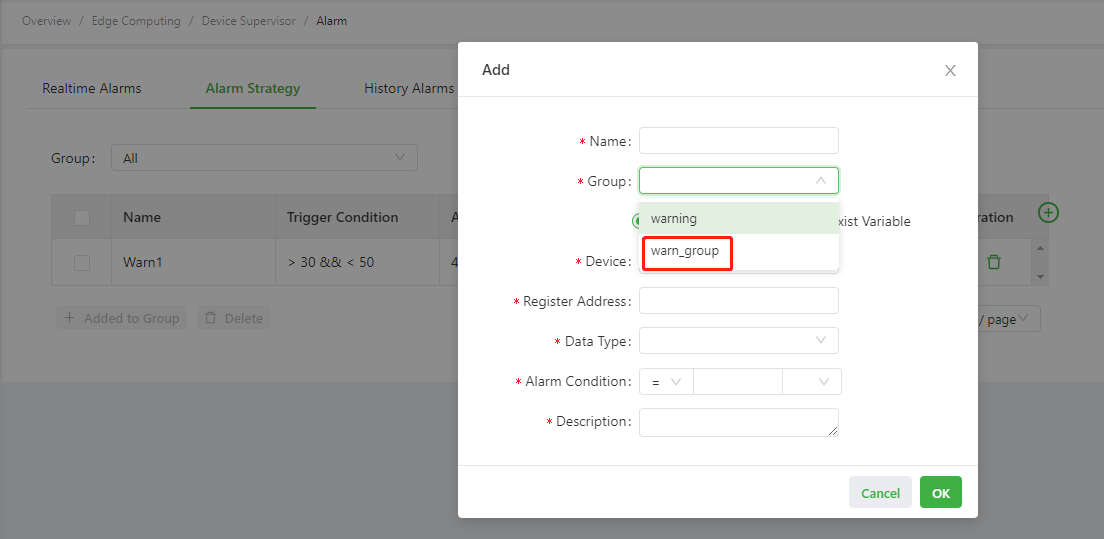
Choose Edge Computing > Device Supervisor > Alarm > Alarm Strategy, click Add, and configure the alarm policy parameters in the pop-up box. You can configure the alarm policy in two modes: Use New Variable and Use Exist Variable. The parameters are described as follows:
Use New Variable
Name: The alarm name.Group: The alarm group.Mode: In Use New Variable mode, the alarm variable is not configured in the Device List. You need to configure the variable parameters, which does not add a new variable to the Device List.Device: The device of the alarm variable.Register Type: The variable register type. Four types are supported:I/Q/M/DB.(ISO on TCP variable)Register Address: The address of the alarm variable.Data Type: The data type of the alarm variable.Alarm ConditionJudgment Conditions: Valid values are =, !=, >, ≥, <, and ≤.Logical ConditionNone: Judge the alarm based on a single judgment condition.&&: Judge the alarm based on two single judgment conditions in AND mode.||: Judge the alarm based on two single judgment conditions in OR mode.
Description: The alarm description.
The following figure is an example of adding an alarm variable. When its value is greater than 30 but less than 50, the alarm is triggered; otherwise, the alarm is not triggered or is cleared.
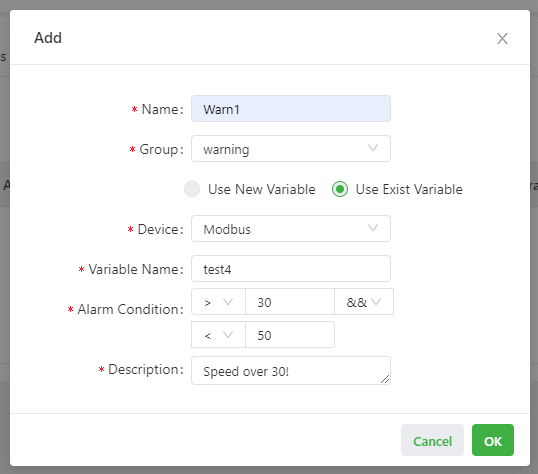
Use Exist Variable
Name: The alarm name.Group: The alarm group.Mode: In Use Existing Variable mode, the alarm variable is already configured in the Device List. You can enter the variable name and use it directly.Device: The device of the alarm variable.Variable Name: The name of referenced variable.Alarm ConditionJudgment Conditions: Valid values are =, !=, >, ≥, <, and ≤.Logical ConditionNone: Judge the alarm based on a single judgment condition.&&: Judge the alarm based on two single judgment conditions in AND mode.||: Judge the alarm based on two single judgment conditions in OR mode.
Description: The alarm description.
The following figure is an example of using an existing variable to generate an alarm variable. When its value is greater than 30 but less than 50, the alarm is triggered; otherwise, the alarm is not triggered or is cleared.
2.2.4 Configure a group
To configure different collection intervals for a variable or an alarm or report the variable data by MQTT topic, choose Edge Computing > Device Supervisor > Group, and add a group on the page.
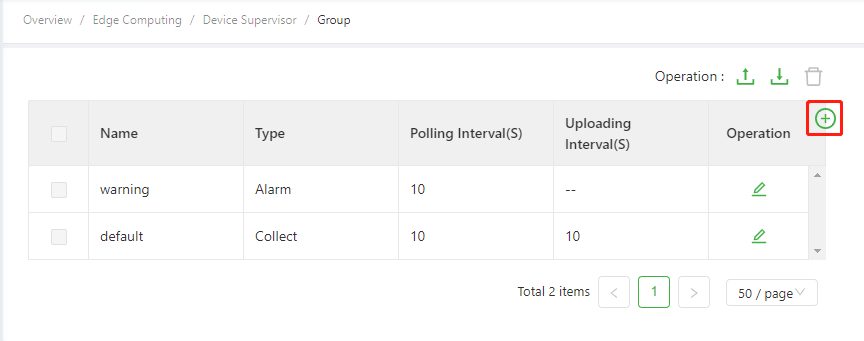
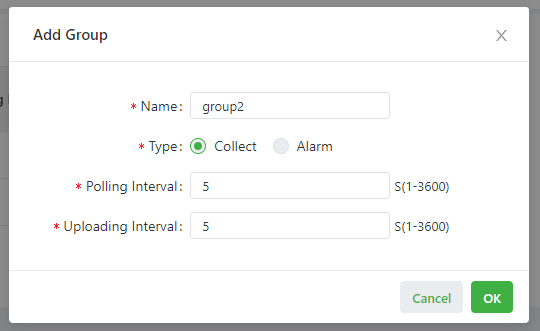
Add a collection group
The following figure is an example of adding a collection group named group2. Data of variables in this group is collected once every 5 seconds.
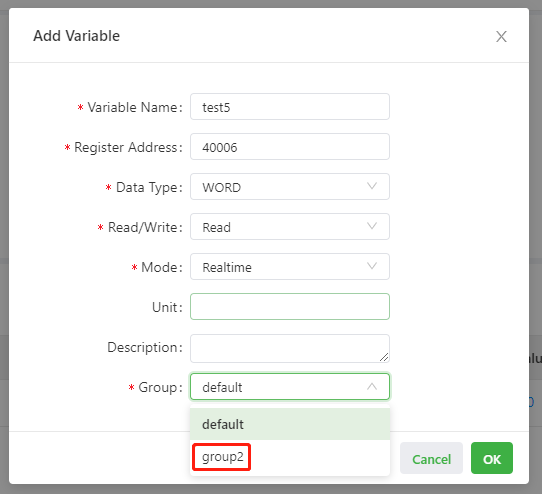
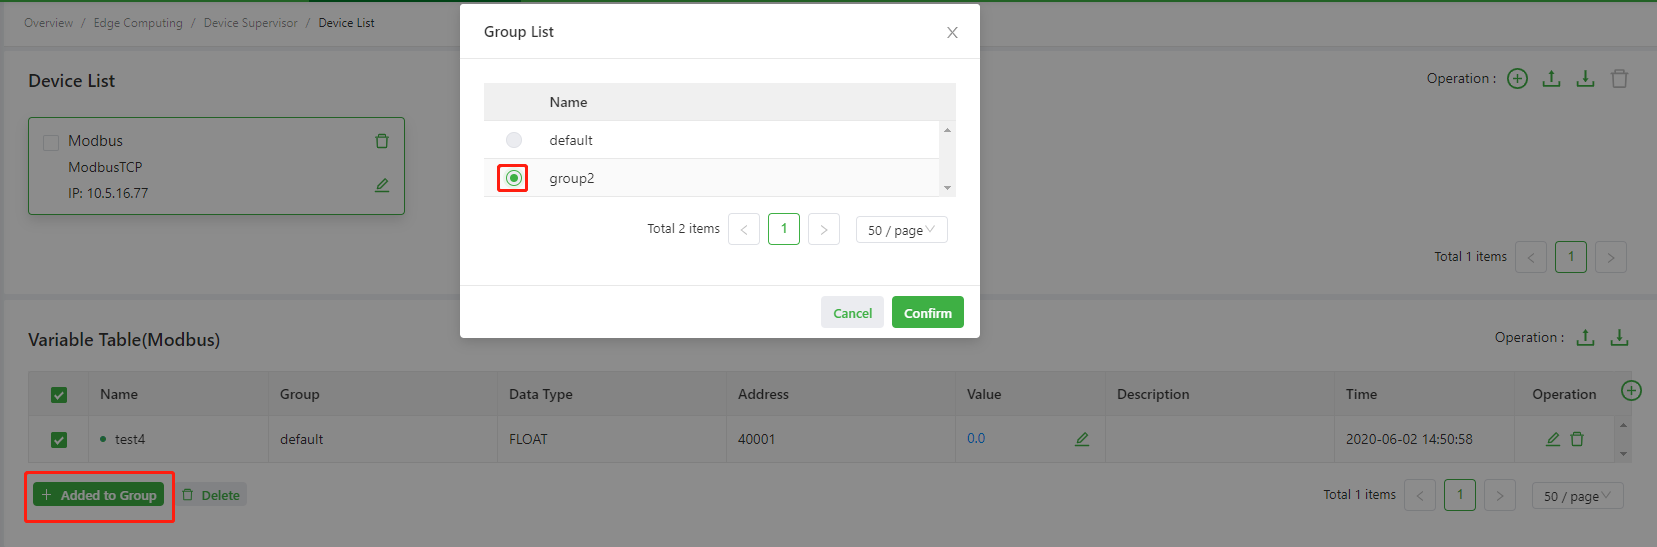
After a collection group is added, you can associate the variable you added with the group or select the target variable from the variable list and add it to the specified group. Data of variables in the group is collected at the group’s collection interval.
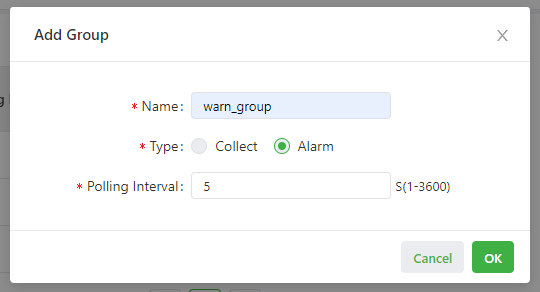
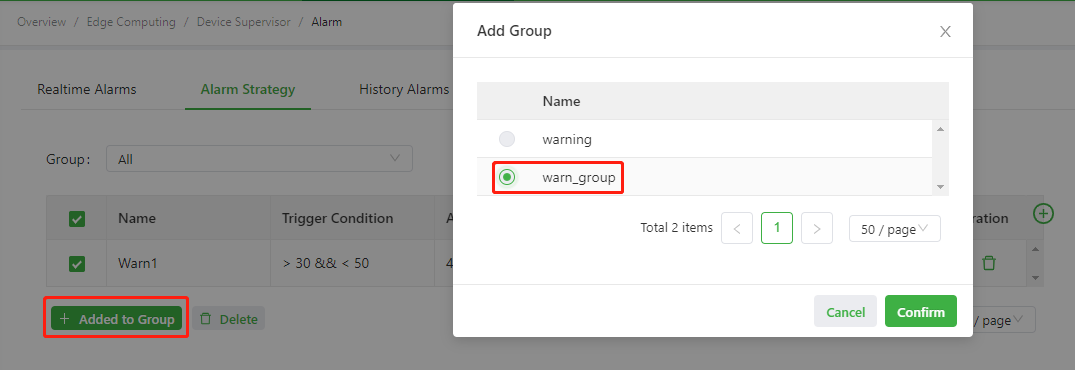
Add an alarm group
The following figure is an example of adding an alarm group named warn_group. The alarm group checks whether the alarm variables in the group are in alarm state once every 5 seconds.
After an alarm group is added, you can associate the alarm policy you added with the group or select the target alarm policy from the alarm list and add it to the specified group. The system checks the variable alarm state at the group’s collection interval according to the alarm policies in the group.
3. Report and monitor the PLC data
3.1 Monitor the PLC data locally
3.1.1 Monitor data collection locally
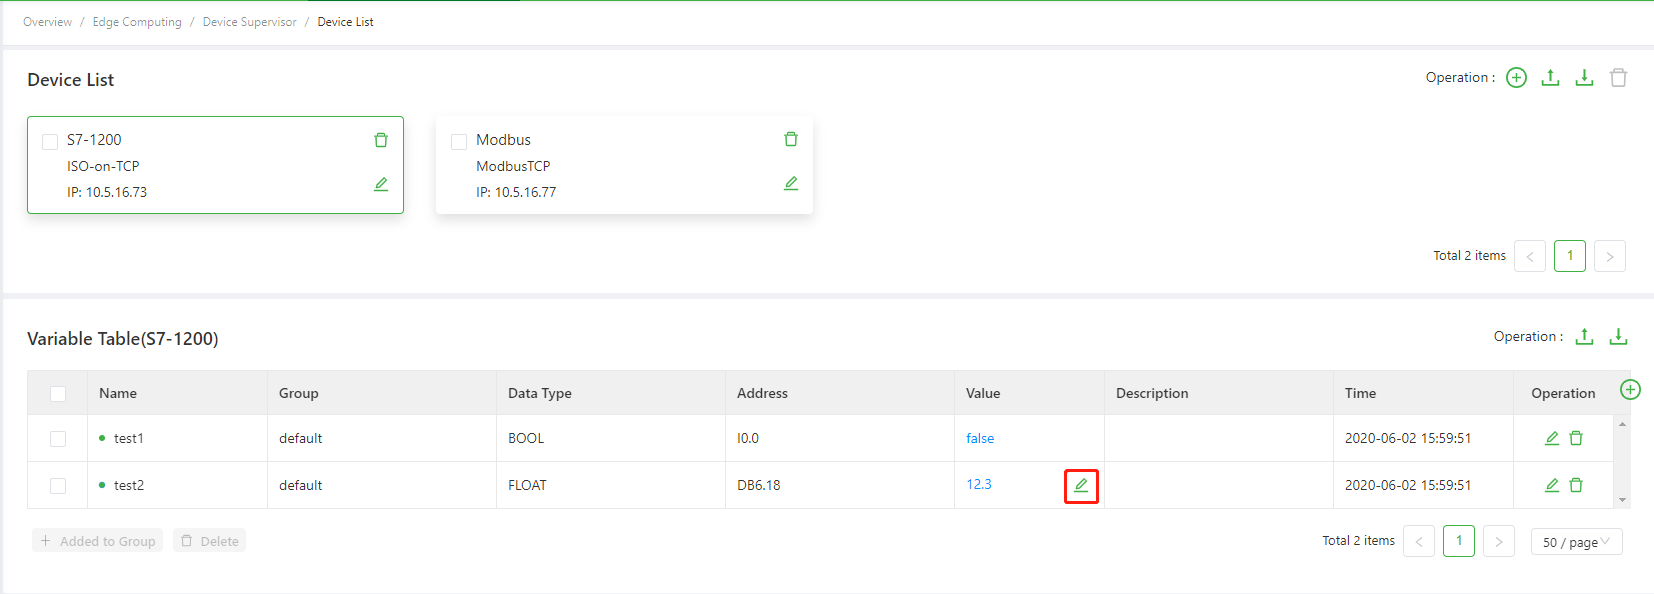
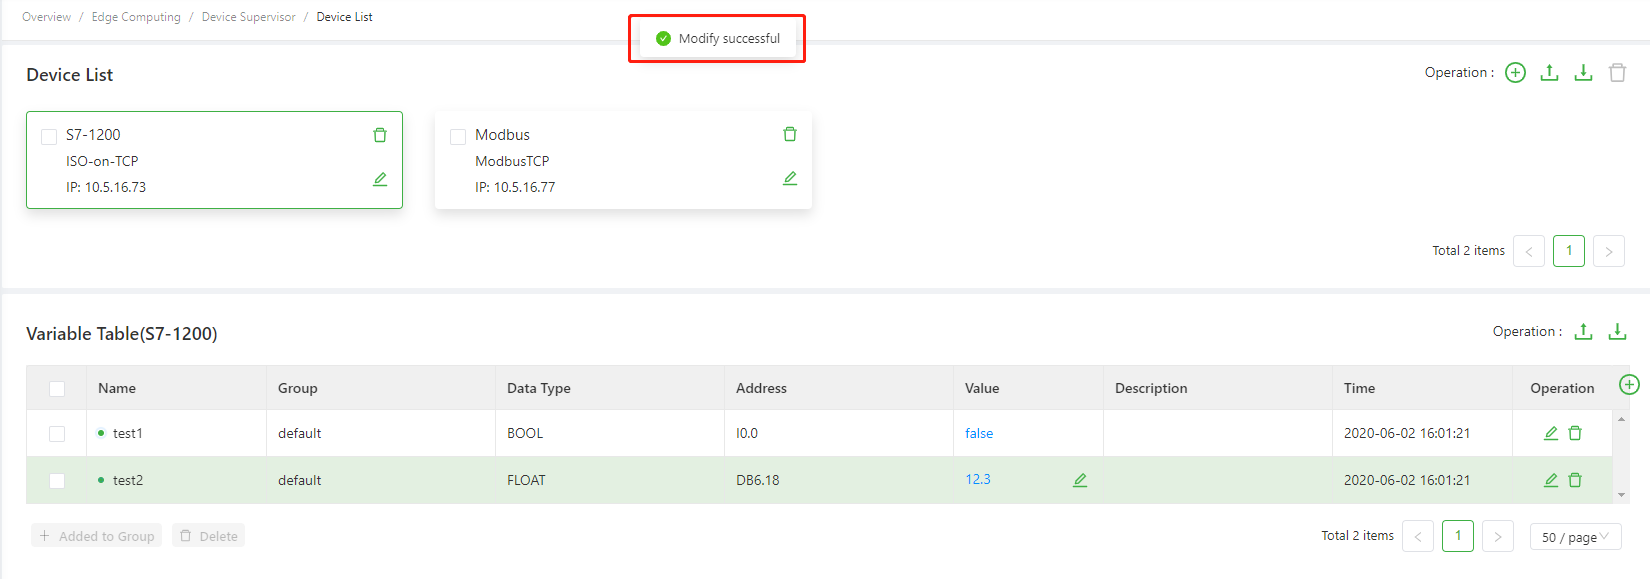
After configuring data collection, choose Edge Computing > Device Supervisor > Device List, and view the data collection status. Click the device card in Device List to switch to the desired PLC data.

Click the button in the value column to write values.
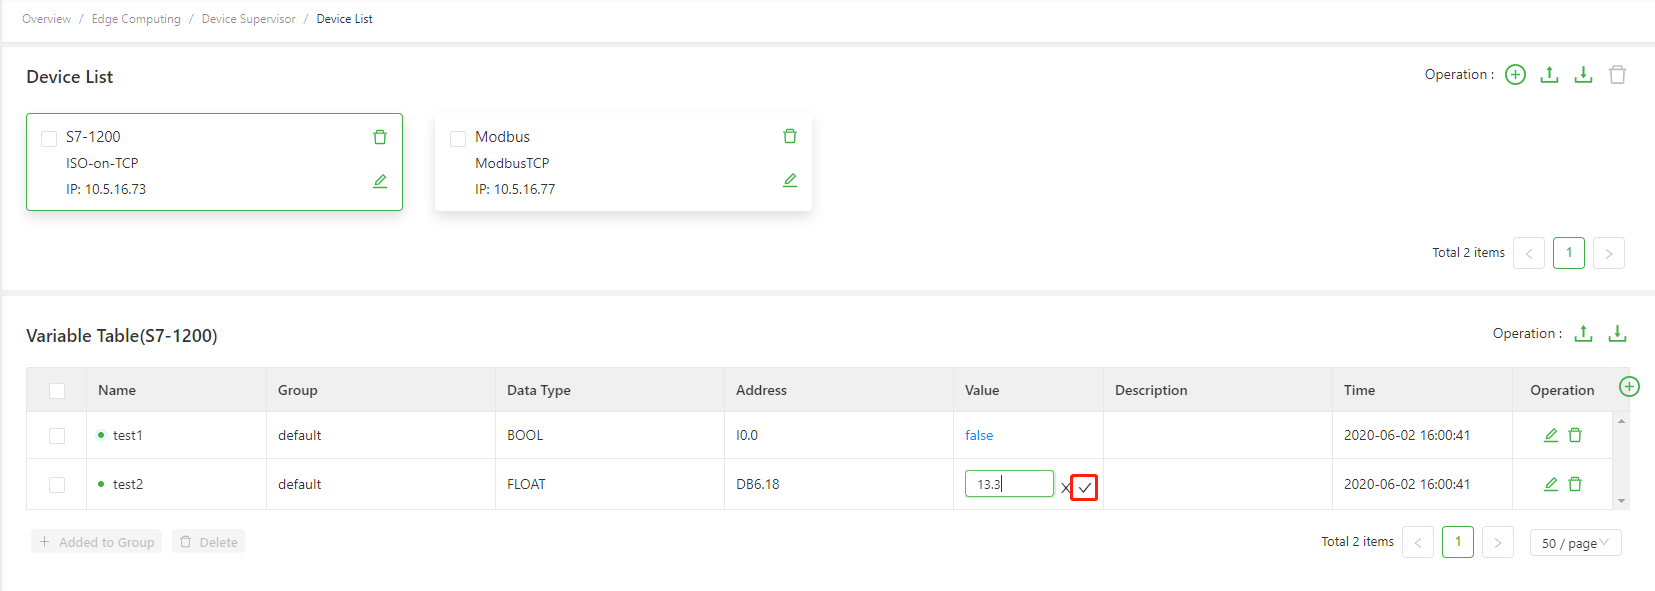
After the value is modified, the page is as follows:
3.1.2 Monitor the alarm locally
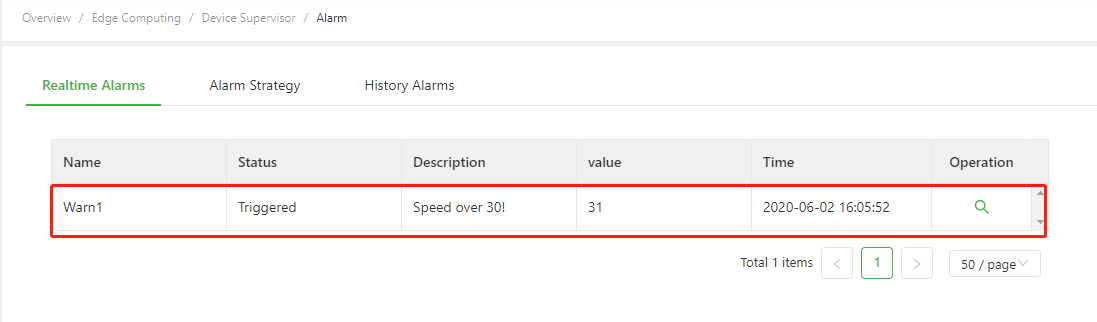
After configuring the alarm policy, choose Edge Computing > Device Supervisor > Alarm, and view the variable alarm status.
Realtime Alarms: View alarm messages that are not cleared.
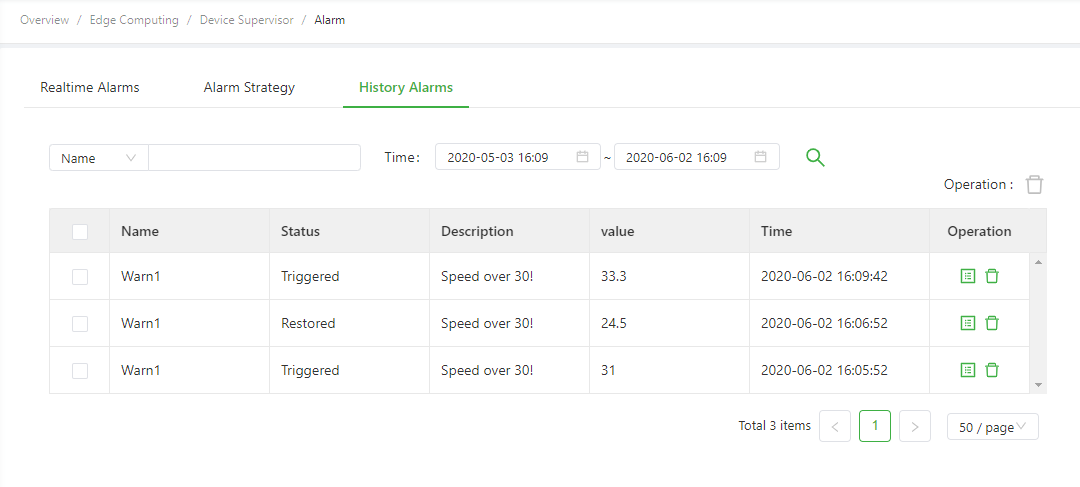
History Alarms: Screen any alarm messages you want to view.
3.2 Monitor the PLC data on cloud
3.2.1 Configure ThingsBoard
For the usage method of ThingsBoard, see Get Started with ThingsBoard or refer to ThingsBoard Reference Flowchart for test.
3.2.2 Configure a cloud service to report and receive data
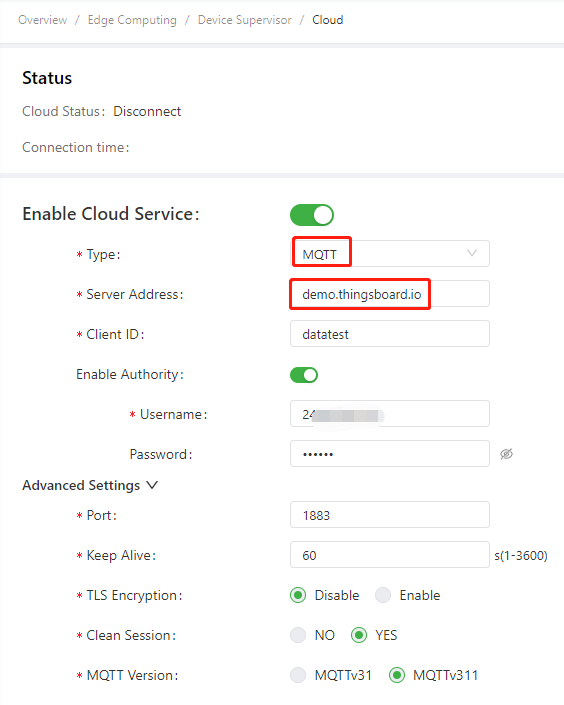
Choose Edge Computing > Device Supervisor > Cloud Service. Select Enable Cloud Service, configure the MQTT connection parameters, and then click Submit.
Type:The connection of Thingsboard is based onStandard MQTT. For more information about how to useAWS IoT, please refer to AWS IoT User Manual;For more information about how to useAzure IoT, please refer to Azure IoT User Manual.Server Address: The ThingsBoard demo address isdemo.thingsboard.io.Client ID: Any unique ID.Username: The access token of the ThingsBoard device. For more information about how to obtain the access token, see Transmit the PLC data to ThingsBoard.Password: A password consisting of 6-32 bits.- Use default values for other configuration items.
After the configuration is completed, the page is as follows:
Then, click Messages Management to configure the publish and subscribe topics. For more information about how to configure the publish and subscribe topics, see Messages Management (custom MQTT publish/subscribe) The following is a configuration example:
Publish messages:
Topic:v1/devices/me/telemetryQos(MQTT):1Group Type:CollectGroup: The name of the group whose data needs to be uploaded to ThingsBoard.defaultis used in this manual.Main Function: The name of the entry function.upload_testis used in this manual.Script:from common.Logger import logger #Import log printing module logger. def upload_test(data, wizard_api): #Define the main function upload_test. logger.info(data) #Print the collected data in logs of the INFO level. value_dict = {} #Define the report data dictionary value_dict. for device, val_dict in data['values'].items(): #Traverse the values dictionary in the data. The dictionary contains the device name and the variables of the device. for id, val in val_dict.items(): #Traverse variables and assign values for the value_dict dictionary. value_dict[id] = val["raw_data"] value_dict["timestamp"] = data["timestamp"] logger.info(value_dict) #Print data of the value_dict dictionary in logs of the INFO level. return value_dict #Send value_list to the app, which then sequential uploads it to the MQTT server. The value_list is finally in the following format: {'bool': False, 'byte': 7, 'real': 0.0, 'timestamp': 1583990892.5429199}.
After the configuration is completed, the page is as follows:

Subscribe messages:
Topic:v1/devices/me/rpc/request/+Qos(MQTT):1Main Function: The name of the entry function.ctl_testis used in this manual.Script:from common.Logger import logger #Import log printing module logger. import json #Import the JSON module. def ctl_test(topic, payload, wizard_api): #Define the main function ctl_test. logger.info(topic) #Print the subscribe topic. logger.info(payload) #Print the subscribe data. ThingsBoard devices deliver data in the following format: {"method":"setValue","params":true}. payload = json.loads(payload) #Deserialize subscribe data. if payload["method"] == "setValue": #Check whether the data is written. message = {"bool":payload["params"]} #Define the message for modifying variables, including the variable names and values. ack_tail = [topic.replace('request', 'response'), message] #Define the confirmation data, including the response topic and message. wizard_api.write_plc_values(message, ack, ack_tail) #Call the write_plc_values method to deliver data from the message dictionary to the specified variable. Call the ack method and deliver ack_tail to the ack method. def ack(data, ack_tail, wizard_api): #Define the ack method. resp_topic = ack_tail[0] #Define the response topic. resp_data = ack_tail[1] #Define the response data. wizard_api.mqtt_publish(resp_topic, json.dumps(resp_data), 1) #Call the mqtt_publish method to deliver the response data to the MQTT server in {'bool': True} format.
After the configuration is completed, the page is as follows:

Appendix
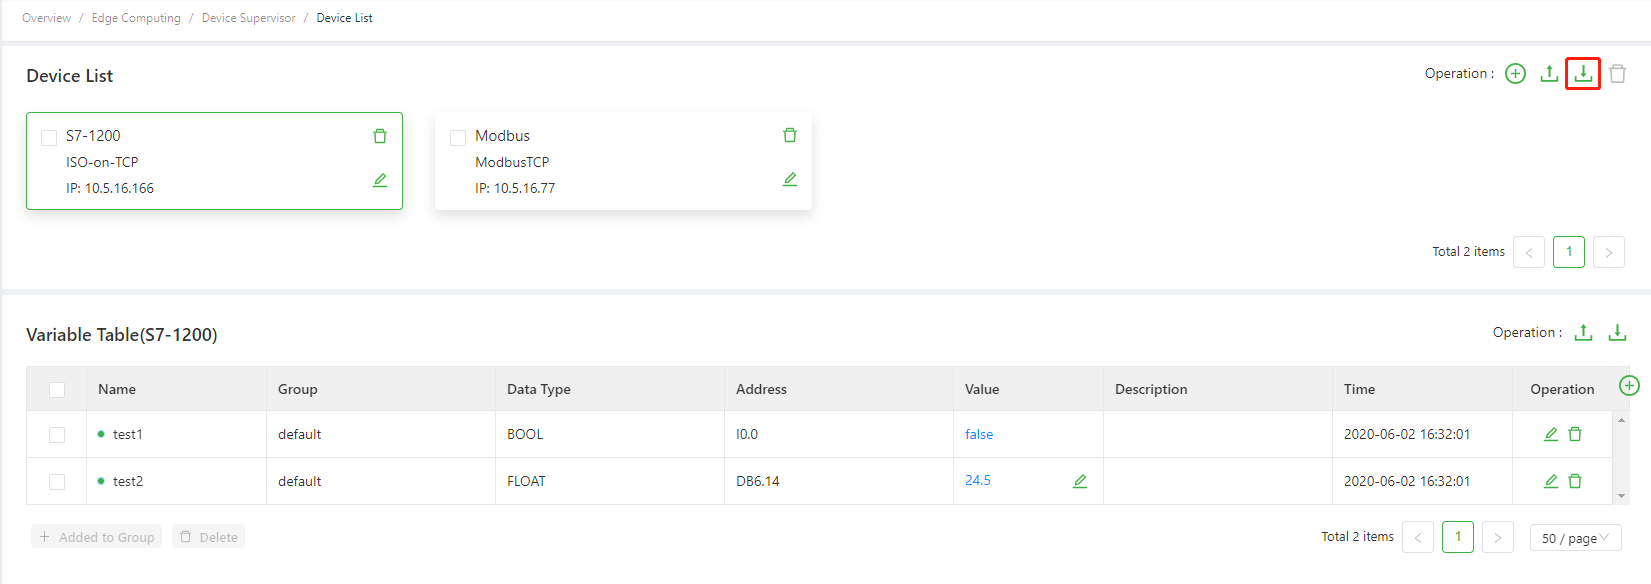
- Importing/exporting data collection configuration
- Messages Management (custom MQTT publish/subscribe)
- Parameter Settings
- Gateway other configuration
- ThingsBoard reference flowchart
Importing/exporting data collection configuration
Device Supervisor provides four CSV configuration files for data collection configuration (To use the Alarm policy configuration file function, App version should be1.2.5 and later). You can quickly configure data collection by importing or exporting configuration files. Each configuration file contains the following items:
device.csv: The device configuration file, which contains the following parameters:Device Name: The device name.Protocol: The communication protocol, such asModbusTCP.Ip/Serial: Enter the IP address for Ethernet devices, and enterRS485orRS232for serial port devices.Port: The communication port number of the Ethernet device.Rack(Only ISO on TCP devices): The rack number of the device.Slot(Only ISO on TCP devices): The slot number of the device.Mode(Only ISO on TCP devices): The ISO on TCP mode. Valid values areTSAPandRack/Slot.Slave(Only Modbus devices): The address of the slave station.Byte Order(Only Modbus devices): The byte order. Valid values areabcd,badc,cdab, anddcba.
The export method is to export the device list on the Device List page.
The following is a configuration example:

var.csv: The variable configuration file, which contains the following parameters:Var Name: The variable name.Device: The device of the variable.Protocol: The communication protocol.Dbnumber(Only ISO on TCP devices): The DB number.Register Type(Only ISO on TCP devices): The register type, such asDB.Register Addr: The register address.Register Bit: The bit offset.Data Type: The data type.Read Write: The read/write permission. Valid values areRead/Write,Write, andRead.Float Repr: The number of decimal places. Valid values are1~6.Mode: The collection mode. Valid values arerealtimeandonchange.Unit: The unit.Size: The string length.Desc: The description.Group: The group.
The export method is to export the variable list on the Device List page.

The following is a configuration example:

group.csv: The group configuration file, which contains the following parameters:Group Name: The group name.Polling Interval: The collection interval.Upload Interval: The upload interval. Left it empty when the group type isalarm.Group Type: The group type. Valid values arealarmandcollect.
The export method is to export groups on the Group page.
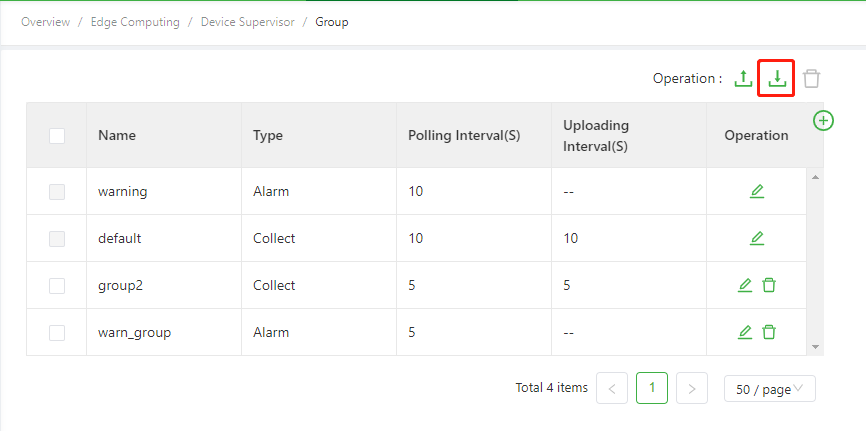
The following is a configuration example:

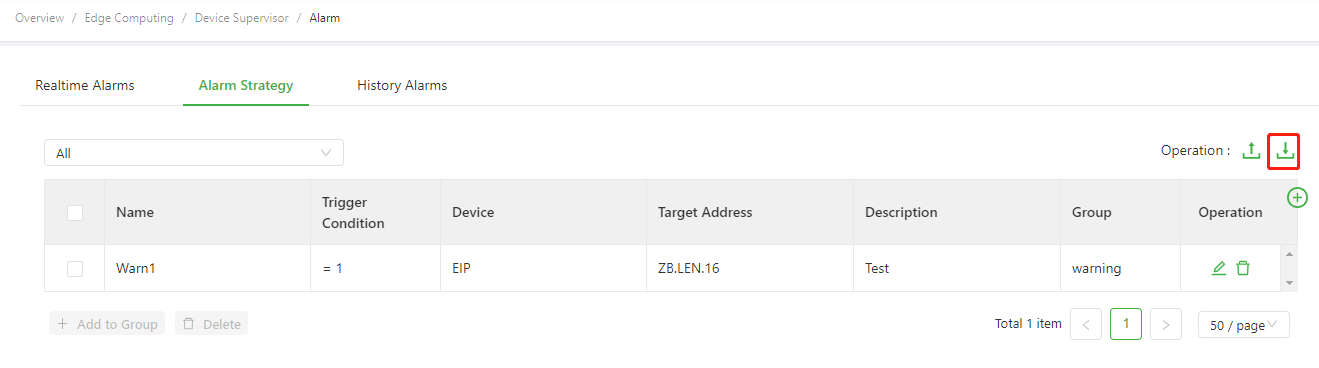
warn.csv: The alarm policy configuration file, which contains the following parameters:Warn Name: The alarm name.Group: The group.Quotes: Whether to reference the variable. 0 means “use new variable”, 1 means “reference existing variable”.Device: The device of the alarm variable.Var Name: The referenced variable name. Leave blank when the variable is not referenced.Condition1: The alarm condition 1. Eq means “equal to”, Neq means “not equal to”, Gt means “greater than”, Gne means “greater than or equal to”, Lne means “less than or equal to”, Lt means “less than”.Operand1: The alarm threshold 1.Combine Method: The alarm condition connection mode. None means empty, And means &&, Or means ||Condition2: The alarm condition 2.Operand2: The alarm threshold 2.Alarm Content: The alarm description.Register Addr: The alarm variable address.Dbnumber: The DB number of the variable when the alarm variable register type is DB.Data Type: The alarm variable data type. Leave it blank when configuring EtherNET/IP and OPCUA variables.Symbol: The alarm variable tag name. Need to fill in when configuring EtherNET/IP variables.Register Type: The alarm variable register type.Register Bit: The bit offset of the variable when the data type of the alarm variable is BOOL or BIT.Namespace Index: The namespace index when the alarm variable is the OPCUA protocol.Identifier: The identification when the alarm variable is the OPCUA protocol.Identifier Type: The ID type when the alarm variable is the OPCUA protocol.Float Repr: The number of decimal places.
The export method is to export alarms on the Alarm page.
Messages Management (custom MQTT publish/subscribe)
You can choose Edge Computing > Device Supervisor > Cloud Service and configure MQTT connection parameters. You can configure the MQTT messages, data source, and other parameters for the data to be uploaded, and customize the data upload and processing logic for the MQTT publish and subscribe topics in Python. In this way, you can perform data upload and delivery with multiple types of MQTT servers without secondary development. The following describes how to use Messages Management.
- Configure Publish Messages
- Configure Subscribe Messages
- Device Supervisor API Description
- Device Supervisor API Callback Function Description
Configure Publish Messages
To customize a publish message, configure the following items:
Name: The custom publish name.Topic: The publish topic, which must be consistent with the topic subscribed to by the MQTT server.Qos(MQTT): The publish QoS, which is recommended to be consistent with that of the MQTT server.0: The message is sent only once, without retry.1: The message is sent at least once to ensure that it reaches the MQTT server.2: Ensure that the message reaches the MQTT server and the MQTT server receives it only once.
Group Type: When publishing variable data, select Collect, and then only Collect Group is available inGroup. When publishing alarm data, select Alarm, and then only Alarm Group is available inGroup.Group: After a group is selected, data of all variables in this group is uploaded to the MQTT server based on this publish configuration. You can select multiple groups.Main Function: The name of the main function (entry function), which must be consistent with that in the script.Script: Use the Python code to customize the packaging and processing logic. Main functions in publish include the following parameters:Parameter 1: Device Supervisor sends the collected variable data to this parameter in the following format:Variable data format:
{
    'timestamp': 1589434519.5458372,  #The timestamp when data is generated.
    'group_name': 'default',  #The name of the collect group.
    'values':  #The variable data dictionary, including the PLC name, variable name, and variable value.
    {
        'S7-1200':  #The PLC name.
        {
            'Test1':  #The variable name.
            {
                'raw_data': False,  #The variable value.
                'status': 1  #The collection status. If the value is not 1, the collection is abnormal.
            },
            'Test2':
            {
                'raw_data': 2,
                'status': 1
            }
        }
    }
}
Alarm data format:
{
    'timestamp': 1589434527.3628697,  #The timestamp when an alarm is generated.
    'group_name': 'warning',  #The name of the alarm group.
    'values':  #The alarm data dictionary, including the alarm information such as alarm name.
    {
        'Warn1':  #The alarm name.
        {
            'timestamp': 1589434527,  #The timestamp when an alarm is generated.
            'current': 'on',  #The alarm status. on: The alarm has been triggered. off: The alarm has been cleared.
            'status': 0,  #The alarm status. 0: The alarm has been triggered. 1: The alarm has been cleared.
            'value': 33,  #The value of the alarm variable when the alarm is triggered.
            'alarm_content': 'The speed has exceeded 30.',  #The alarm description.
            'level': 1  #The reserved field.
        }
    }
}
Parameter 2: It is the API provided by Device Supervisor. For more information about it, see Device Supervisor API Description.
The following are examples of common custom publish methods. Do not use the mqtt_publish or save_data method together with the return command:
Publish example 1: Upload the variable data in
returnmodeIn this example, the variable data is uploaded in
returnmode, the processed variable data is sent to Device Supervisor through thereturncommand. Device Supervisor automatically sequential uploads the variable data by collection time to the MQTT server according to the topic and QoS configured in the publish. If the variable data failed to send, it caches the variable data, waits until the MQTT connection is normal, and then sequential uploads the variable data by collection time to the MQTT server. The following is an example of publish and code configuration: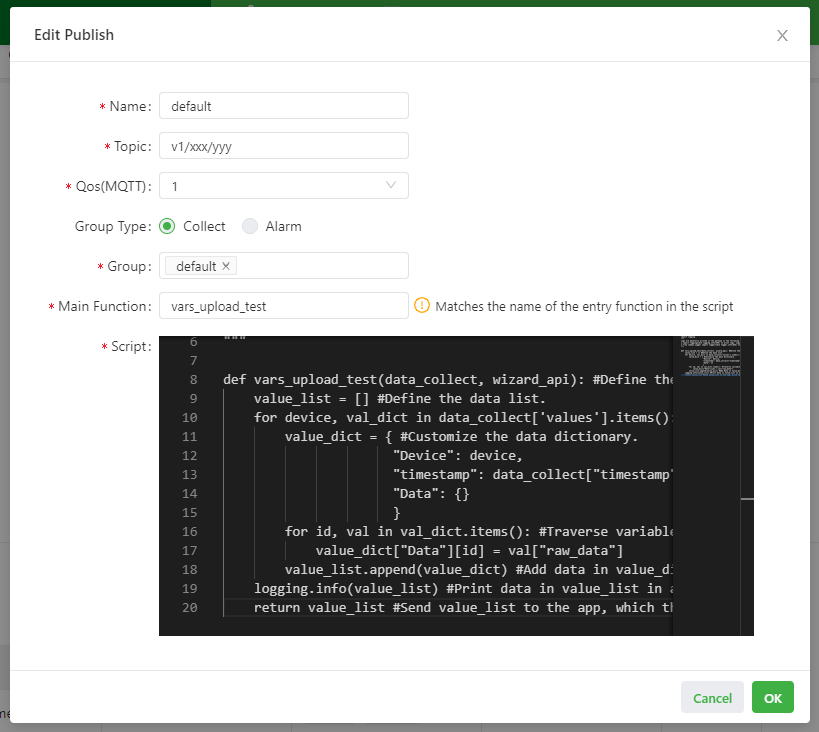
import logging
"""
Logs are generally printed in the gateway in the following ways:
1.import logging:Use logging.info(XXX) to print logs. Logs printed in this way are not controlled by the log level parameter on the Parameter Settings page.
2.from common.Logger import logger:Use logger.info(XXX) to print logs. Logs printed in this way are controlled by the log level parameter on the Parameter Settings page.
"""

def vars_upload_test(data_collect, wizard_api): #Define the main function for publish.
    value_list = [] #Define the data list.
    for device, val_dict in data_collect['values'].items(): #Traverse the values dictionary. The dictionary contains the device name and the variables of the device.
        value_dict = { #Customize the data dictionary.
                      "Device": device,
                      "timestamp": data_collect["timestamp"],
                      "Data": {}
                      }
        for id, val in val_dict.items(): #Traverse variables and assign values for the Data dictionary.
            value_dict["Data"][id] = val["raw_data"]
        value_list.append(value_dict) #Add data in value_dict to value_list in sequence.
    logging.info(value_list) #Print data in value_list in app logs in the following format: [{'Device': 'S7-1200', 'timestamp': 1589538347.5604711, 'Data': {'Test1': False, 'Test2': 12}}].
    return value_list #Send value_list to the app, which then sequential uploads it to the MQTT server by collection time. If it fails to be sent, cache the data and sequential upload it to the MQTT server by collection time after the connection recovers.
Publish example 2: Upload the alarm data in
returnmodeIn this example, alarm data is uploaded. The following is an example of publish and code configuration:
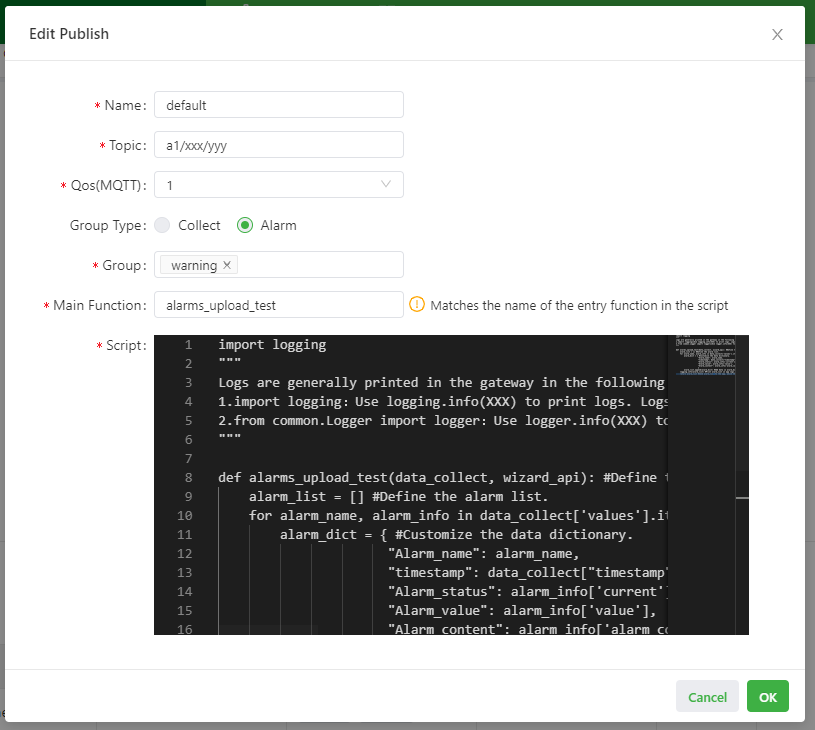
import logging
"""
Logs are generally printed in the gateway in the following ways:
1.import logging:Use logging.info(XXX) to print logs. Logs printed in this way are not controlled by the log level parameter on the Parameter Settings page.
2.from common.Logger import logger:Use logger.info(XXX) to print logs. Logs printed in this way are controlled by the log level parameter on the Parameter Settings page.
"""

def alarms_upload_test(data_collect, wizard_api): #Define the main function for publish.
    alarm_list = [] #Define the alarm list.
    for alarm_name, alarm_info in data_collect['values'].items(): #Traverse the values dictionary. The dictionary contains the information such as alarm name and alarm generation time.
        alarm_dict = { #Customize the data dictionary.
                      "Alarm_name": alarm_name,
                      "timestamp": data_collect["timestamp"],
                      "Alarm_status": alarm_info['current'],
                      "Alarm_value": alarm_info['value'],
                      "Alarm_content": alarm_info['alarm_content']
                      }
        alarm_list.append(alarm_dict) #Add data in alarm_dict to alarm_list in sequence.
    logging.info(alarm_list) #Print alarm_list in app logs.
    return alarm_list #Send alarm_list to the app, which then sequential uploads it to the MQTT server by collection time. If it fails to be sent, cache the data and sequential upload it to the MQTT server by time after the connection recovers.
Publish example 3: Use
mqtt_publishto upload the variable data and usesave_datato save the variable data that failed to upload.In this example, the variable data is uploaded to the MQTT server through
mqtt_publish. If the variable data failed to upload due to MQTT connection failure, the topic, QoS, and the variable data are saved to the database throughsave_data. The saved variable data will be uploaded by saving order to the MQTT server based on the topic and QoS in the data after the MQTT connection is resumed to normal. The following is an example of publish and code configuration: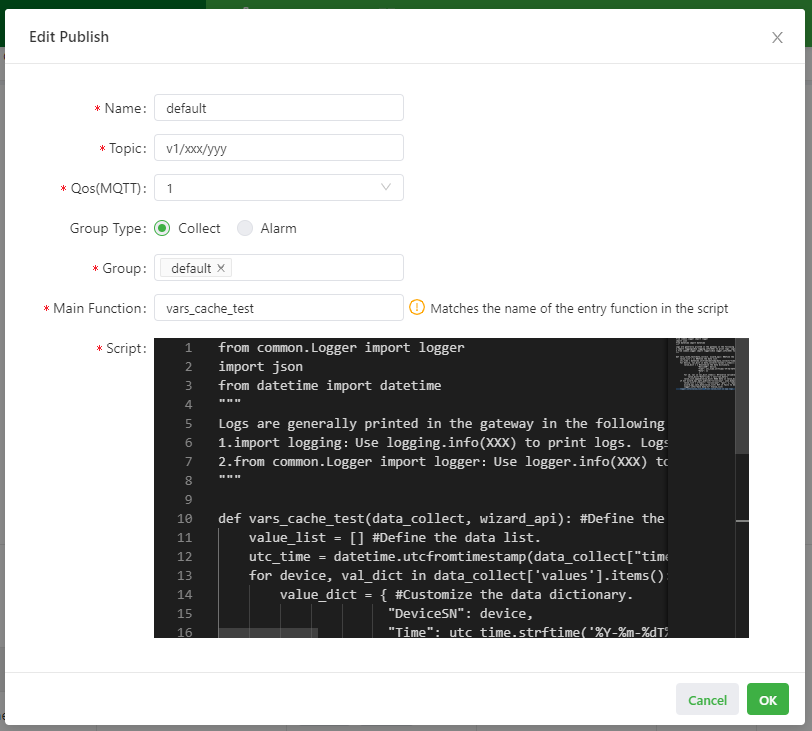
from common.Logger import logger
import json
from datetime import datetime
"""
Logs are generally printed in the gateway in the following ways:
1.import logging:Use logging.info(XXX) to print logs. Logs printed in this way are not controlled by the log level parameter on the Parameter Settings page.
2.from common.Logger import logger:Use logger.info(XXX) to print logs. Logs printed in this way are controlled by the log level parameter on the Parameter Settings page.
"""

def vars_cache_test(data_collect, wizard_api): #Define the main function for publish.
    value_list = [] #Define the data list.
    utc_time = datetime.utcfromtimestamp(data_collect["timestamp"]) #Convert the Linux timestamp to the UTC time.
    for device, val_dict in data_collect['values'].items(): #Traverse the values dictionary. The dictionary contains the device name and the variables of the device.
        value_dict = { #Customize the data dictionary.
                      "DeviceSN": device,
                      "Time": utc_time.strftime('%Y-%m-%dT%H:%M:%S.%fZ'),
                      "Data": {}
                       }
        for id, val in val_dict.items(): #Traverse variables and assign values for the Data dictionary.
            value_dict["Data"][id] = val["raw_data"]
        value_list.append(value_dict) #Add data in value_dict to value_list in sequence.
    if not wizard_api.mqtt_publish("v1/xxx/yyy", json.dumps(value_list), 1): #Call the mqtt_publish method of the wizard_api module to send value_list to the MQTT server based on the topic "v1/xxx/yyy" and QoS level 1, and then check whether it is successfully sent.
        value_list = {"topic": "v1/xxx/yyy", "qos": 1, "payload": value_list}
        wizard_api.save_data(value_list) #If it fails to be sent, cache the data and upload it to the MQTT server by time after the connection recovers.
        logger.info("Save data:%s" %value_list)
    logger.info(value_list) #Print value_list in app logs.
Publish example 4: Use
mqtt_publishto upload the variable data and usesave_datato save the variable data that failed to upload.In this example, the variable data is uploaded to the MQTT server through
mqtt_publish. If the variable data failed to upload due to MQTT connection failure, the variable data and group name are saved throughsave_data. The saved variable data will be uploaded by saving order to the MQTT server based on the topic and QoS associated with the group in the cloud service after the MQTT connection is resumed to normal. Do not use themqtt_publishorsave_datamethod together with thereturncommand. The following is an example of publish and code configuration:
from common.Logger import logger
import json
from datetime import datetime
"""
Logs are generally printed in the gateway in the following ways:
1.import logging:Use logging.info(XXX) to print logs. Logs printed in this way are not controlled by the log level parameter on the Parameter Settings page.
2.from common.Logger import logger:Use logger.info(XXX) to print logs. Logs printed in this way are controlled by the log level parameter on the Parameter Settings page.
"""

def vars_cache_test(data_collect, wizard_api): #Define the main function for publish.
    value_list = [] #Define the data list.
    utc_time = datetime.utcfromtimestamp(data_collect["timestamp"]) #Convert the Linux timestamp to the UTC time.
    for device, val_dict in data_collect['values'].items(): #Traverse the values dictionary. The dictionary contains the device name and the variables of the device.
        value_dict = { #Customize the data dictionary.
                      "DeviceSN": device,
                      "Time": utc_time.strftime('%Y-%m-%dT%H:%M:%S.%fZ'),
                      "Data": {}
                       }
        for id, val in val_dict.items(): #Traverse variables and assign values for the Data dictionary.
            value_dict["Data"][id] = val["raw_data"]
        value_list.append(value_dict) #Add data in value_dict to value_list in sequence.
    if not wizard_api.mqtt_publish("v1/xxx/yyy", json.dumps(value_list), 1): #Call the mqtt_publish method of the wizard_api module to send value_list to the MQTT server based on the topic "v1/xxx/yyy" and QoS level 1, and then check whether it is successfully sent.
        wizard_api.save_data(value_list,'default') #If it fails to be sent, cache the data and upload it to the MQTT server by time after the connection recovers.
        logger.info("Save data:%s" %value_list)
    logger.info(value_list) #Print value_list in app logs.
Publish example 5: Use
get_tag_configto get the configuration of devices, variables, and alarms.In this example, when the app is restarted each time, the configuration of devices, variables, and alarms are gotten through
get_tag_configrespectively and then sent to the MQTT server(This example is only useful for getting Rackslot pattern point tables for ISO on TCP and Modbus). The following is an example of publish and code configuration: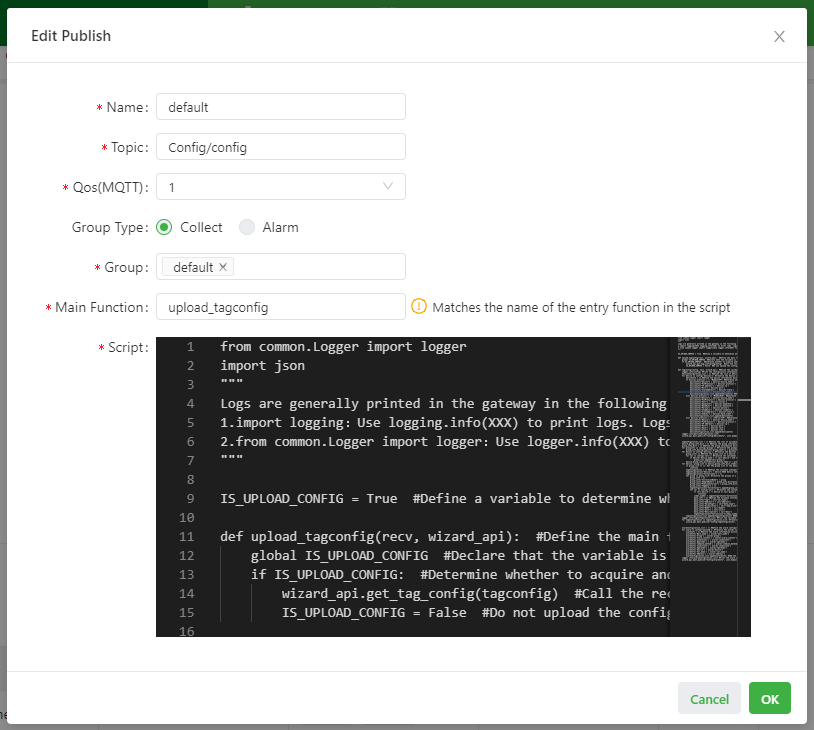
from common.Logger import logger
import json
"""
Logs are generally printed in the gateway in the following ways:
1.import logging:Use logging.info(XXX) to print logs. Logs printed in this way are not controlled by the log level parameter on the Parameter Settings page.
2.from common.Logger import logger:Use logger.info(XXX) to print logs. Logs printed in this way are controlled by the log level parameter on the Parameter Settings page.
"""

IS_UPLOAD_CONFIG = True  #Define a variable to determine whether to acquire and upload the configuration.

def upload_tagconfig(recv, wizard_api):  #Define the main function for publish.
    global IS_UPLOAD_CONFIG  #Declare that the variable is a global variable.
    if IS_UPLOAD_CONFIG:  #Determine whether to acquire and upload the configuration.
        wizard_api.get_tag_config(tagconfig)  #Call the recall_data method of the wizard_api module to define the callback function name of the method as tagconfig.
        IS_UPLOAD_CONFIG = False  #Do not upload the configuration again after it is acquired and uploaded.

def tagconfig(config, tail, wizard_api): #Define the callback function tagconfig used to acquire the configuration.
    logger.info(config) #Print the configuration information, including the device, group, variable, and alarm configuration.
    deviceConfiguration_list = [] #Define the list of device configuration.
    for device in config['devices']: #Traverse the device configuration.
        deviceInfo = {} #Define the device information dictionary.
        if device['protocol'] == "ModbusTCP": #Determine whether the device communication protocol is ModbusTCP.
            deviceInfo["Device"] = device['device_name']
            deviceInfo["PLCProtocol"] = device['protocol']
            deviceInfo["IP Address"] = device['ip']
            deviceInfo["Port"] = device['port']
            deviceInfo["SlaveAddress"] = device['slave']
            deviceInfo["Endian"] = device['byte_order']
            deviceConfiguration_list.append(deviceInfo) #Add deviceInfo to deviceConfiguration_list in sequence.
        elif device['protocol'] == "ModbusRTU": #Determine whether the device communication protocol is ModbusRTU.
            deviceInfo["Device"] = device['device_name']
            deviceInfo["PLCProtocol"] = device['protocol']
            deviceInfo["Port"] = device['serial']
            deviceInfo["Baudrate"] = device['baudrate']
            deviceInfo["DataBits"] = device['bytesize']
            deviceInfo["Parity"] = device['parity']
            deviceInfo["StopBits"] = device['stopbits']
            deviceInfo["SlaveAddress"] = device['slave']
            deviceInfo["Endian"] = device['byte_order']
            deviceConfiguration_list.append(deviceInfo)
        elif device['protocol'] == "ISO-on-TCP": #Determine whether the device communication protocol is ISO-on-TCP.
            deviceInfo["Device"] = device['device_name']
            deviceInfo["PLCProtocol"] = device['protocol']
            deviceInfo["IP Address"] = device['ip']
            deviceInfo["Port"] = device['port']
            deviceInfo["Rack"] = device['rack']
            deviceInfo["Slot"] = device['slot']
            deviceConfiguration_list.append(deviceInfo)
    logger.info(deviceConfiguration_list)
    wizard_api.mqtt_publish("Config/DeviceInfo", json.dumps(deviceConfiguration_list), 1) #Call the mqtt_publish method of the wizard_api module to send deviceConfiguration_list to the MQTT server based on the topic "Config/DeviceInfo" and QoS level 1.


    tagConfiguration_list = [] #Define the list of variable configuration.
    device_group_info_dict = {} #Define the group information dictionary of a device.
    group_info_dict = {} #Define the group information dictionary.
    for groupinfo in config['groups']: #Traverse the groups in the configuration.
        group_info_dict[groupinfo["group_name"]] = groupinfo #Map the group names and group information.
    for device in config['devices']: #Traverse the devices in the configuration.
        group_list= [] #Define the group list of a device.
        for var in config['vars']: #Traverse the variables in the configuration.
            if device['device_name'] == var['device'] and var['group'] not in group_list: #Determine whether the variable is in the device. If the group of the variable is not in group_list, add the group to group_list.
                group_list.append(var['group'])
        device_group_info_dict[device['device_name']] = group_list #Map the devices and the group lists of the devices.
    for device, group_list in device_group_info_dict.items(): #Traverse the group information dictionary of a device.
        if group_list == []: #If the group list of the device is empty, no variable is defined for the device. Then, skip this device.
            continue
        tagConfiguration = {} #Define the variable configuration dictionary.
        tagConfiguration["Device"] = device #Add device information.
        tagConfiguration["Collections"] = []
        for group in group_list: #Traverse the groups of a device and add group information.
            group_info = {}
            group_info["CollectionName"] = group
            group_info["SampleRate"] = group_info_dict[group]["polling_interval"]
            group_info["PublishInterval"] = group_info_dict[group]["upload_interval"]
            group_info["TagData"] = []
            tagConfiguration["Collections"].append(group_info)
            for var in config['vars']: #Traverse the variables in the configuration.
                if var['device'] != device or var['group'] != group: #If the variable does not belong to the device and group, skip this variable.
                    continue
                index_number = tagConfiguration["Collections"].index(group_info) #Obtain the index of the group in tagConfiguration["Collections"].
                data_info = {} #Define the variable information dictionary.
                data_info["Tag"] = var["var_name"]
                data_info["Address"] = var["address"]
                data_info["ValueType"] = var["data_type"]
                data_info["AccessLevel"] = var["read_write"]
                data_info["Mode"] = var["mode"]
                data_info["Unit"] = var["unit"]
                data_info["Description"] = var["desc"]
                tagConfiguration["Collections"][index_number]["TagData"].append(data_info) #Add variable information to TagData of the specified group.
        tagConfiguration_list.append(tagConfiguration) #Add the tagConfiguration to tagConfiguration_list in sequence.
    logger.info(tagConfiguration_list) #Print the variable Configuration.
    for tagConfiguration in tagConfiguration_list: #Traverse the variable Configuration of each device and upload them to the MQTT server.
        wizard_api.mqtt_publish("Config/TagConfiguration", json.dumps(tagConfiguration), 1) #Call the mqtt_publish method of the wizard_api module to send tagConfiguration_list to the MQTT server based on the topic "Config/TagConfiguration" and QoS level 1.


    alarmConfiguration_list = [] #Define the alarm configuration.
    for alarm in config['warning']: #Traverse the alarms in the configuration.
        alarmInfo = {} #Define the alarm information dictionary.
        alarmInfo['Warn_name'] = alarm['warn_name']
        alarmInfo['Group'] = alarm['group']
        alarmInfo['Alarm_content'] = alarm['alarm_content']
        alarmInfo['Condition1'] = alarm['condition1']
        alarmInfo['Operand1'] = alarm['operand1']
        alarmInfo['Combine_method'] = alarm['combine_method']
        alarmInfo['Condition2'] = alarm['condition2']
        alarmInfo['Operand2'] = alarm['operand2']
        alarmInfo['Device'] = alarm['device']
        alarmInfo['Var_name'] = alarm['var_name']
        alarmInfo['Address'] = alarm['address']
        alarmConfiguration_list.append(alarmInfo) #Add the alarm information to alarmConfiguration_list in sequence.
    logger.info(alarmConfiguration_list) #Print the alarm configuration.
    wizard_api.mqtt_publish("Config/AlarmInfo", json.dumps(alarmConfiguration_list), 1) #Call the mqtt_publish method of the wizard_api module to send alarmConfiguration_list to the MQTT server based on the topic "Config/AlarmInfo" and QoS level 1.
Publish example 6: Use
get_global_parameterto get custom parameter set in Parameter Settings.In this example, custom parameter set in Parameter Settings are gotten through
device_id, and the MQTT topic is configured with the wildcard${device_id}. The following is an example of publish and code configuration: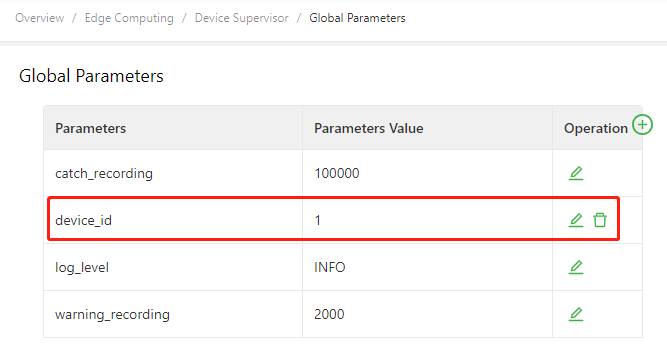
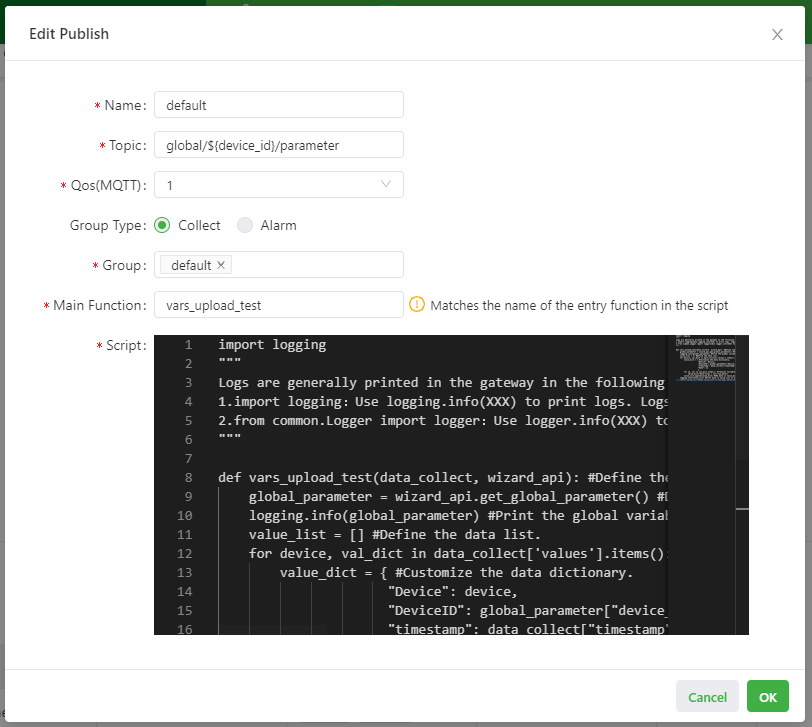
import logging
"""
Logs are generally printed in the gateway in the following ways:
1.import logging:Use logging.info(XXX) to print logs. Logs printed in this way are not controlled by the log level parameter on the Parameter Settings page.
2.from common.Logger import logger:Use logger.info(XXX) to print logs. Logs printed in this way are controlled by the log level parameter on the Parameter Settings page.
"""

def vars_upload_test(data_collect, wizard_api): #Define the main function for publish.
    global_parameter = wizard_api.get_global_parameter() #Define the Custom Parameter variables.
    logging.info(global_parameter) #Print the Custom Parameter variables.
    value_list = [] #Define the data list.
    for device, val_dict in data_collect['values'].items(): #Traverse the values dictionary. The dictionary contains the device name and the variables of the device.
        value_dict = { #Customize the data dictionary.
                      "Device": device,
                      "DeviceID": global_parameter["device_id"], #Acquire the device ID defined in Custom Parameter.
                      "timestamp": data_collect["timestamp"],
                      "Data": {}
                      }
        for id, val in val_dict.items(): #Traverse variables and assign values for the Data dictionary.
            value_dict["Data"][id] = val["raw_data"]
        value_list.append(value_dict) #Add data in value_dict to value_list in sequence.
    logging.info(value_list) #Print data in value_list in app logs in the following format: [{'Device': 'S7-1200', 'DeviceID': '1', 'timestamp': 1589538347.5604711, 'Data': {'Test1': False, 'Test2': 12}}].
    return value_list #Send value_list to the app, which then sequential uploads it to the MQTT server by collection time. If it fails to be sent, cache the data and sequential upload it to the MQTT server by time after the connection recovers.
Configure Subscribe Messages
Custom subscribe message contains the following items:
Name: The custom subscribe name.Topic: The subscribe topic, which must be consistent with the topic published by the MQTT server.Qos(MQTT): The subscribe QoS, which is recommended to be consistent with that of the MQTT server.Main Function: The name of the main function (entry function), which must be consistent with that in the script.Script: Use the Python code to custom the packaging and processing logic. Main functions in subscribe include the following parameters:Parameter 1: It is the received topic. The data type isstring.Parameter 2: It is the received data. The data type isstring.Parameter 3: It is the API provided by Device Supervisor. For more information about it, see Device Supervisor API Description.
The following are four common custom subscribe methods:
Subscribe example 1: Deliver the variable name and value and write the PLC data but do not return the write result.
In this example, a command is delivered by the MQTT server to modify the variable value. The following is an example of publish and code configuration:
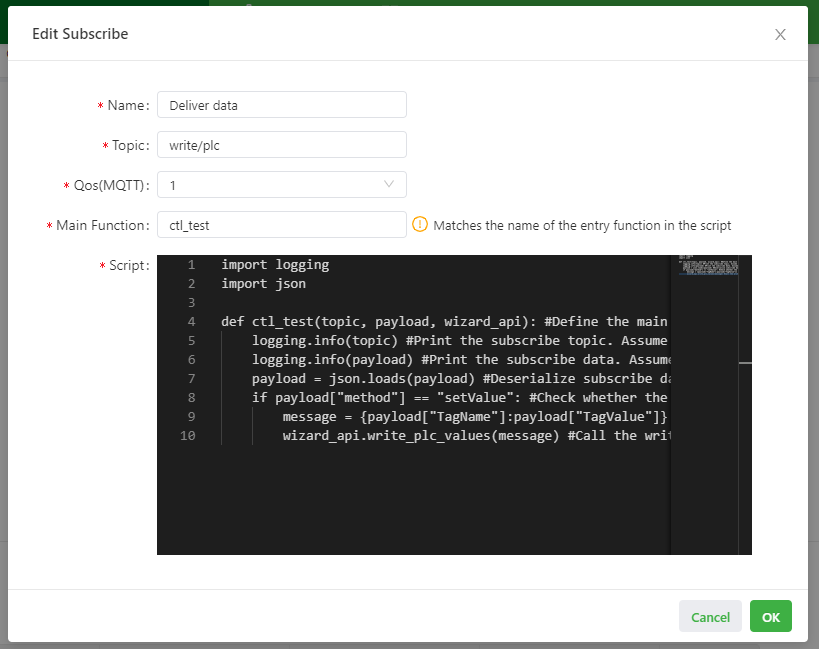
import logging
import json

def ctl_test(topic, payload, wizard_api): #Define the main function for subscribe.
    logging.info(topic) #Print the subscribe topic. Assume that the topic is "write/plc".
    logging.info(payload) #Print the subscribe data. Assume that the payload data is {"method":"setValue", "TagName":"SP1", "TagValue":12.3}.
    payload = json.loads(payload) #Deserialize subscribe data.
    if payload["method"] == "setValue": #Check whether the data is written.
        message = {payload["TagName"]:payload["TagValue"]} #Define the message to be delivered, including the variable name and value to be delivered.
        wizard_api.write_plc_values(message) #Call the write_plc_values method of the wizard_api module to deliver data from the message dictionary to the specified variable.
Subscribe example 2: Deliver the device name, and variable name and value and write the PLC data but do not return the write result.
In this example, a command is delivered by the MQTT server to modify the variable value. The following is an example of publish and code configuration:
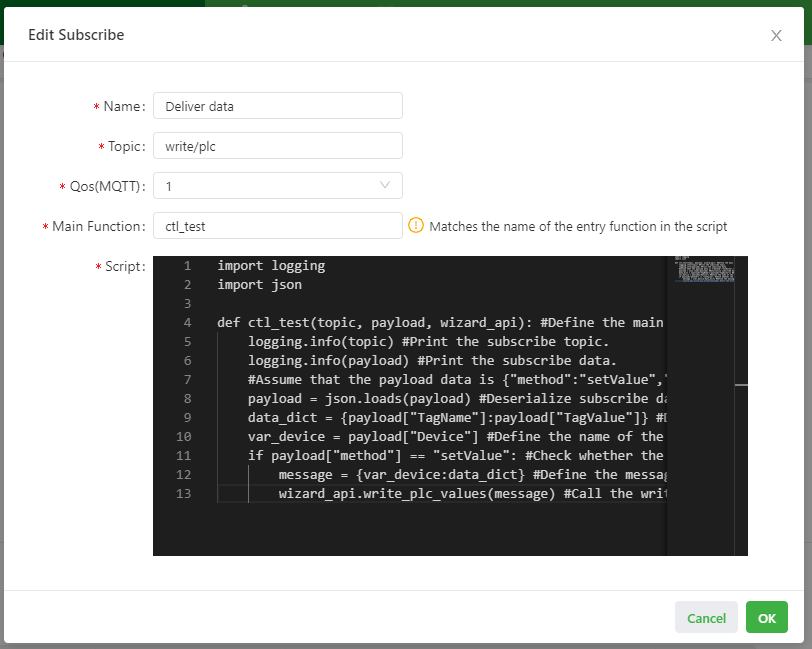
import logging
import json

def ctl_test(topic, payload, wizard_api): #Define the main function for subscribe.
    logging.info(topic) #Print the subscribe topic.
    logging.info(payload) #Print the subscribe data.
    #Assume that the payload data is {"method":"setValue","Device":"Modbus_test", "TagName":"SP1", "TagValue":12.3}.
    payload = json.loads(payload) #Deserialize subscribe data.
    data_dict = {payload["TagName"]:payload["TagValue"]} #Define the data dictionary to be delivered, including the variable name and value to be delivered.
    var_device = payload["Device"] #Define the name of the device.
    if payload["method"] == "setValue": #Check whether the data is written.
        message = {var_device:data_dict} #Define the message to be delivered, including the device name and data dictionary to be delivered.
        wizard_api.write_plc_values(message) #Call the write_plc_values method of the wizard_api module to deliver data from the message dictionary to the specified variable.
Subscribe example 3: Write the variable data and return the write result.
In this example, a command is delivered by the MQTT server to modify the variable value and return the modification result. The following is an example of publish and code configuration:
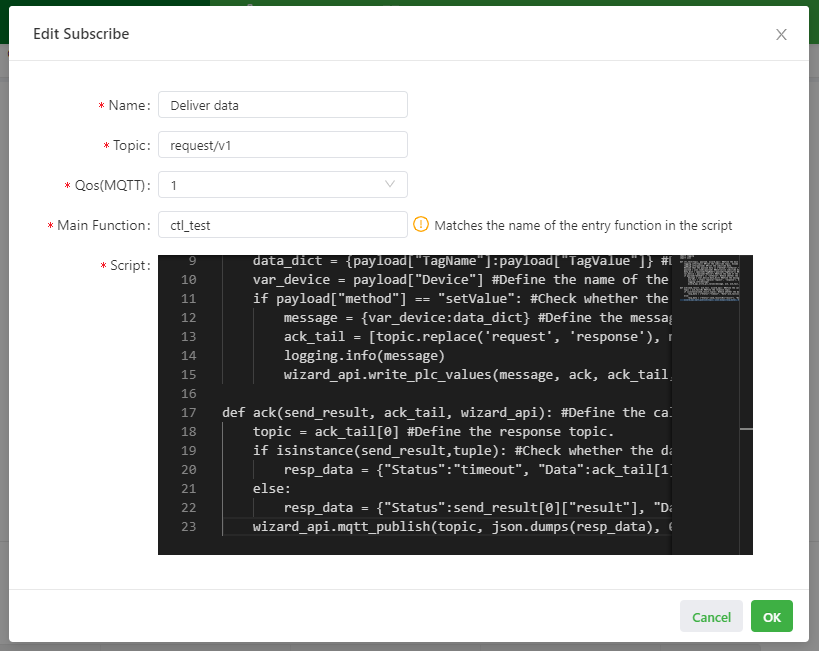
import logging
import json

def ctl_test(topic, payload, wizard_api): #Define the main function for subscribe.
    logging.info(topic) #Print the subscribe topic. Assume that the topic is "request/v1".
    logging.info(payload) #Print the subscribe data.
    #Assume that the payload data is {"method":"setValue","Device":"Modbus_test", "TagName":"SP1", "TagValue":12.3}.
    payload = json.loads(payload) #Deserialize subscribe data.
    data_dict = {payload["TagName"]:payload["TagValue"]} #Define the data dictionary to be delivered, including the variable name and value to be delivered.
    var_device = payload["Device"] #Define the name of the device.
    if payload["method"] == "setValue": #Check whether the data is written.
        message = {var_device:data_dict} #Define the message to be delivered, including the device name and data dictionary to be delivered.
        ack_tail = [topic.replace('request', 'response'), message] #Define the confirmation data, including the response topic and message.
        logging.info(message)
        wizard_api.write_plc_values(message, ack, ack_tail, timeout = 0.5) #Call the write_plc_values method of the wizard_api module to deliver data from the message dictionary to the specified variable. Define the callback function of this method as ack and deliver ack_tail to the ack function.

def ack(send_result, ack_tail, wizard_api): #Define the callback function ack.
    topic = ack_tail[0] #Define the response topic.
    if isinstance(send_result,tuple): #Check whether the data type of send-result is tuple. If so, the delivery times out.
        resp_data = {"Status":"timeout", "Data":ack_tail[1]} #Define the response for delivery timeout.
    else:
        resp_data = {"Status":send_result[0]["result"], "Data":ack_tail[1]} #Define the response if the delivery does not time out.
    wizard_api.mqtt_publish(topic, json.dumps(resp_data), 0) #Call the mqtt_publish method of the wizard_api module to deliver the response data to the MQTT server.
Subscribe example 4: Recall the data immediately.
In this example, when the specified command is delivered by the MQTT server, the system immediately reads values of all variables and sends them to the MQTT server. The following is an example of publish and code configuration:
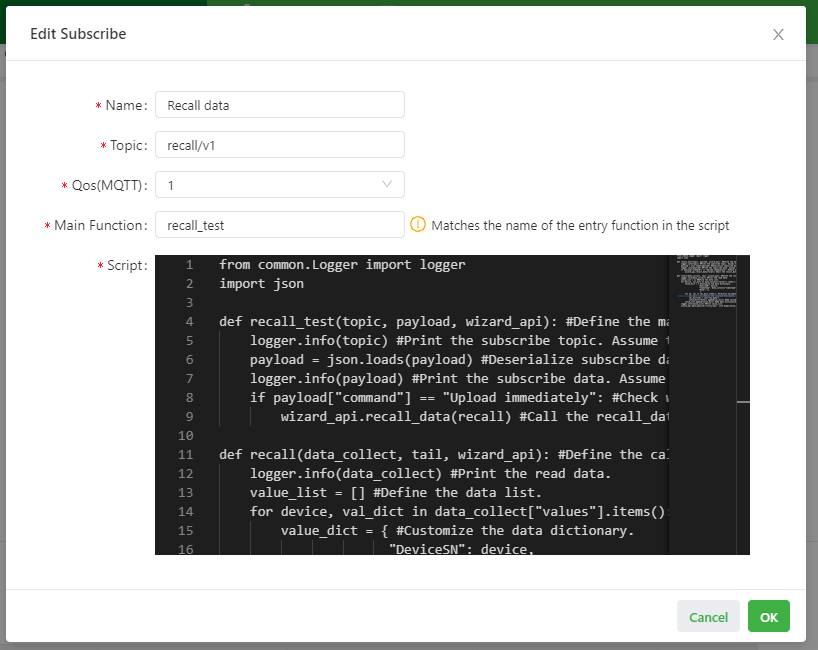
from common.Logger import logger
import json

def recall_test(topic, payload, wizard_api): #Define the main function for subscribe.
    logger.info(topic) #Print the subscribe topic. Assume that the topic is "recall/v1".
    payload = json.loads(payload) #Deserialize subscribe data.
    logger.info(payload) #Print the subscribe data. Assume that the payload data is {"command":"Upload immediately"}.
    if payload["command"] == "Upload immediately": #Check whether to call back the data.
        wizard_api.recall_data(recall) #Call the recall_data method of the wizard_api module to define the callback function name of the method as recall.

def recall(data_collect, tail, wizard_api): #Define the callback function recall.
    logger.info(data_collect) #Print the read data.
    value_list = [] #Define the data list.
    for device, val_dict in data_collect["values"].items(): #Traverse the values dictionary. The dictionary contains the device name and the variables of the device.
        value_dict = { #Customize the data dictionary.
                      "DeviceSN": device,
                      "timestamp": data_collect["timestamp"],
                      "Data": []
                       }
        for id, val in val_dict.items(): #Traverse variables and assign values for the Data list.
            var_dict = {} #Define the variable dictionary.
            var_dict[id] = val["raw_data"]
            value_dict["Data"].append(var_dict) #Add variable dictionaries to value_dict in sequence.
        value_list.append(value_dict) #Add data dictionaries to value_list in sequence.
    logger.info(value_list) #Print value_list.
    wizard_api.mqtt_publish("v1/xxx/yyy", json.dumps(value_list), 1) #Call the mqtt_publish method of the wizard_api module to send value_list to the MQTT server based on the topic "v1/xxx/yyy" and QoS level 1.
Device Supervisor API Description
The API provided by Device Supervisor supports the following methods:
mqtt_publish: The MQTT message publish method. It is used to send the specified data to the MQTT server based on the topic and return the sending result (True or False). For its usage example, see Publish example 3. This method contains the following parameters:Parameter 1: The MQTT topic. The data type isstring. This topic is used to send the data to the MQTT server.Parameter 2: The data to be sent.Parameter 3: The QoS level. Valid values are 0, 1, and 2.
save_data: The method for saving data to the database. The saved data will be uploaded by saving order to the MQTT server when the MQTT connection is resumed to normal. For its usage example, see Publish example 3 and Publish example 4. This method contains the following parameters:Parameter 1: The data to be saved. If onlyParameter 1is provided whensave_datais called, the data type ofParameter 1isdict, the saved data must have key-value pairs withtopic,qos, andpayloadas the keys, and the saved data is sent to the MQTT server based on itstopic,qos, andpayloadafter the MQTT connection is resumed to normal.Parameter 2(groupis optional): The group name of the data to be saved. The data type isstring. Whensave_datais called, ifParameter 2is provided,Parameter 1is sent to the MQTT server based on the topic and QoS associated with this group in the cloud service.
write_plc_values: Deliver the data to the specified variable method and return the modification result. For its usage example, see Subscribe example 1, Subscribe example 2 and Subscribe example 3. This method contains the following parameters:Parameter 1: Deliver the data. Two forms are supported:Form 1: Input adictwhich uses the variable name and value as the key-value pair. When using this method to modify the variable value, keep the variable name unique in the Device list. The following is a data format example:{ "SP1": 12.3, #The key-value pair of the variable name and value. "SP2": 12.4 }
Form 2: Input adictthat contains the device name and variable name and value. The following is a data format example:{ "S7-1200": #The name of the device. { "SP1": 12.3, #The key-value pair of the variable name and value. "SP2": 12.4 } }
Parameter 2(callbackis optional): The name of the callback function that returns the modification result. For more information about the callback function, see Description of the write_plc_values callback function.Parameter 3(tailis optional): WhenParameter 2is available, you can assign the data that needs to be sent to the callback function returning the modification result toParameter 3.Parameter 4(timeoutis optional): The write timeout time. The data type isIntegerorfloat. The default value is 60s.
get_tag_config: The method to get the configurations, including the PLC, variable, group, and alarm configurations. For its usage example, see Publish example 5. This method contains the following parameters:Parameter 1: The name of the callback function that gets the configuration. For more information about the callback function, see Description of the get_tag_config callback function.Parameter 2(tailis optional): It can be used to assign the data that needs to be sent to the callback function getting the configuration toParameter 2.Parameter 3(timeoutis optional): The timeout time for getting the configuration. The data type isInteger. The default value is 60s.
recall_data: The method that is used to read values of all variables immediately. For its usage example, see Subscribe example 4. This method contains the following parameters:Parameter 1: The name of the callback function that immediately reads values of all variables. For more information about the callback function, see Description of the recall_data callback function.Parameter 2(tailis optional): It can be used to assign the data that needs to be sent to the callback function immediately reading values of all variables toParameter 2.Parameter 3(timeoutis optional): The timeout time for immediately reading values of all variables. The data type isInteger. The default value is 60s.
get_global_parameter: The method to get the custom parameter. For its usage example, see Publish example 6. This method returns a dictionary for custom parameter. The data format is as follows:{ 'gateway_sn': 'GT902XXXXXXXXXX', #The gateway serial number, which is a system parameter. 'log_level': 'INFO', #The log level, which is a system parameter. 'catch_recording': 100000, #The maximum number of MQTT messages of variables that can be cached. 'warning_recording': 2000, #The maximum number of MQTT messages of alarms that can be cached. 'device_id': '1' #The custom parameter. }
Device Supervisor API Callback Function Description
write_plc_valuesCallback function descriptionwrite_plc_valuesThe callback function contains the following parameters. For its usage example, see Subscribe example 3:Parameter 1: The write result of thewrite_plc_valuesmethod.When write times out, the returned value is
("error", -110, "timeout")
When write succeeds, the format of the returned value is:
[
{
    'value': 12, #The written value.
    'device': 'S7-1200', #The written device.
    'var_name': 'Test2', #The written variable name.
    'result': 'OK', #The written result. OK: writing succeeded; Failed: writing failed.
    'error': '' #The writing error. When the writing result is OK, this parameter is empty.
}]
When write failed, the format of the returned value is:
[
{
    'value': 12.3,
    'device': 'Modbus_test',
    'var_name': 'SP1',
    'result': 'Failed',
    'error': "Device 'Modbus_test' not found."
}]
Parameter 2: TheParameter 3configured in thewrite_plc_valuesmethod. IfParameter 3is not configured inwrite_plc_values, this parameter isNone.Parameter 3: It is the API provided by Device Supervisor. For more information about it, see Device Supervisor API Description.
get_tag_configCallback function descriptionget_tag_configThe callback function contains the following parameters. For its usage example, see Publish example 5:Parameter 1: The configuration returned by theget_tag_configmethod. When getting configuration times out, the returned value is("error", -110, "timeout"); otherwise, the data format is as follows (Take Rack/slot mode of the ISO-on-TCP protocol as an example):{ 'devices': [ #The device configuration. { 'protocol': 'ISO-on-TCP', #The device protocol. 'device_name': 'S7-1200', #The name of the device. 'ip': '10.5.16.73', #The IP address. 'port': 102, #Port 'rack': 0, #The rack number. 'slot': 0, #The slot number. 'id': '6358f50294dc11ea8d890018050ff046' #The device ID. }], 'groups': [ #The group configuration. { 'group_name': 'warning', #The group name. 'polling_interval': 10, #The collection interval. 'upload_interval': '', #The reporting interval. 'group_type': 'alarm', #The group type. collect: collect group; alarm: alarm group. 'id': '84c371902eb911eabab11a4f32d1ee44' #The group ID. }], 'warning': [ #The alarm configuration. { 'warn_name': 'Warn1', #The alarm name. 'group': 'warning', #The group of the alarm. 'quotes': 1, #The variable source of the alarm. 0: direct use address; 1: reference address. 'device': 'S7-1200', #The device of the alarm variable. 'alarm_content': 'The speed has exceeded 30!' #The alarm description. 'condition1': 'Gt', #The alarm condition 1. Eq: equal to; Neq: not equal to; Gt: grater than; Gne: greater than or equal to; Lne: less than or equal to; Lt: less than. 'operand1': '30', #The alarm threshold 1. 'combine_method': 'And', #The connection mode of alarm conditions. None: empty; And: &&; Or: || 'condition2': 'Lt', #The alarm condition 2. 'operand2': '50', #The alarm threshold 2. 'var_name': 'Test2', #The variable name of the alarm. 'var_id': '96c93c3094dd11eabd400018050ff046', #The variable ID of the alarm. 'size': 1, #The length of the string when the data type of the alarm variable is STRING. 'float_repr': 2, #The number of digits following the decimal point of the variable when the data type of the alarm variable is FLOAT. 'id': '9165ed78943e11ea8a000018050ff046', #The alarm ID. 'address': 'DB6.2', #The variable address of the alarm. 'protocol': 'ISO-on-TCP', #The communication protocol of the alarm device. 'data_type': 'WORD', #The data type of the alarm variable. 'register_type': 'DB', #The register type of the alarm variable. 'register_addr': 2, #The register address of the alarm variable. 'read_write': 'read/write', #The read/write permission of the alarm. read: read-only; write: write-only; read/write: read and write. 'mode': 'realtime', #The variable collection mode of the alarm. 'unit': '', #The variable unit of the alarm. 'desc': '', #The variable description of the alarm. 'dbnumber': 6, #The DB number of the variable when the register type of the alarm variable is DB. 'register_bit': '' #The offset of the variable when the data type of the alarm variable is BOOL or BIT. }], 'vars': [ #The variable configuration. { 'device': 'S7-1200', #The name of the device to which the variable belongs. 'protocol': 'ISO-on-TCP', #The communication protocol of the device to which the variable belongs. 'data_type': 'BOOL', #The data type of the variable. 'register_type': 'I', #The register type of the variable. 'var_name': 'Test1', #The variable name. 'register_addr': 0, #The register address of the variable. 'read_write': 'read/write', #The read/write permission of the variable. read: read-only; write: write-only; read/write: read and write. 'mode': 'realtime', #The collection mode of the variable. 'unit': '', #The unit of the variable. 'desc': '', #The description of the variable. 'group': 'default', #The group of the variable. 'register_bit': 0, #The offset of the variable when the data type of the variable is BOOL or BIT. 'size': 1, #The length of the string when the data type of the variable is STRING. 'float_repr': 2, #The length of the data following the decimal point of the variable when the data type of the variable is FLOAT. 'dbnumber': 0, #The DB number of the variable when the register type of the variable is DB. 'id': 'a1d9439a94dc11eaa2830018050ff046', #The ID of the variable. 'address': 'I0.0' #The address of the variable. }, { 'device': 'S7-1200', 'protocol': 'ISO-on-TCP', 'data_type': 'WORD', 'register_type': 'DB', 'var_name': 'Test2', 'register_addr': 2, 'read_write': 'read/write', 'mode': 'realtime', 'unit': '', 'desc': '', 'group': '2222', 'dbnumber': 6, 'size': 1, 'float_repr': 2, 'register_bit': '', 'id': '96c93c3094dd11eabd400018050ff046', 'address': 'DB6.2' }] }
Parameter 2: TheParameter 3configured in theget_tag_configmethod. IfParameter 3is not configured inget_tag_config, this parameter isNone.Parameter 3: It is the API provided by Device Supervisor. For more information about it, see Device Supervisor API Description.
recall_dataCallback function descriptionrecall_dataThe callback function contains the following parameters. For its usage example, see Subscribe example 4:Parameter 1: The variable data returned by therecall_datamethod. When getting variable data times out, the returned value is("error", -110, "timeout"); otherwise, the data format is as follows:{ 'timestamp': 1589507333.2521989, #The timestamp when data is generated. 'values': #The data dictionary, including the PLC name, variable name, and variable value. { 'S7-1200': #The PLC name. { 'Test1': #The variable name. { 'raw_data': False, #The variable value. 'status': 1 #The collection status. If the value is not 1, the collection is abnormal. }, 'Test2': { 'raw_data': 33, 'status': 1 } } } }
Parameter 2: TheParameter 3configured in therecall_datamethod. IfParameter 3is not configured inrecall_data, this parameter isNone.Parameter 3: It is the API provided by Device Supervisor. For more information about it, see Device Supervisor API Description.
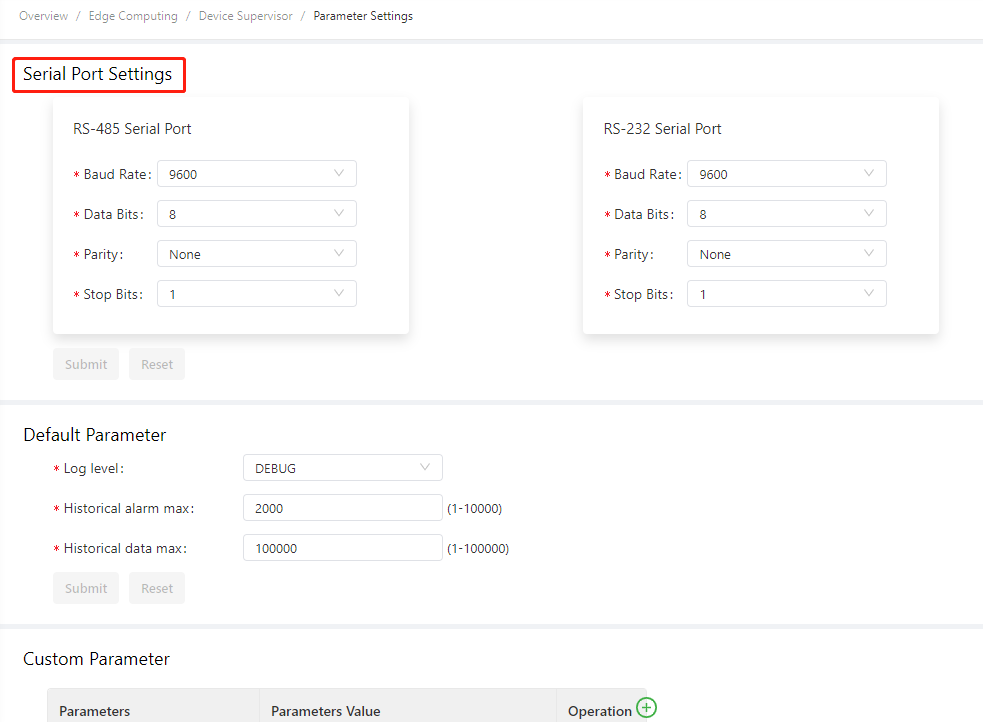
Parameter Settings
You can choose Edge Computing > Device Supervisor > Parameter Settings and configure global settings for Device Supervisor.
Default Parameter
You can set the log level, the number of historical alarm and historical data in the default parameter.
Custom Parameter
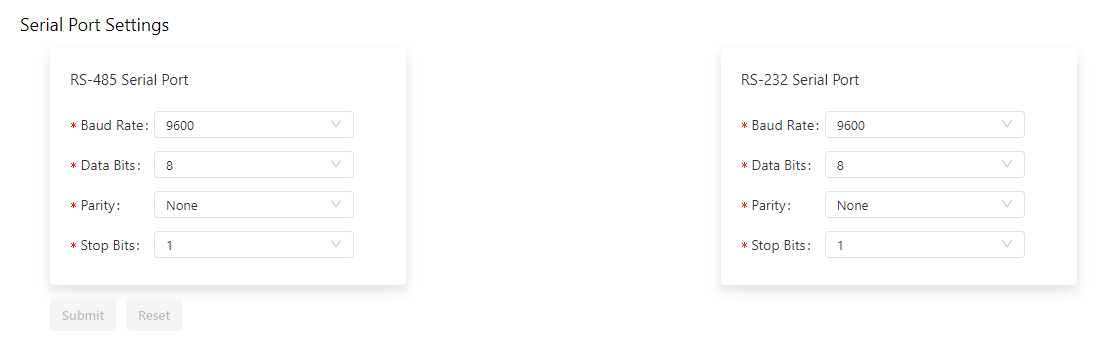
You can add common parameter to the custom parameter as wildcards and use them in the cloud service. The usage is
${Parameter Name}, as shown in the figure below:Serial port settingsIn the serial port setting module, you can configure communication parameters for the serial ports RS485 and RS232, as shown in the figure below:
Gateway other configuration
For more information about other common gateway operations, see Get Started with IG501, Get Started with IG502 or Get Started with IG902.
ThingsBoard reference flowchart
Add devices and assets
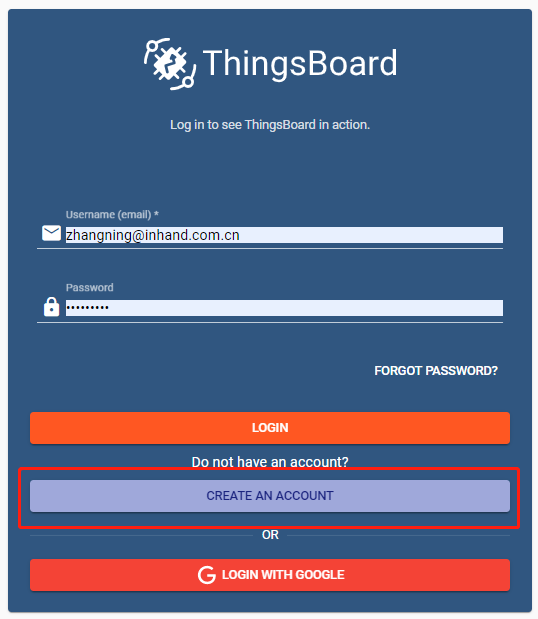
Visit https://demo.thingsboard.io/login and enter the login account and password. If you do not have an account yet, register an account first before login. Registration requires access to the network outside China.
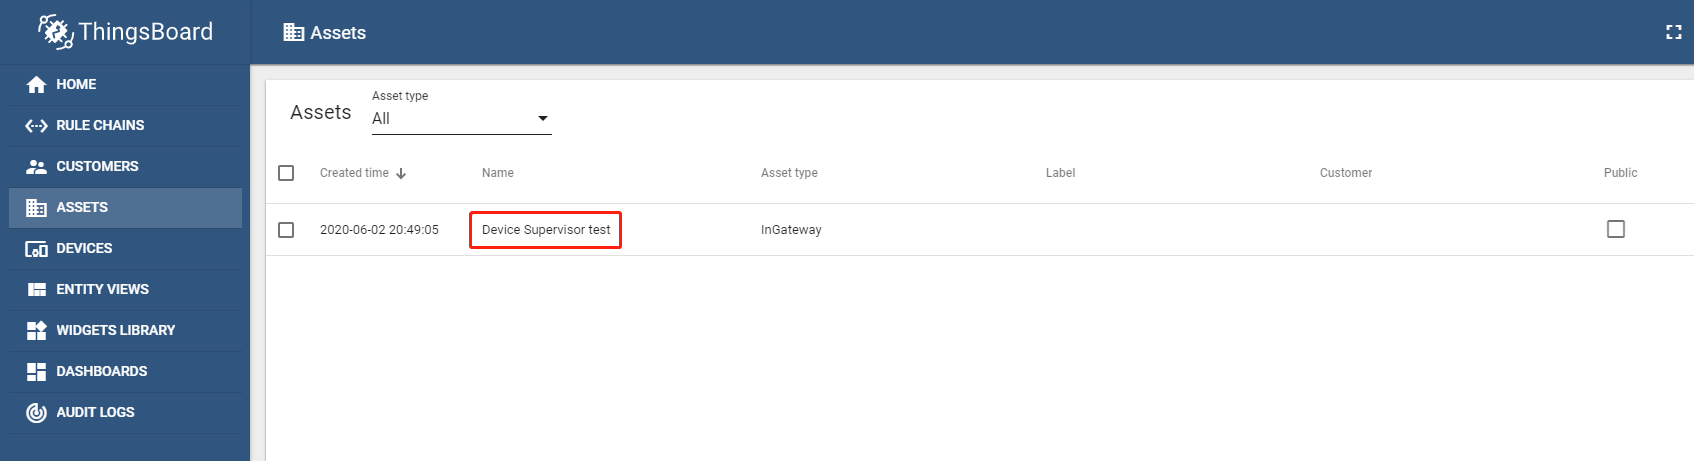
Add an asset

After the asset is added, the page is as follows:
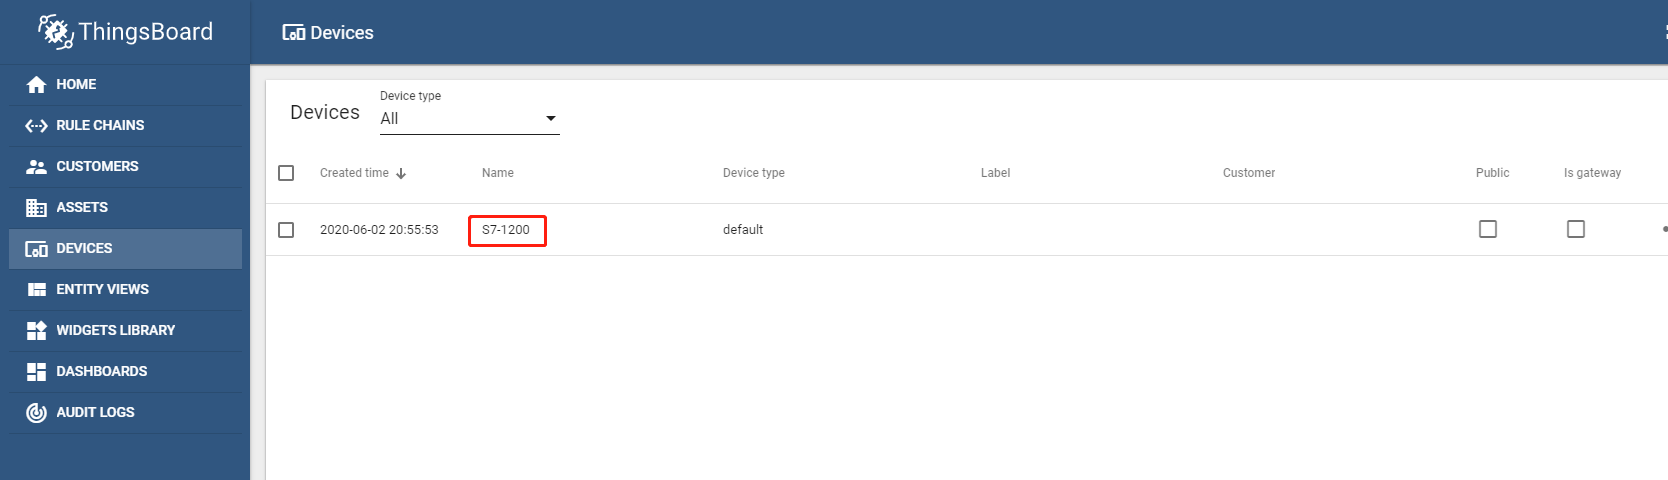
Add a device
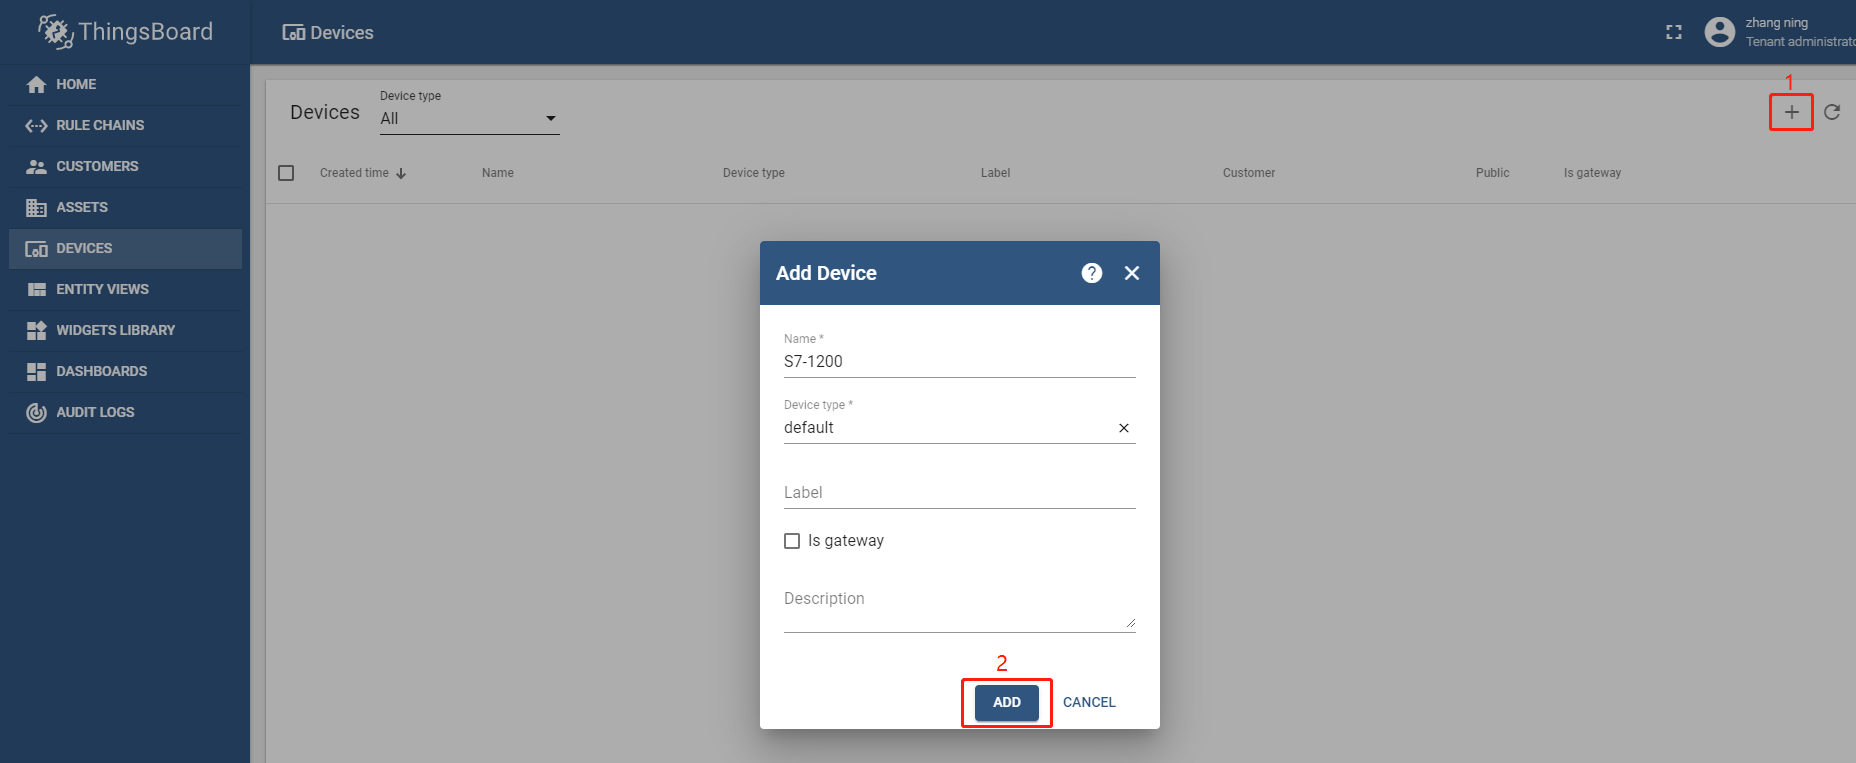
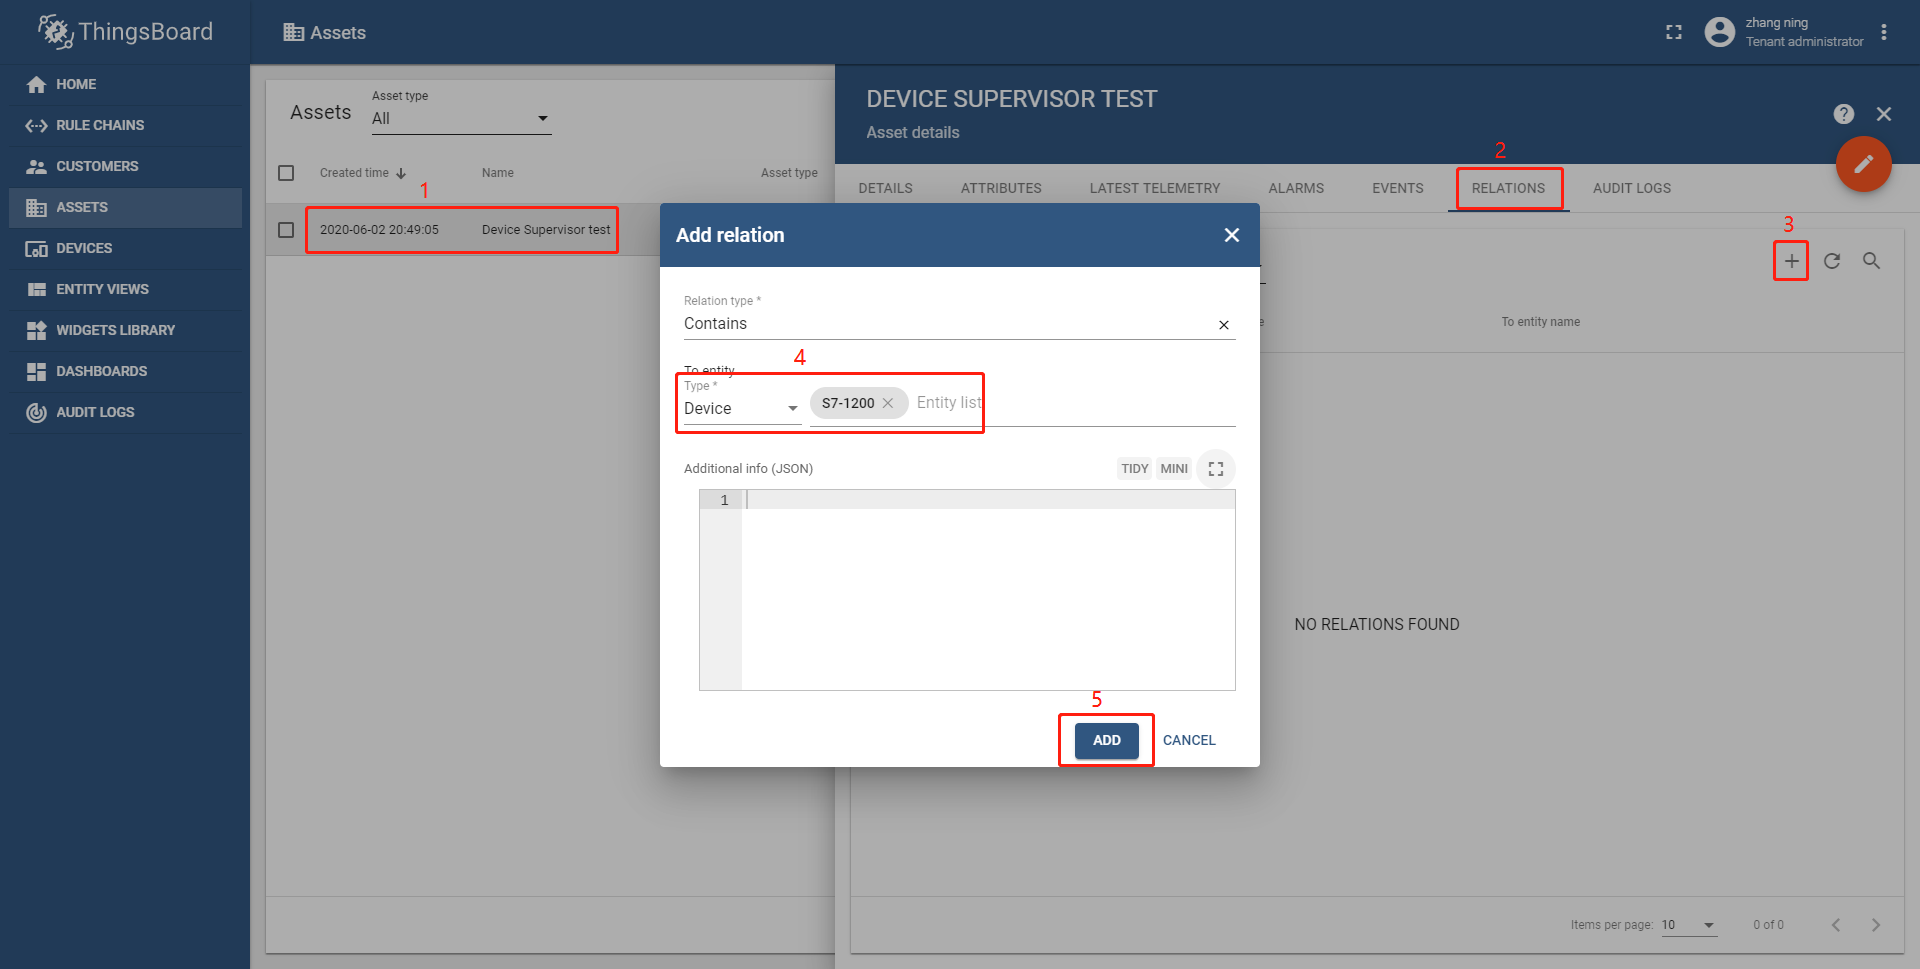
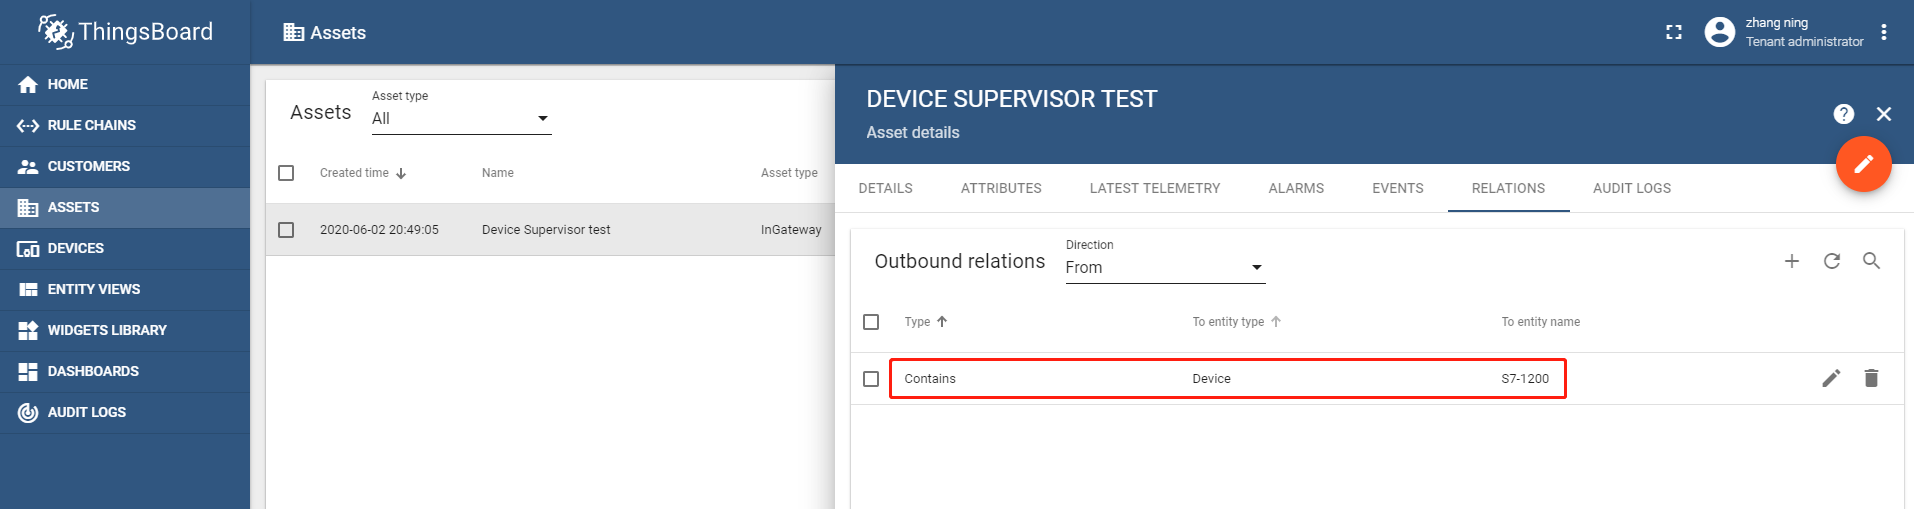
Associate the asset with the device.
After the device is added, the page is as follows:
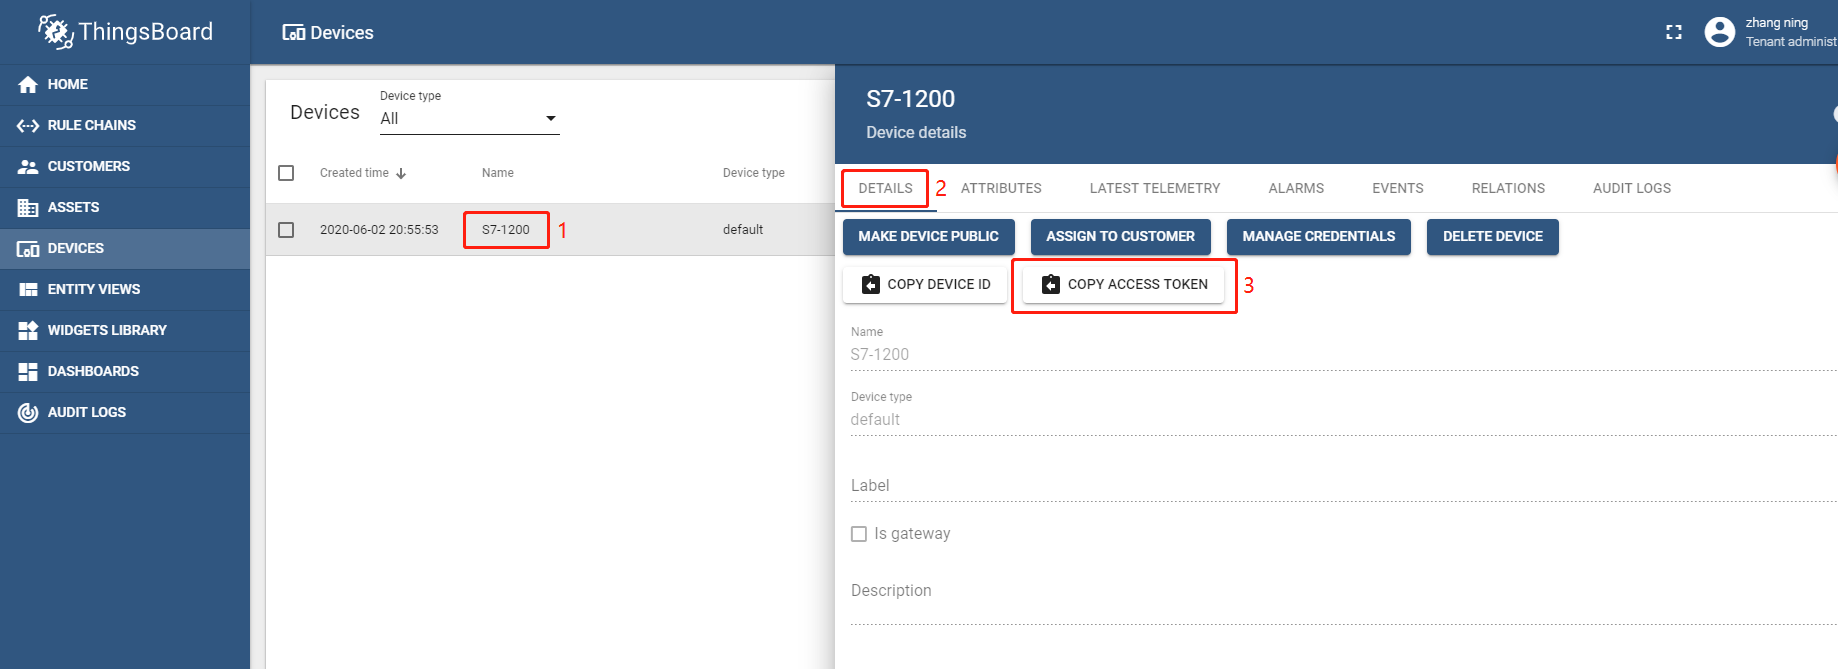
Transmit the PLC data to ThingsBoard devices
After configuring the asset and device, copy the access token of the added device and paste it to the username field on the cloud service page of the gateway, and then transmit the data to the S7-1200 device in ThingsBoard.
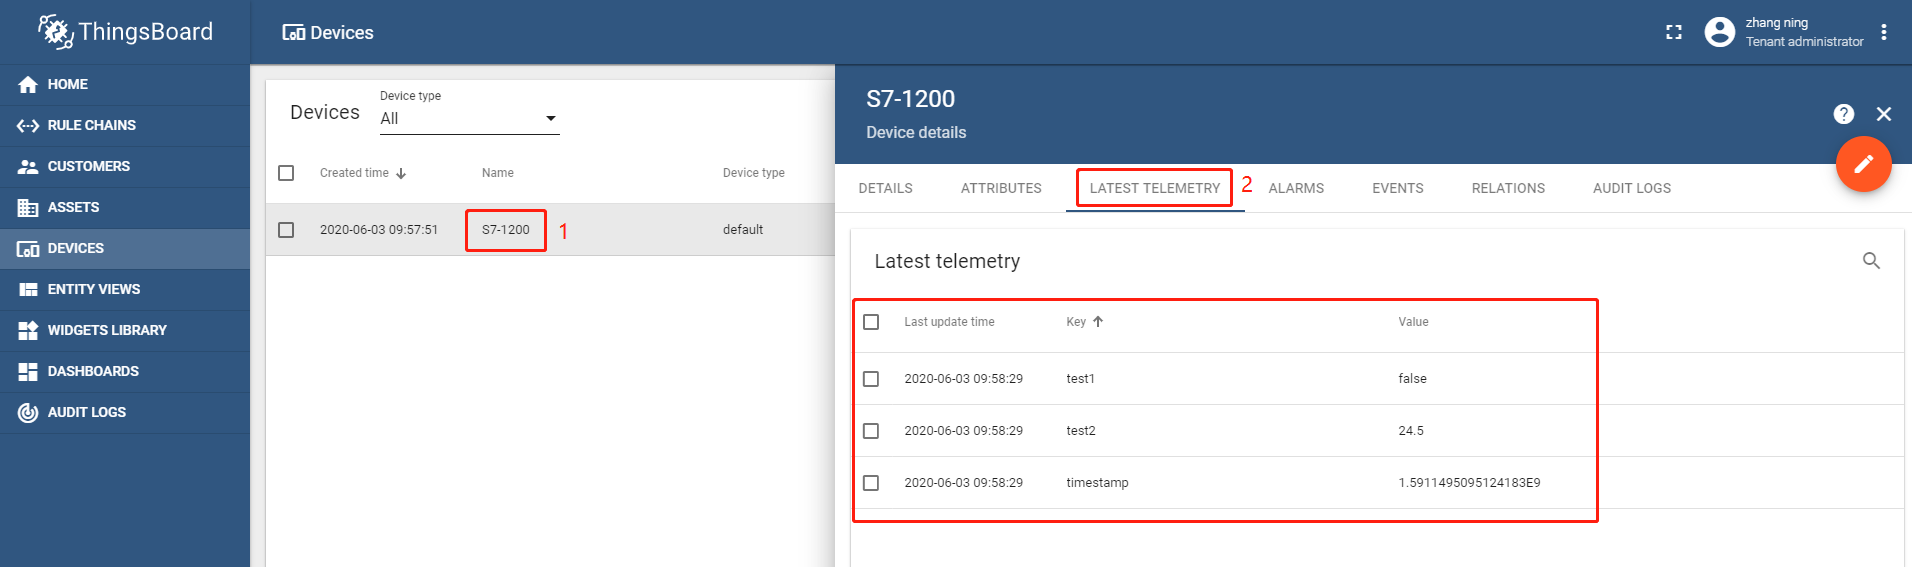
Then, you can view the uploaded data in the latest telemeter of the device.
Configure a visual dashboard
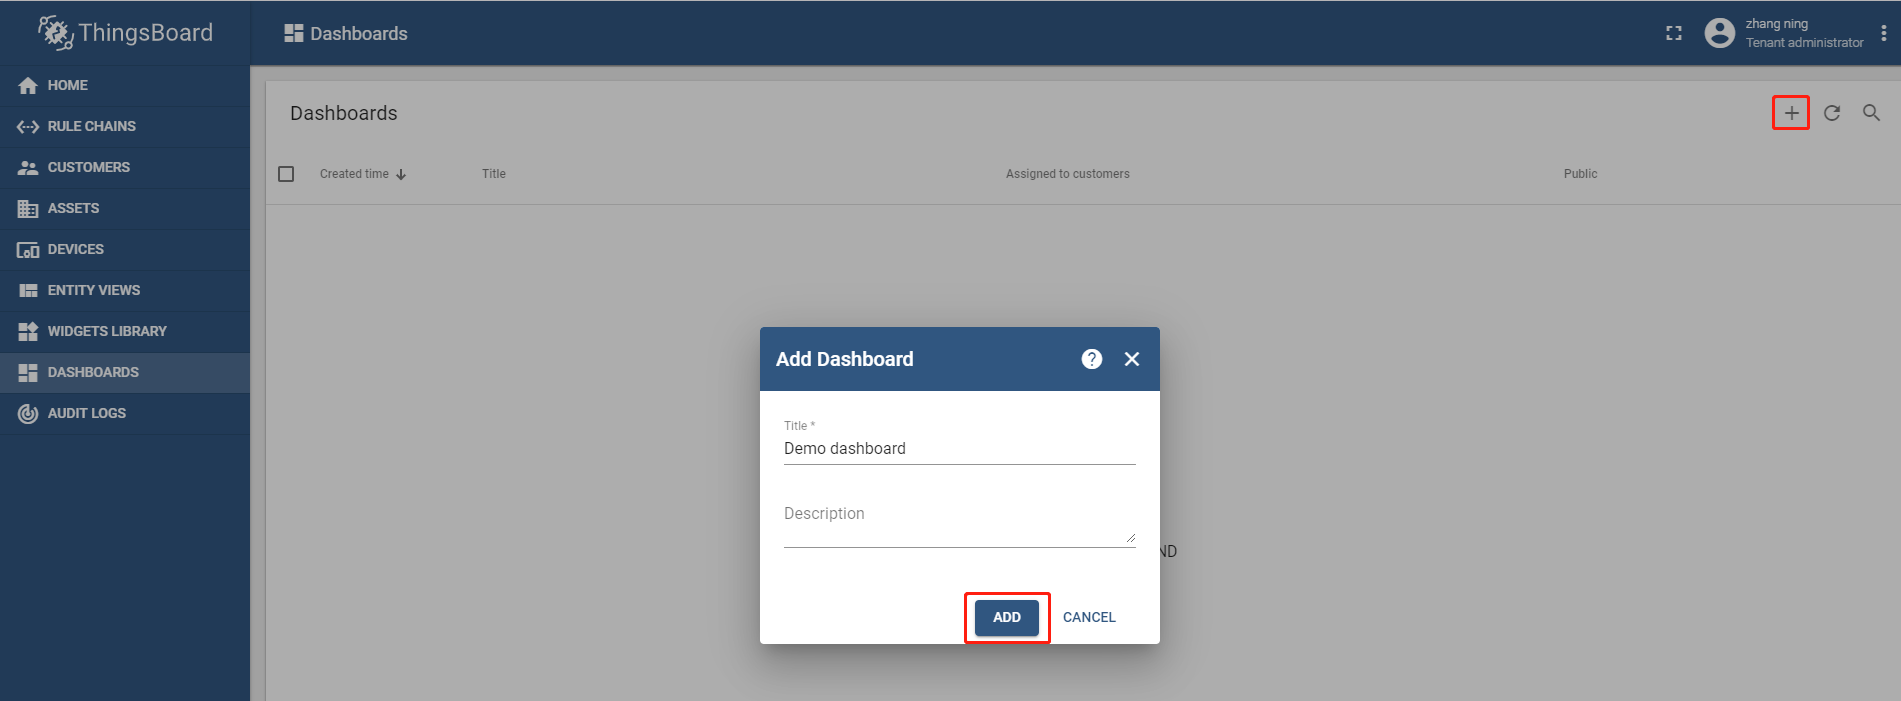
Add a dashboard
Click Add Dashboard and select Create new dashboard. On the Add Dashboard page, configure and add a dashboard.
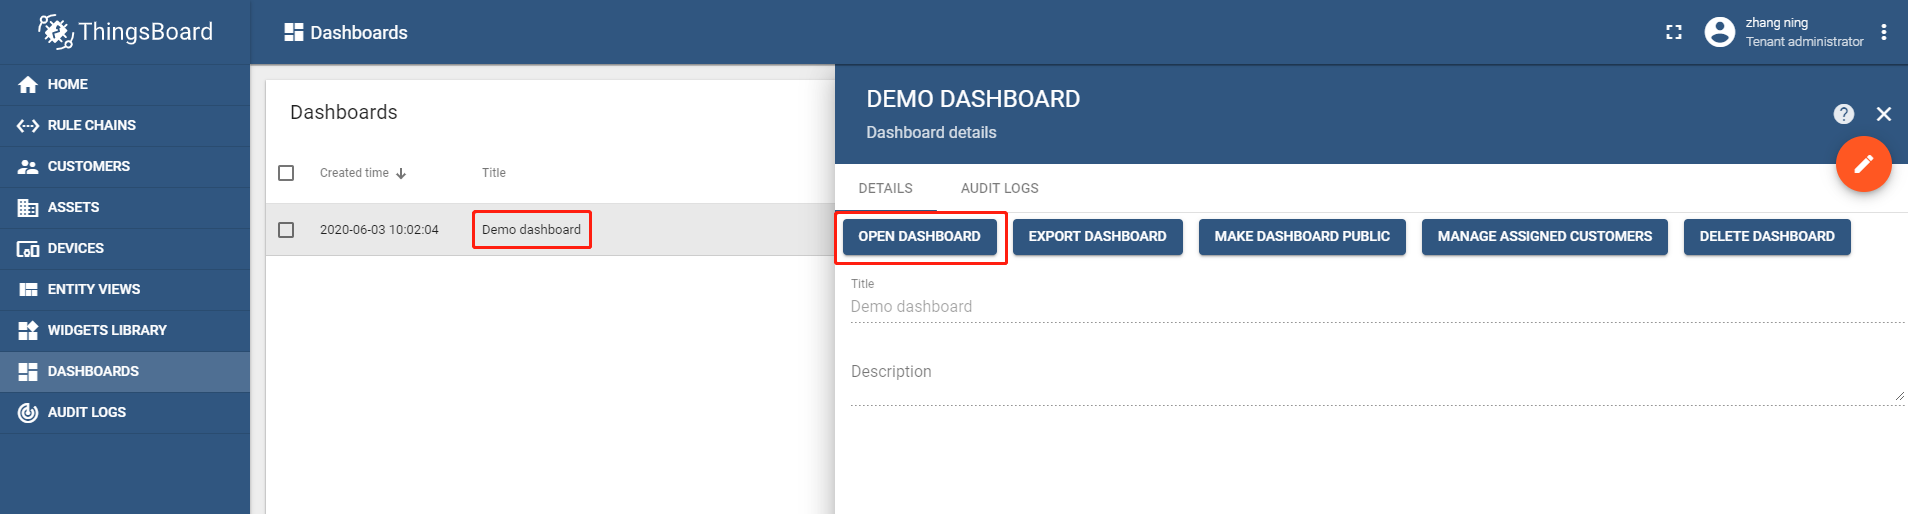
Then, click the dashboard name, and select OPEN DASHBOARD.
Click Enter edit mode.
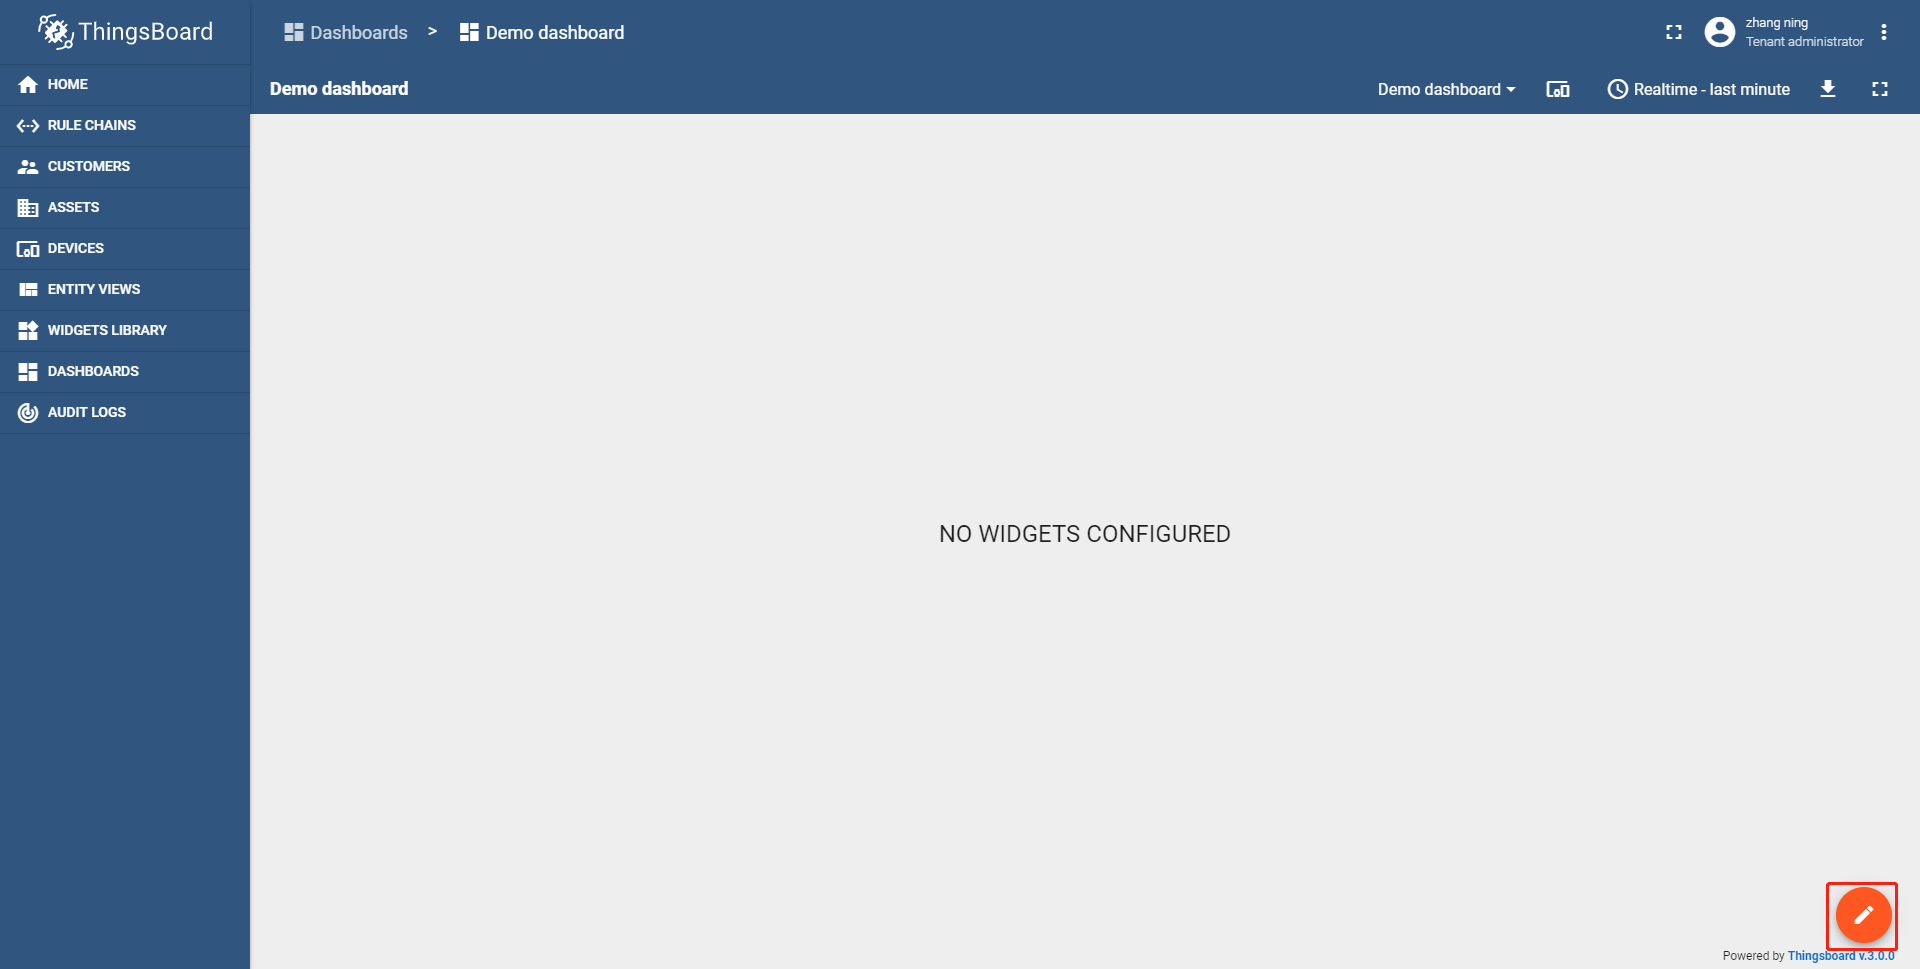
Click Entity aliases to add an entity alias for the dashboard.
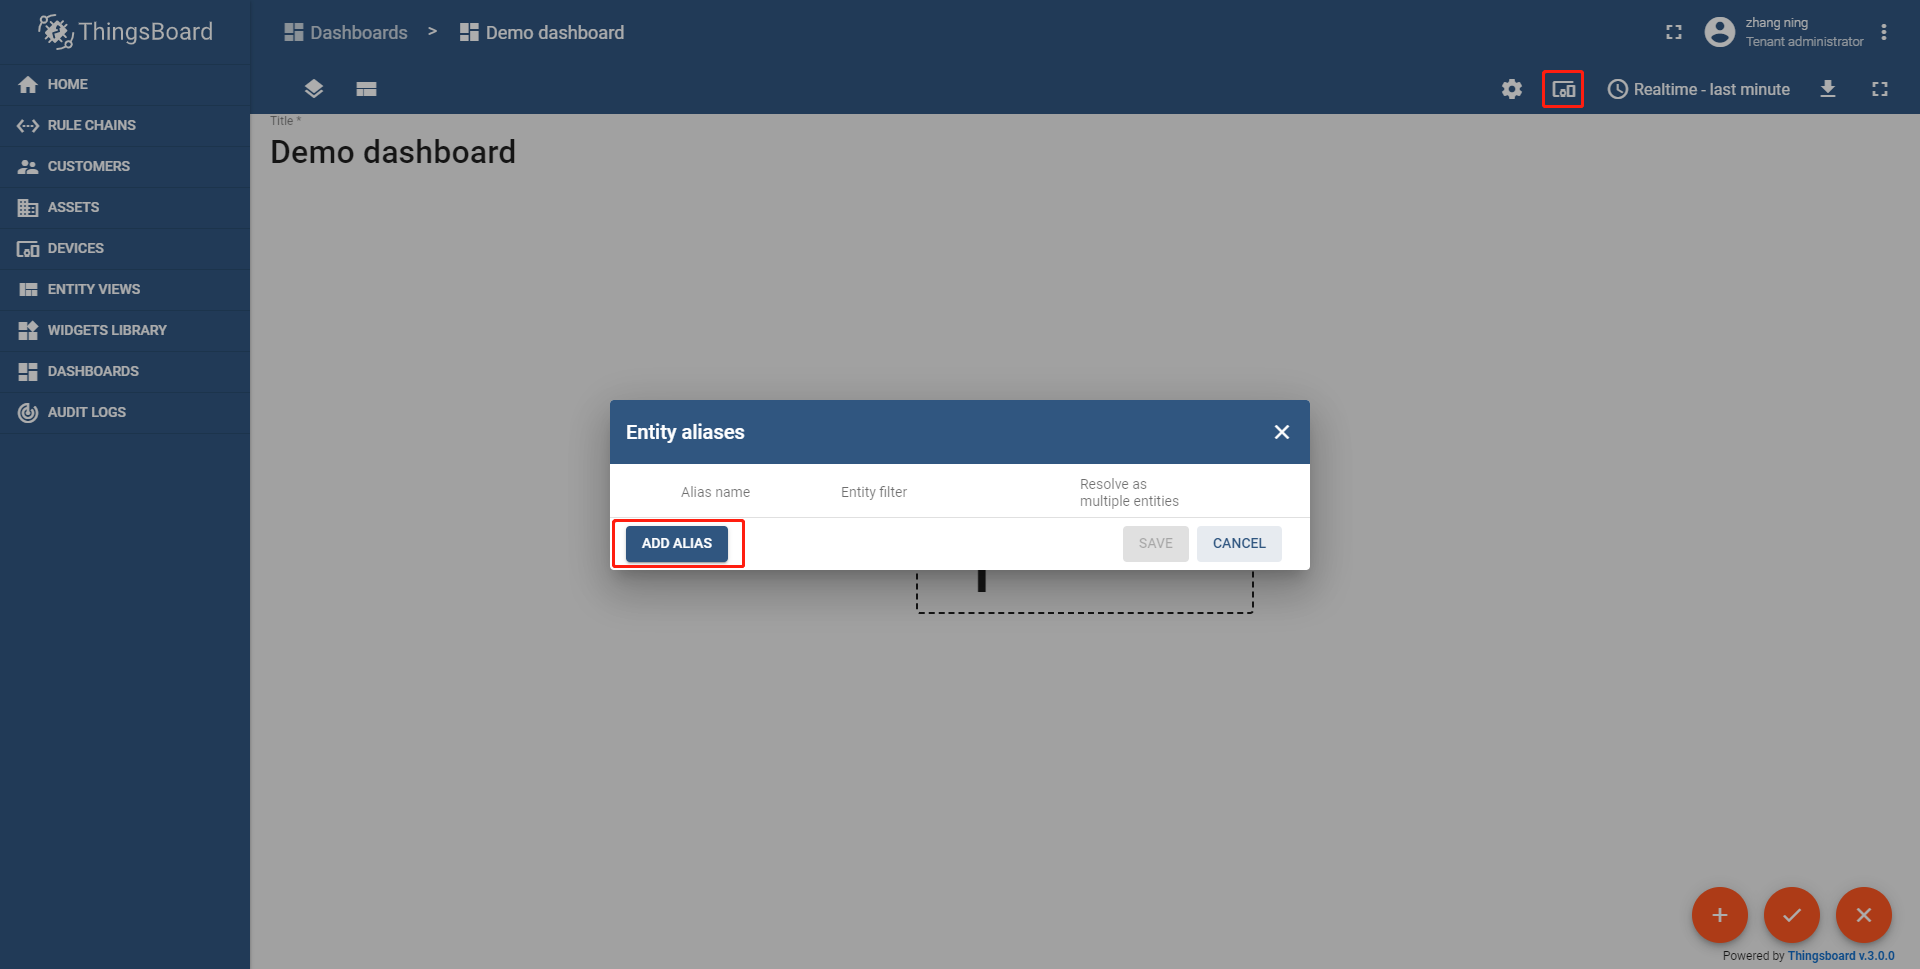
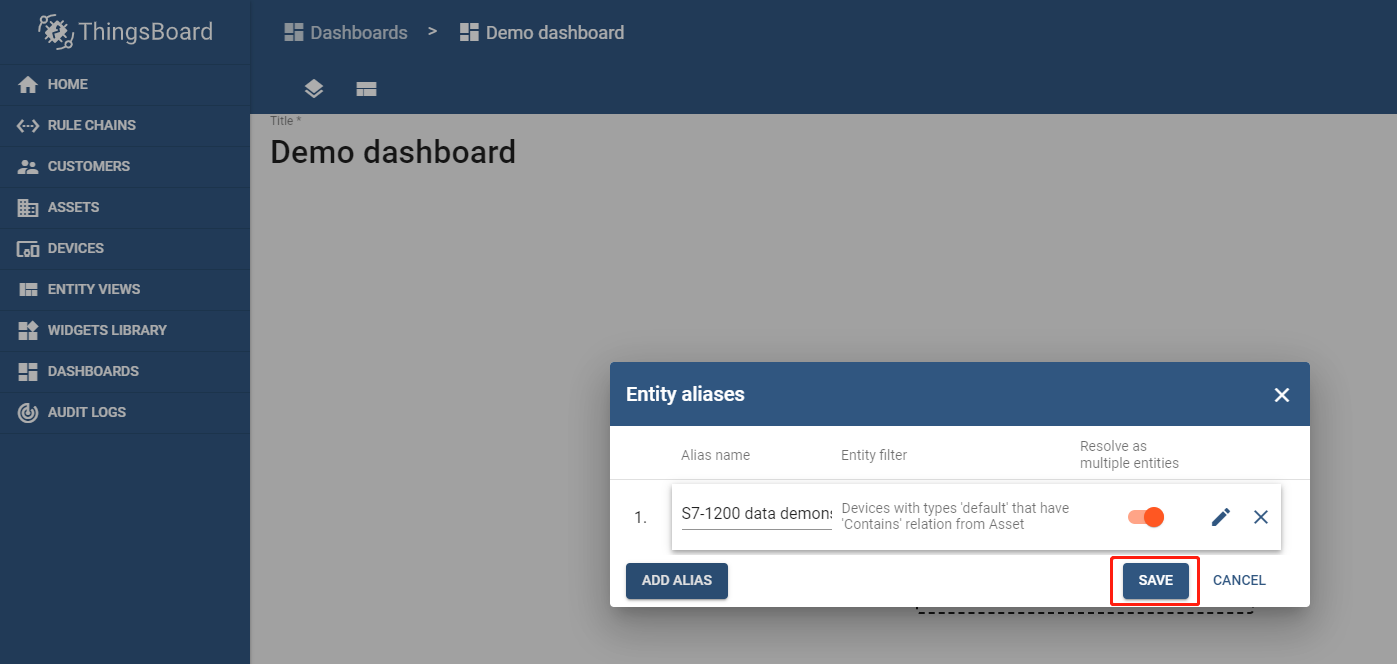
On the Entity Alias page, configure it according to the following figure:
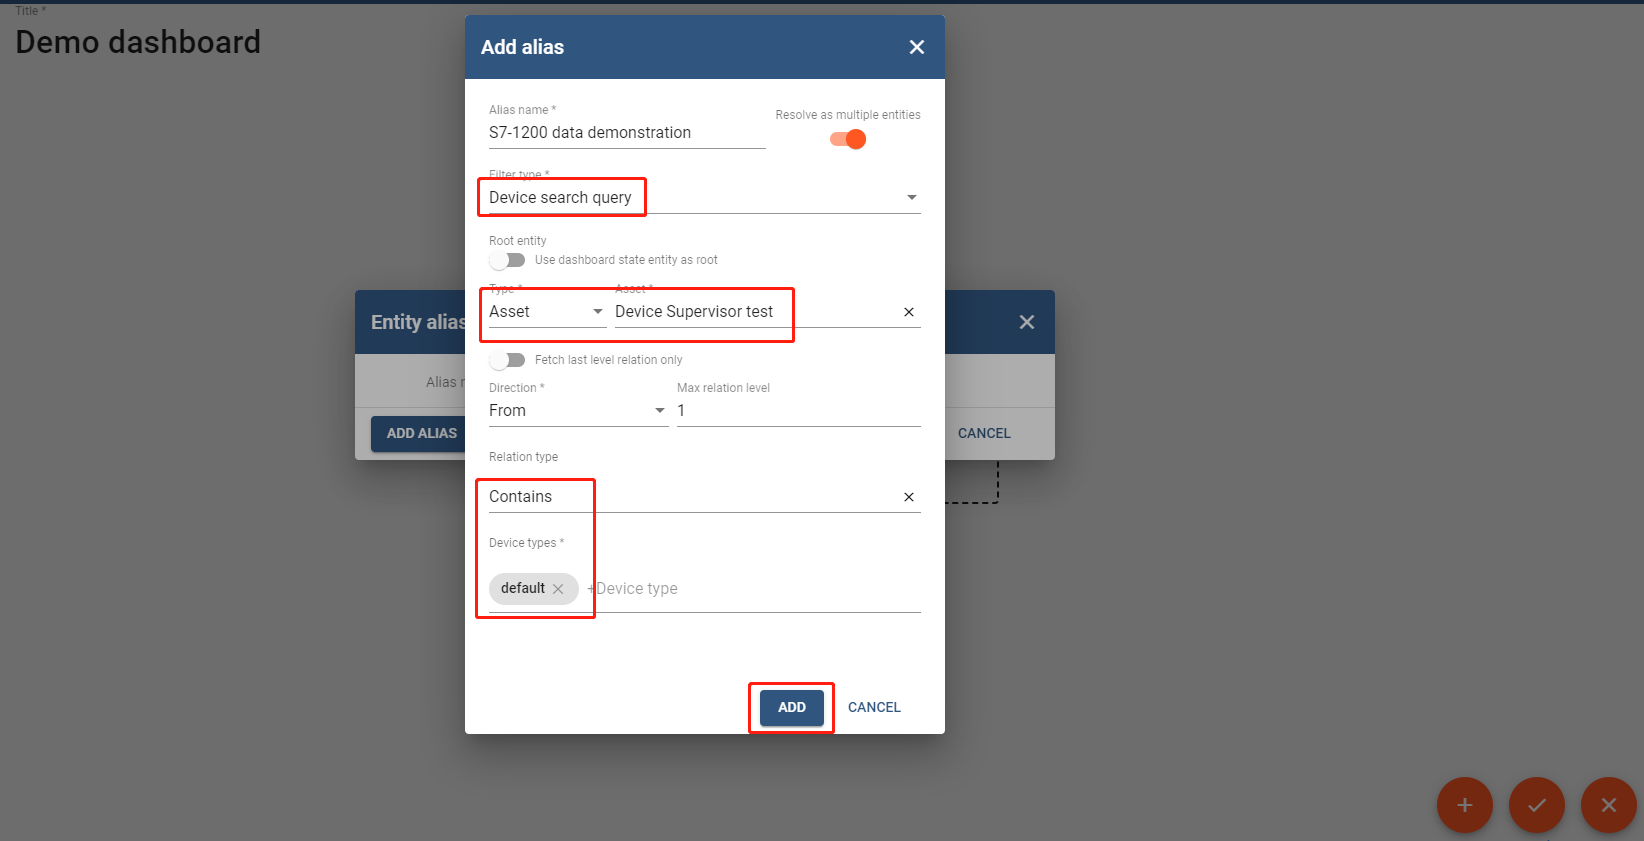
Save it after configuration.
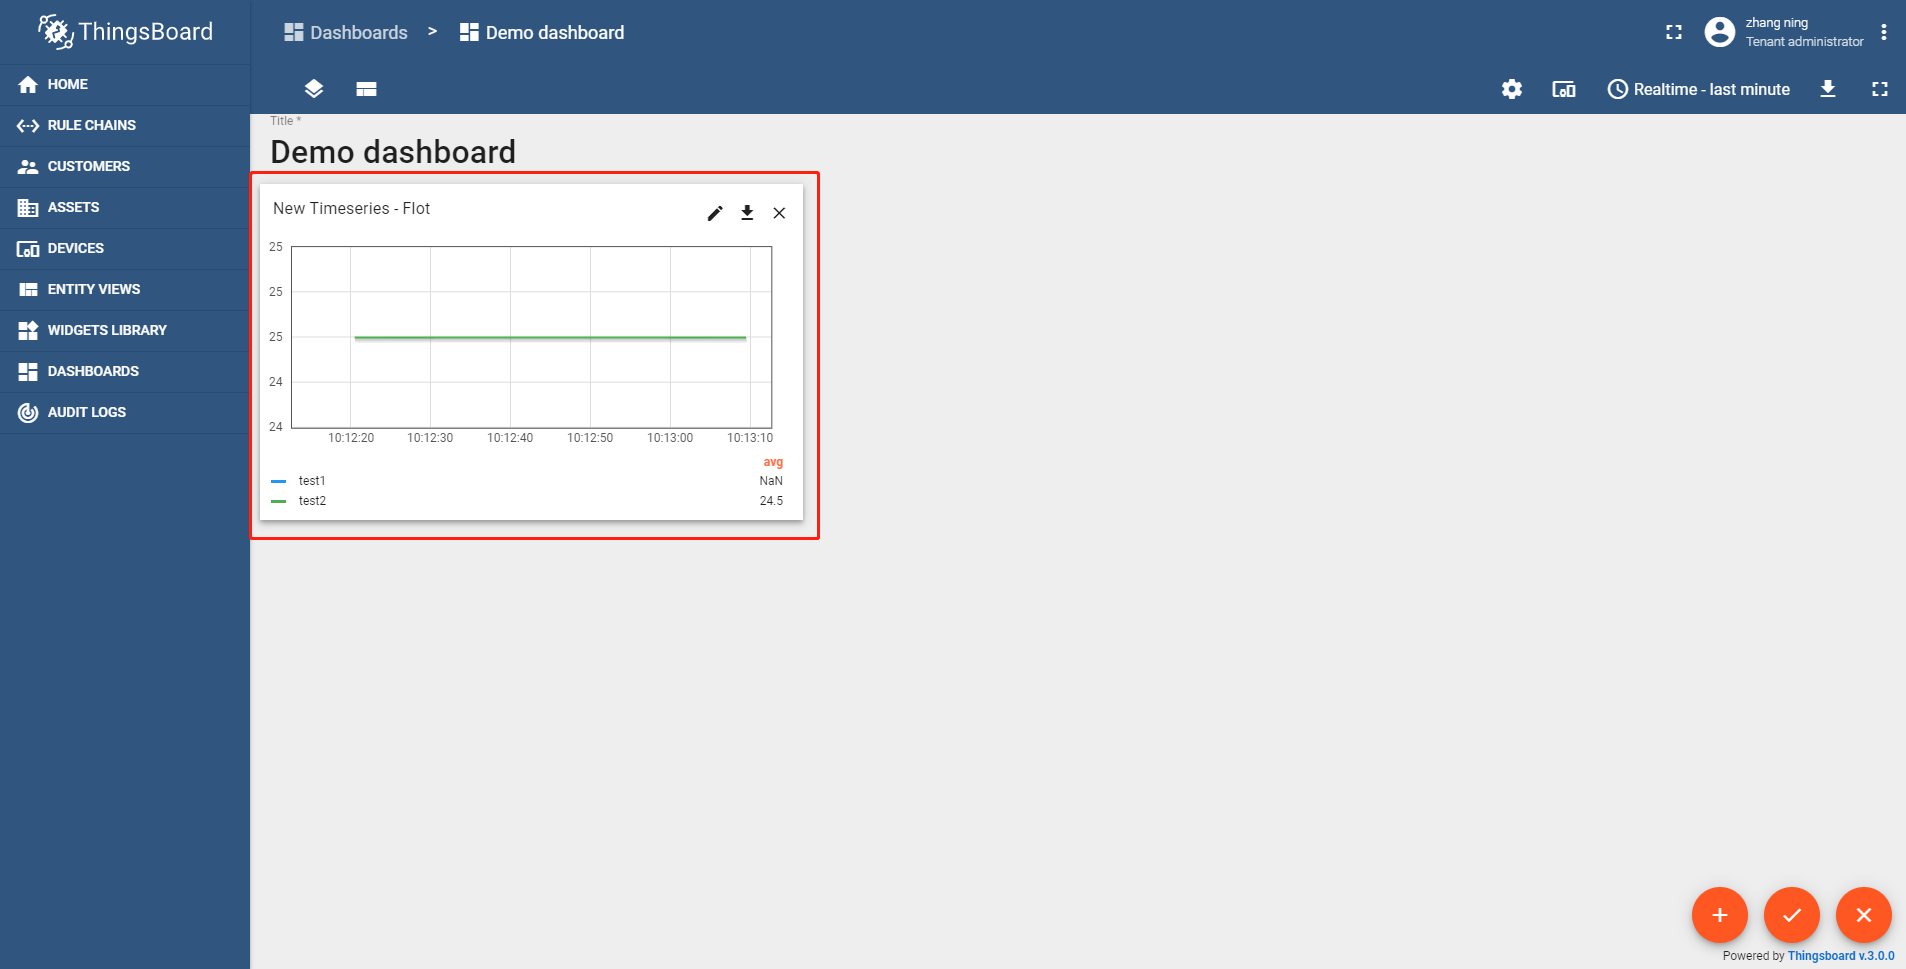
Add a trend chart
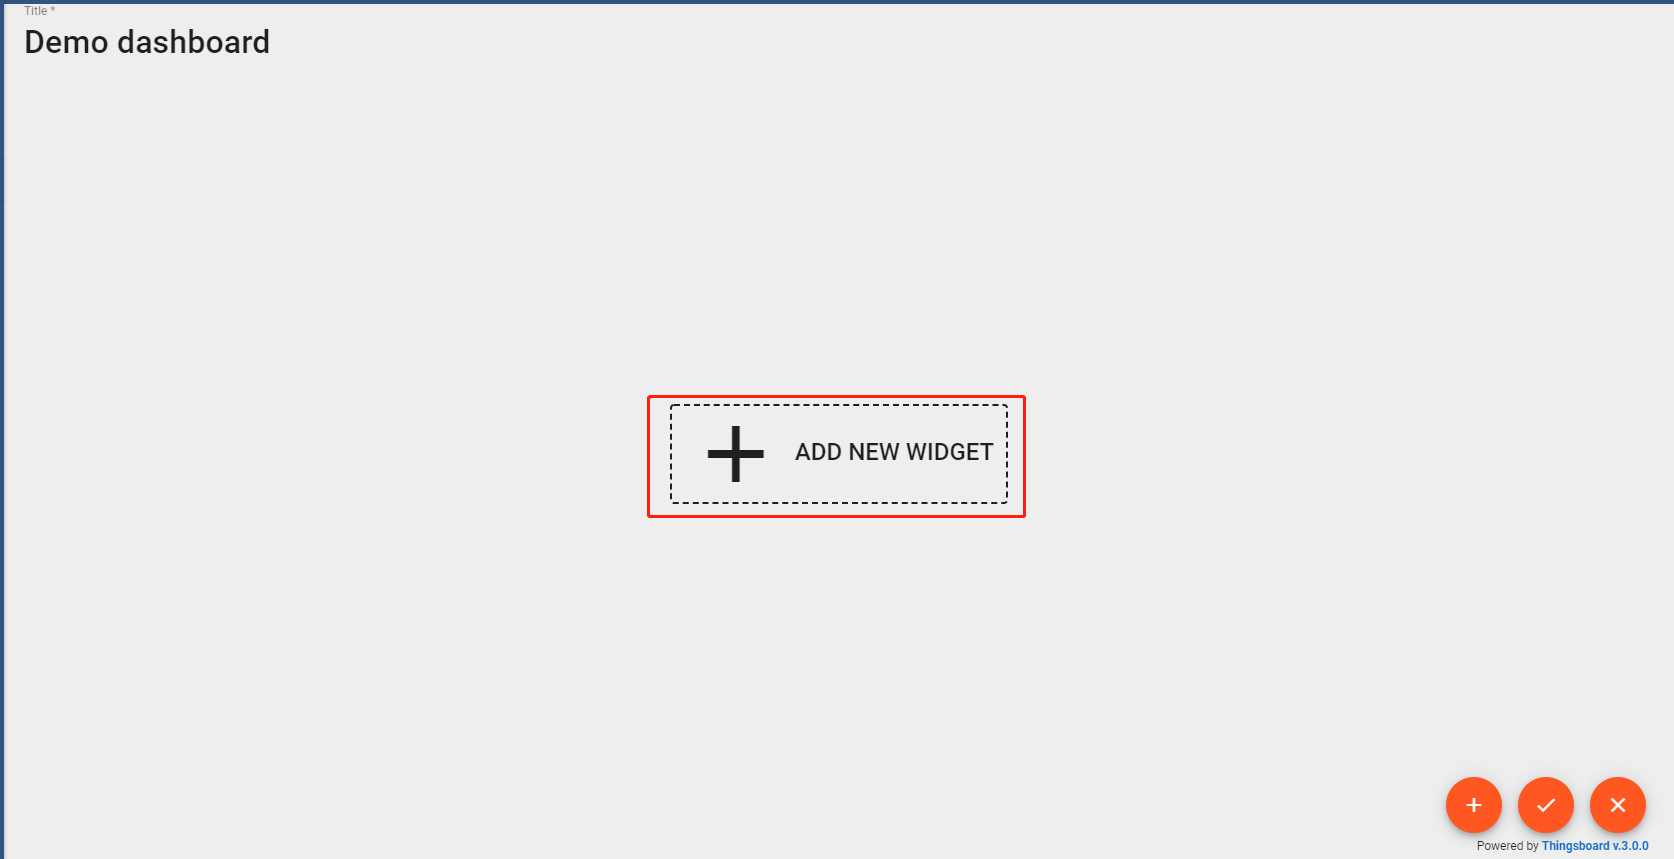
On the dashboard page, click Enter edit mode and then click Add new widget.
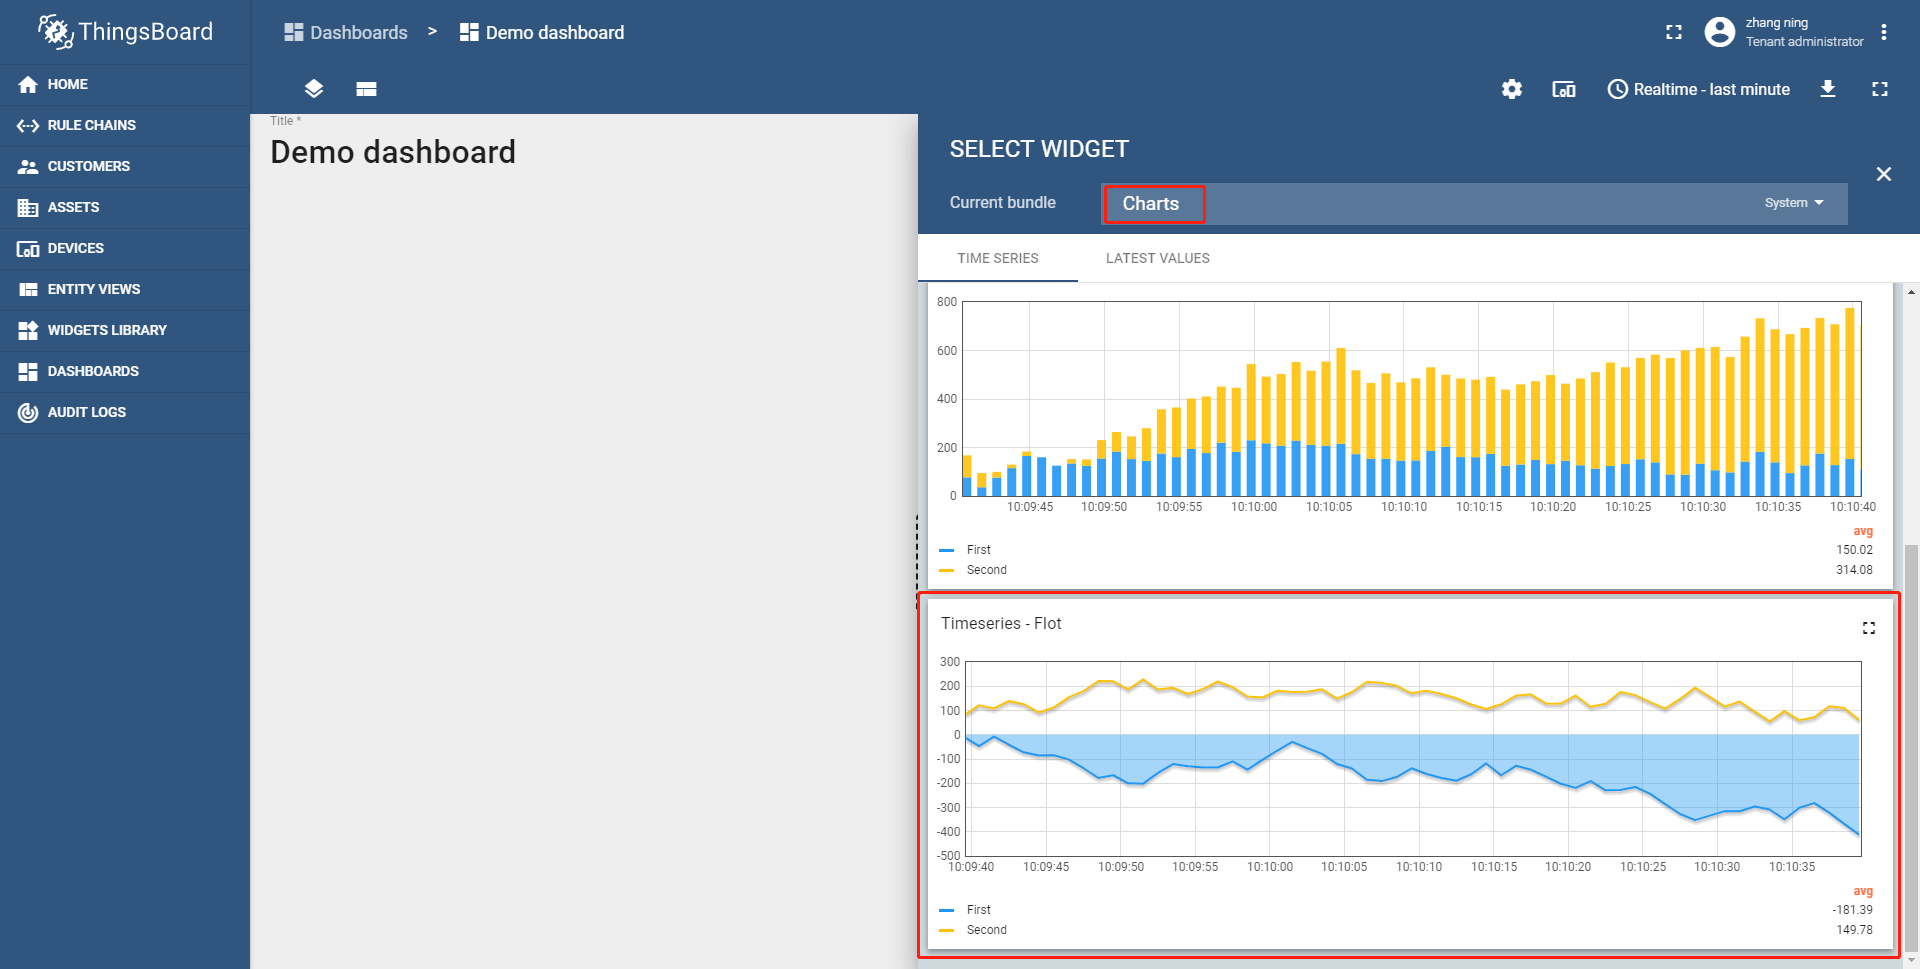
Select Charts from components and click Timeseries-Flot.
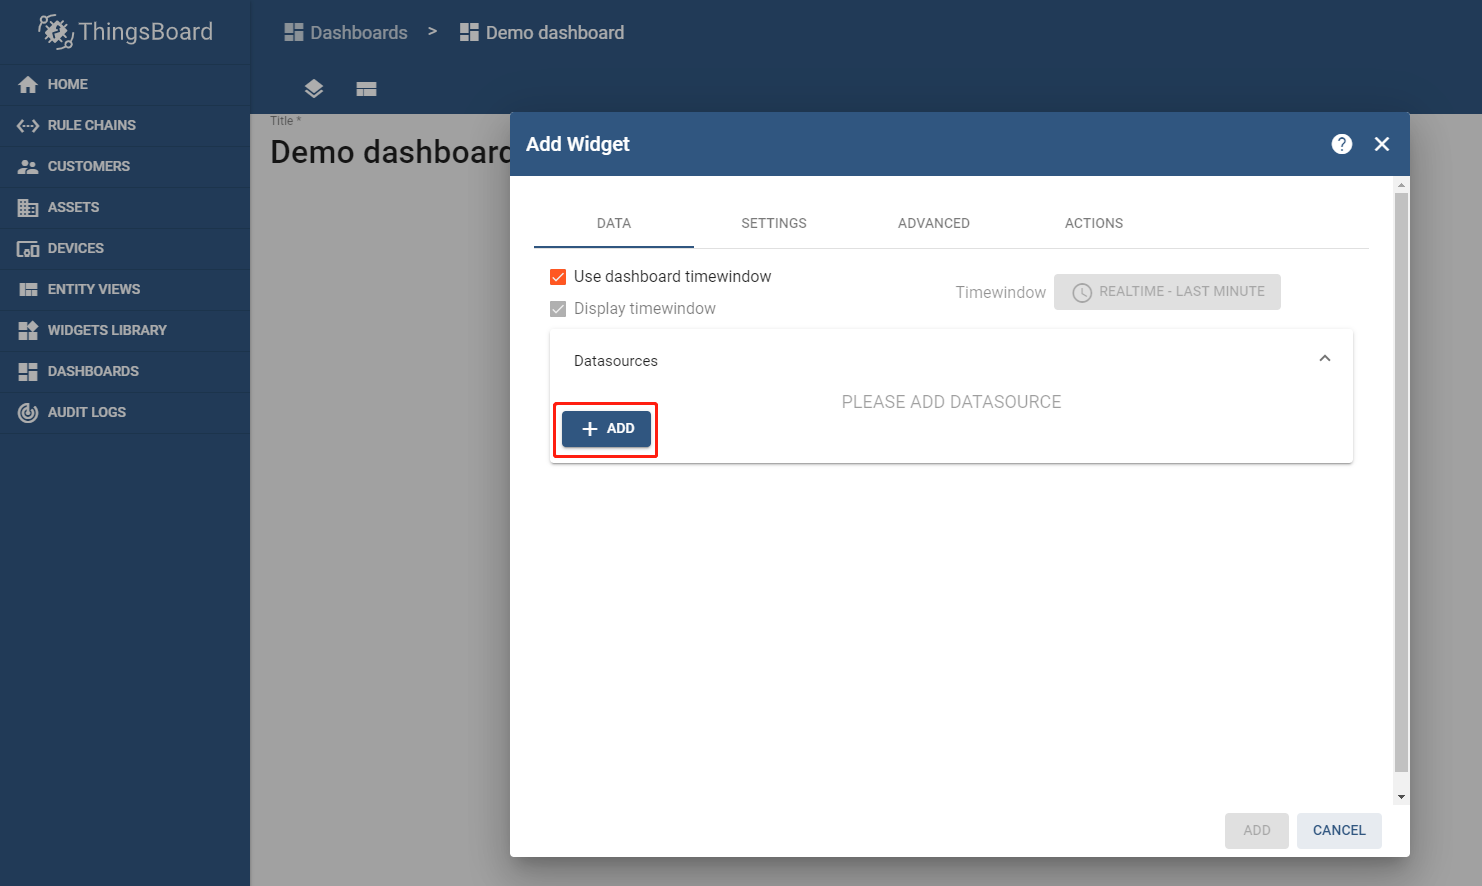
On the DATA page of the chart, add data to the trend chart.
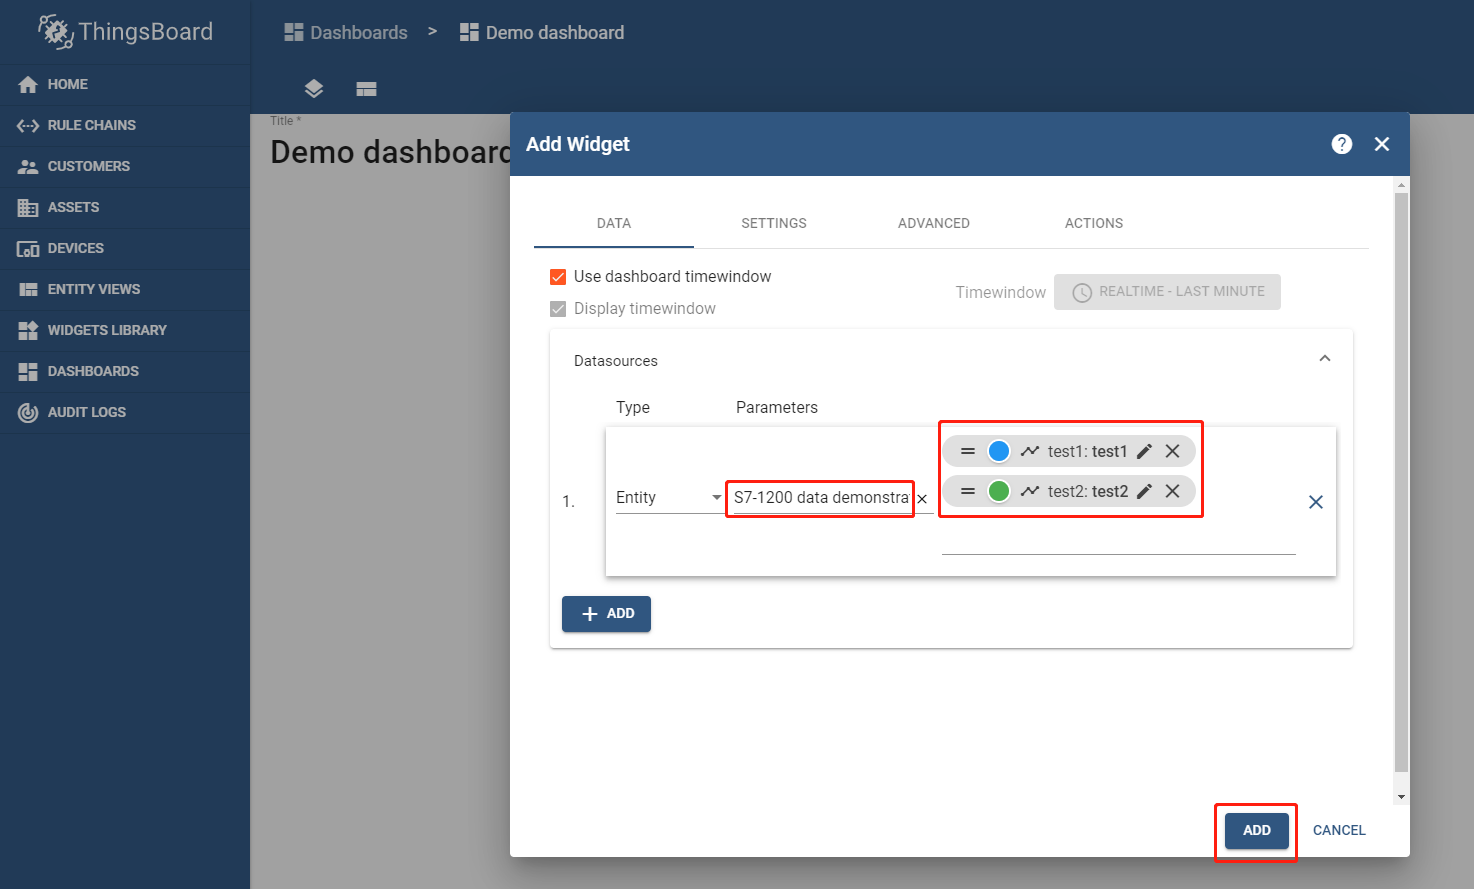
After the data is added, the page is as follows:
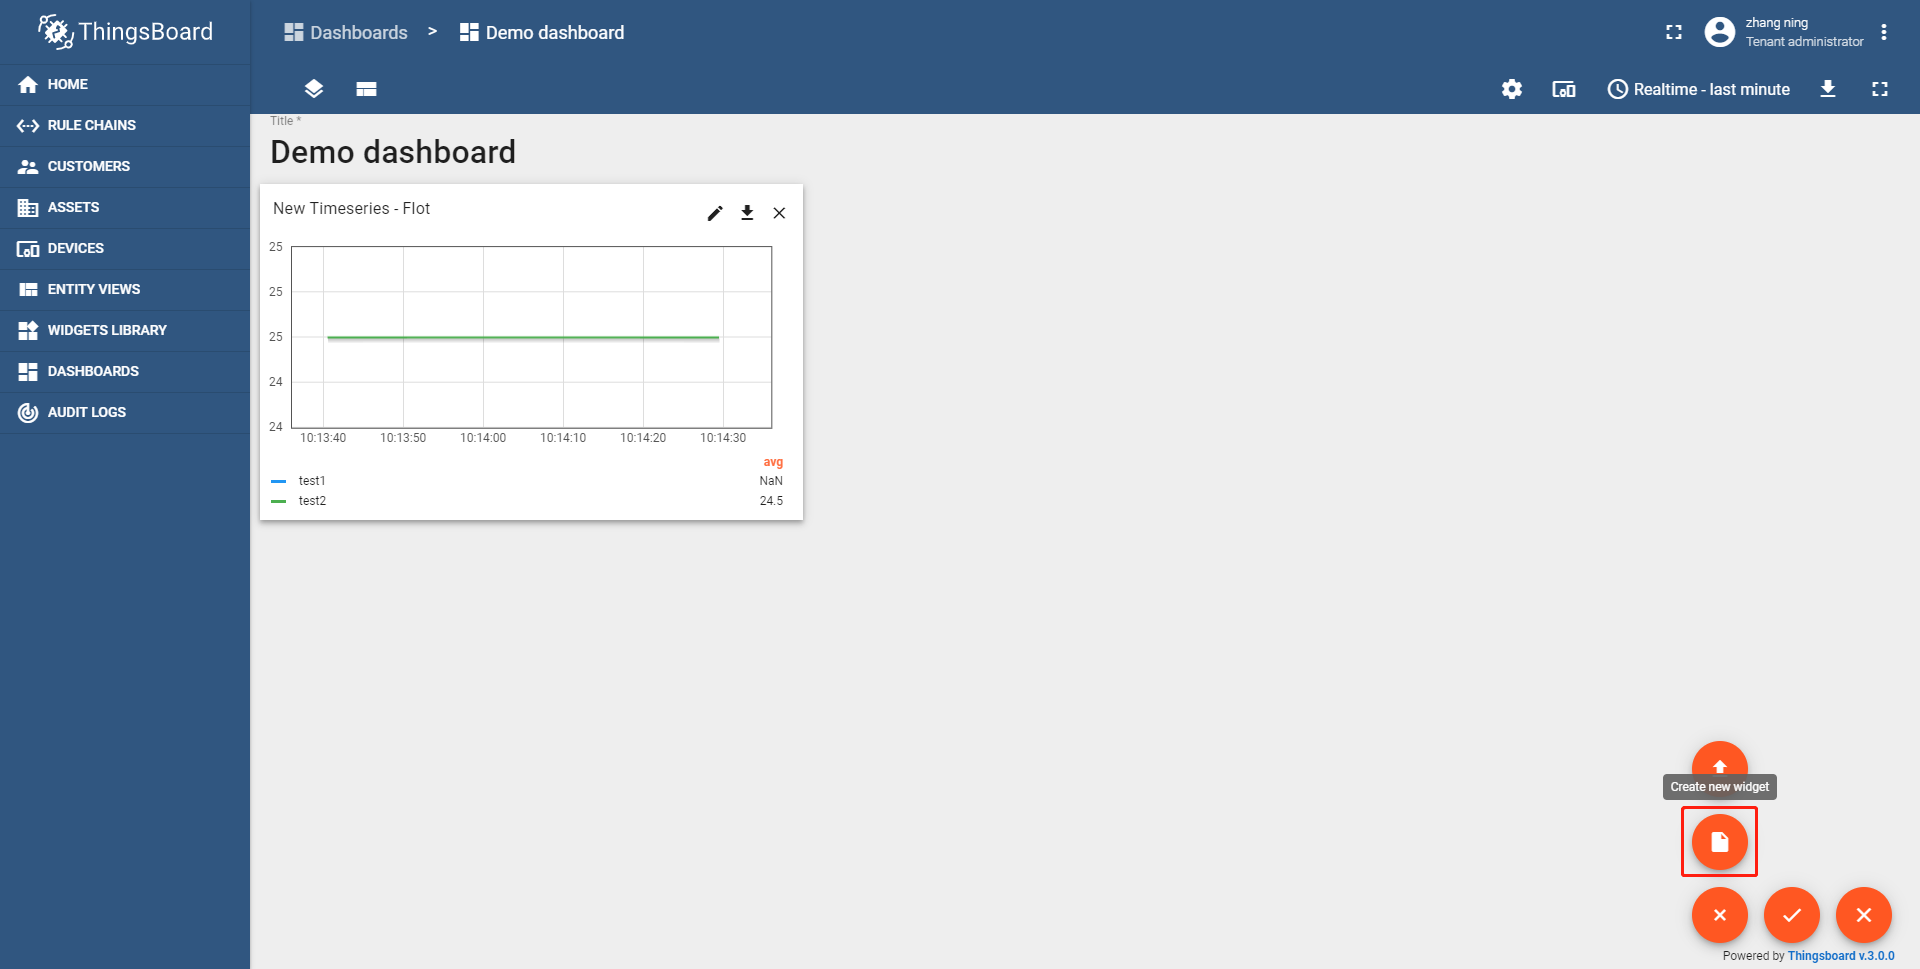
Add a switch
Click Add new widget, select Create new widget, and add a control switch.
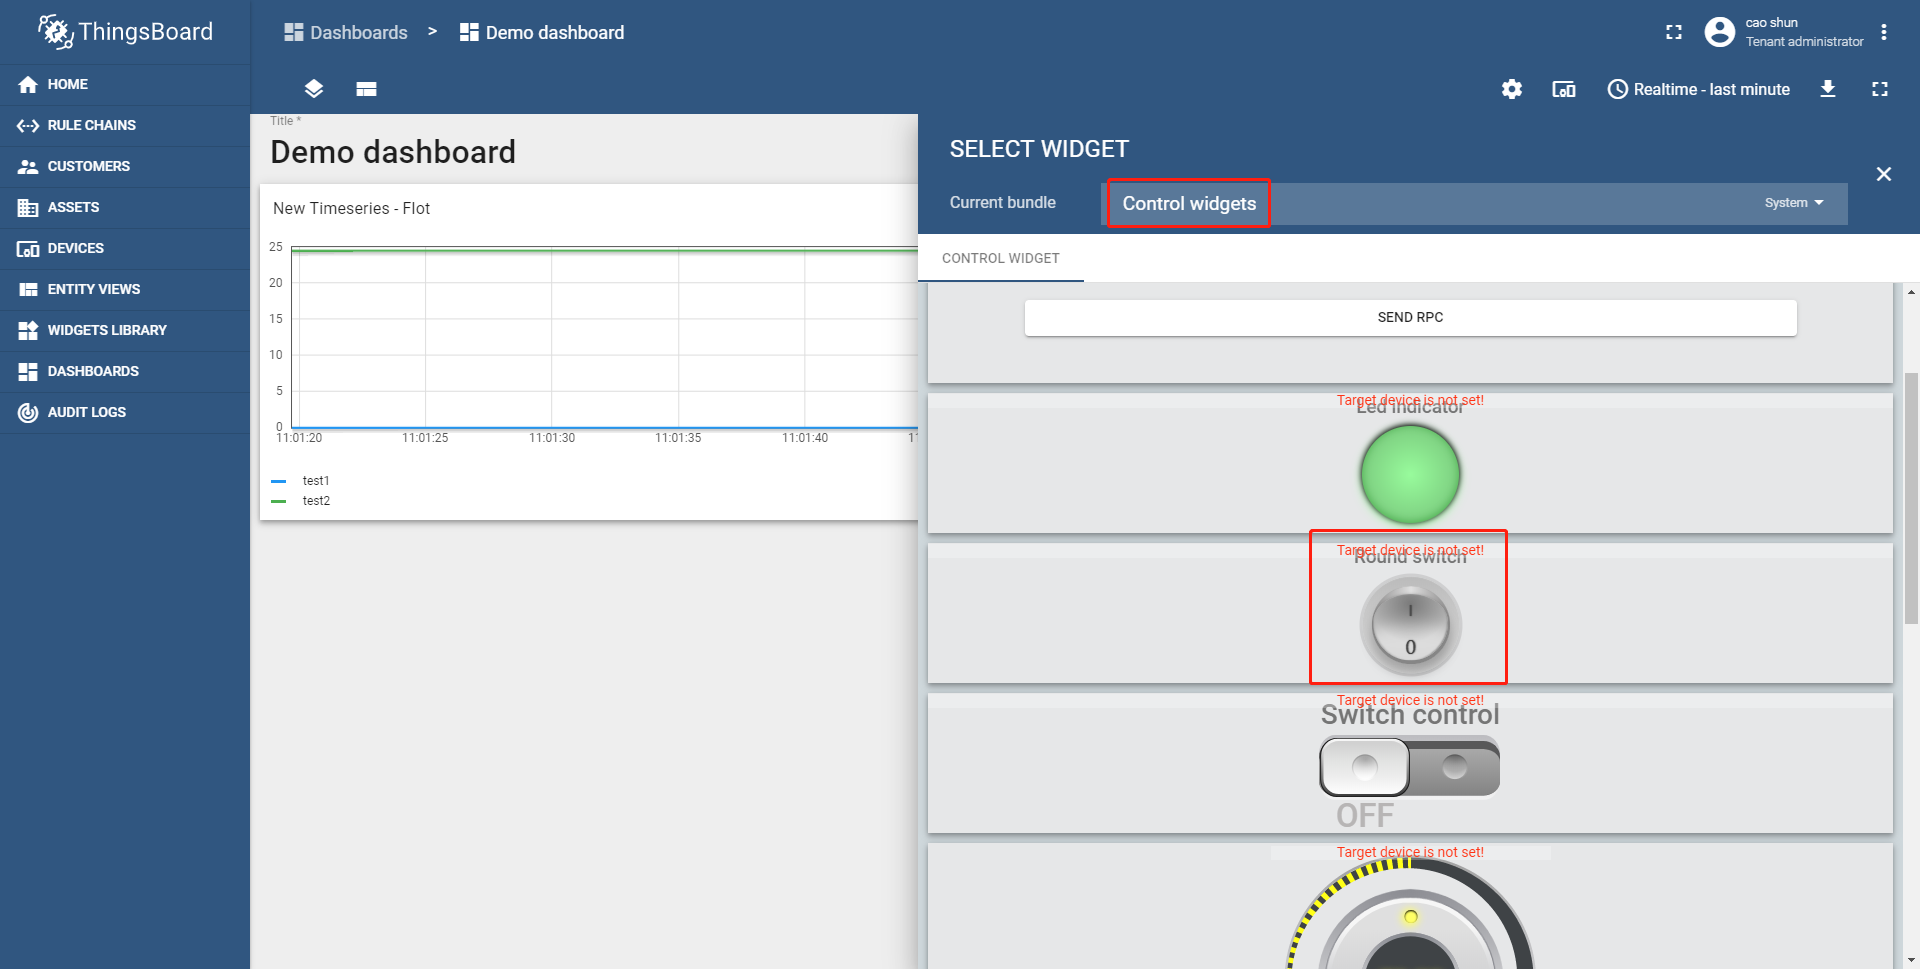
Select Control widgets from components, and click Round switch.
Select the target device.
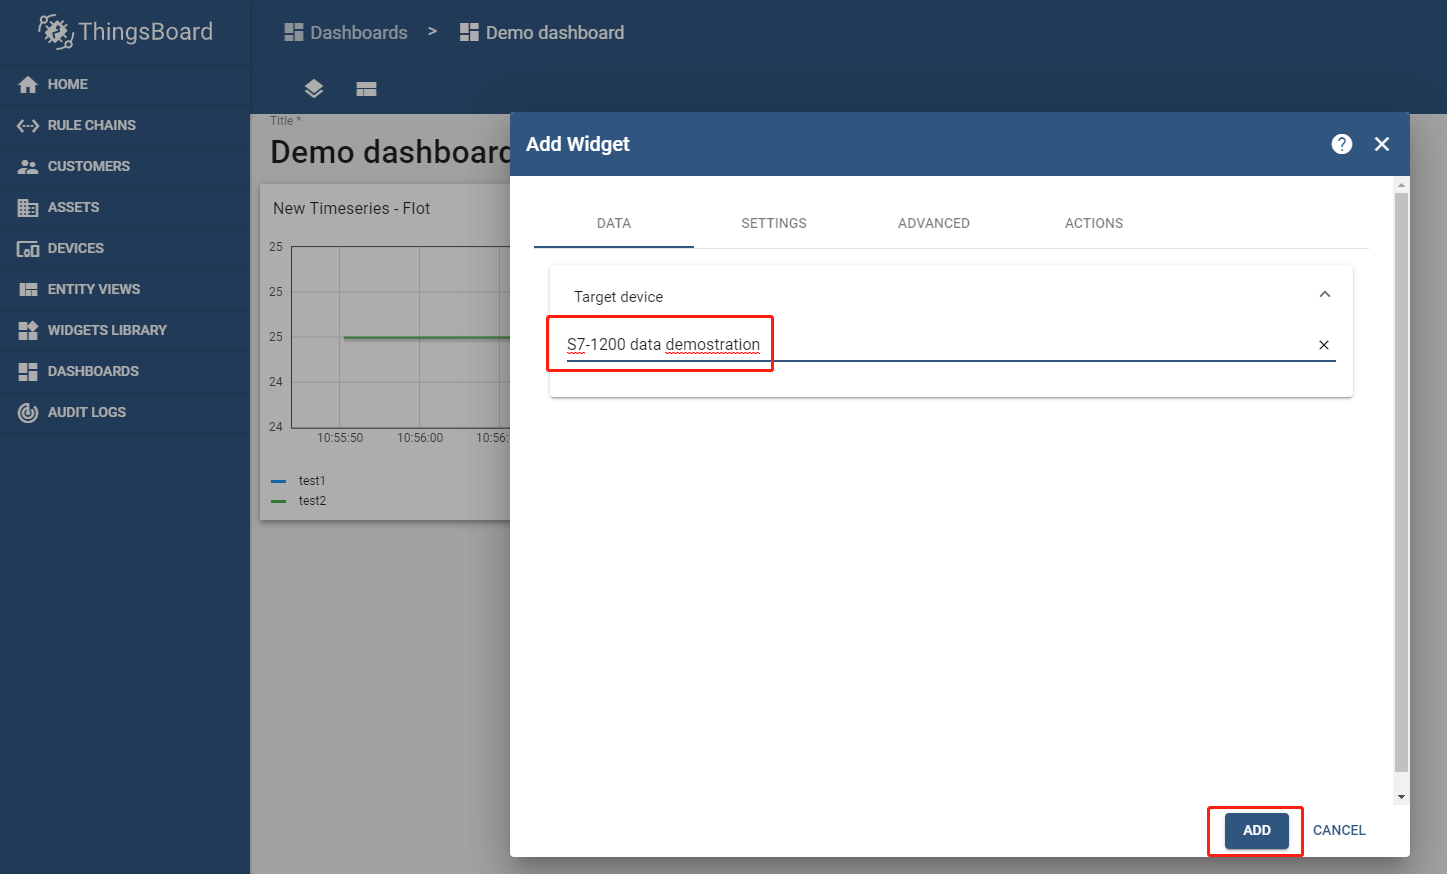
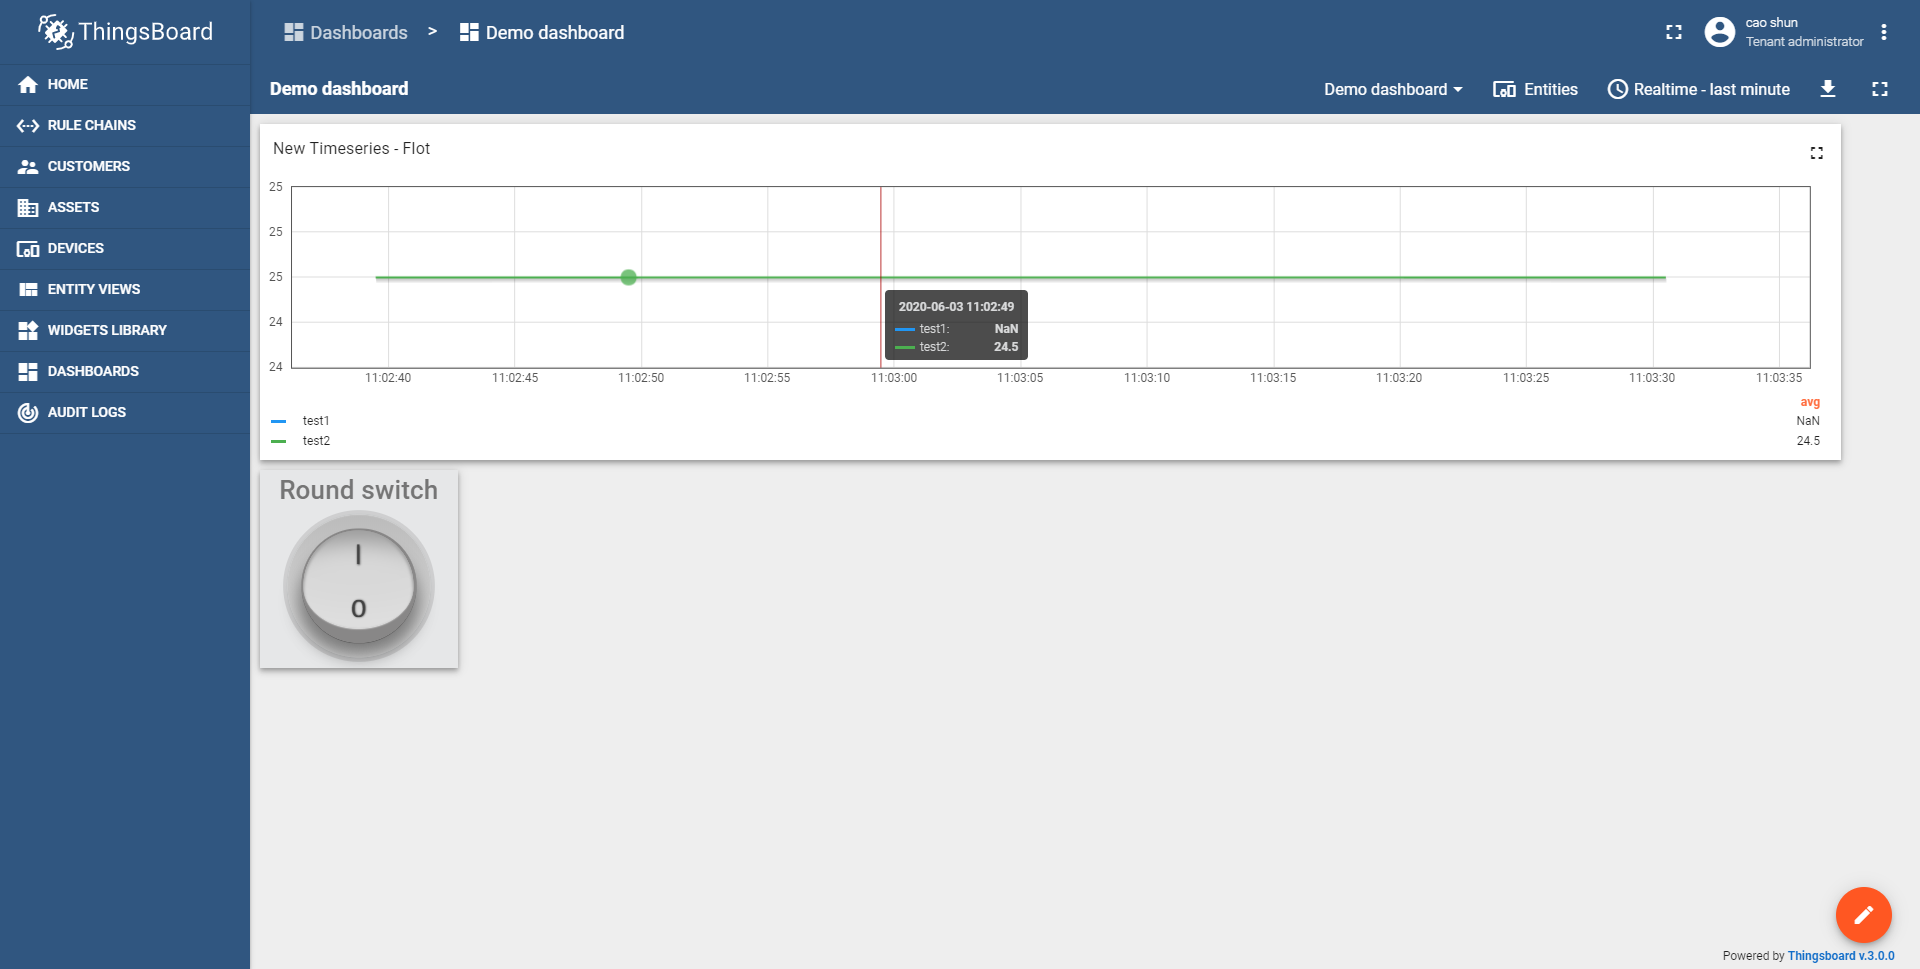
After configuration, adjust the component size and layout, and save the configuration.
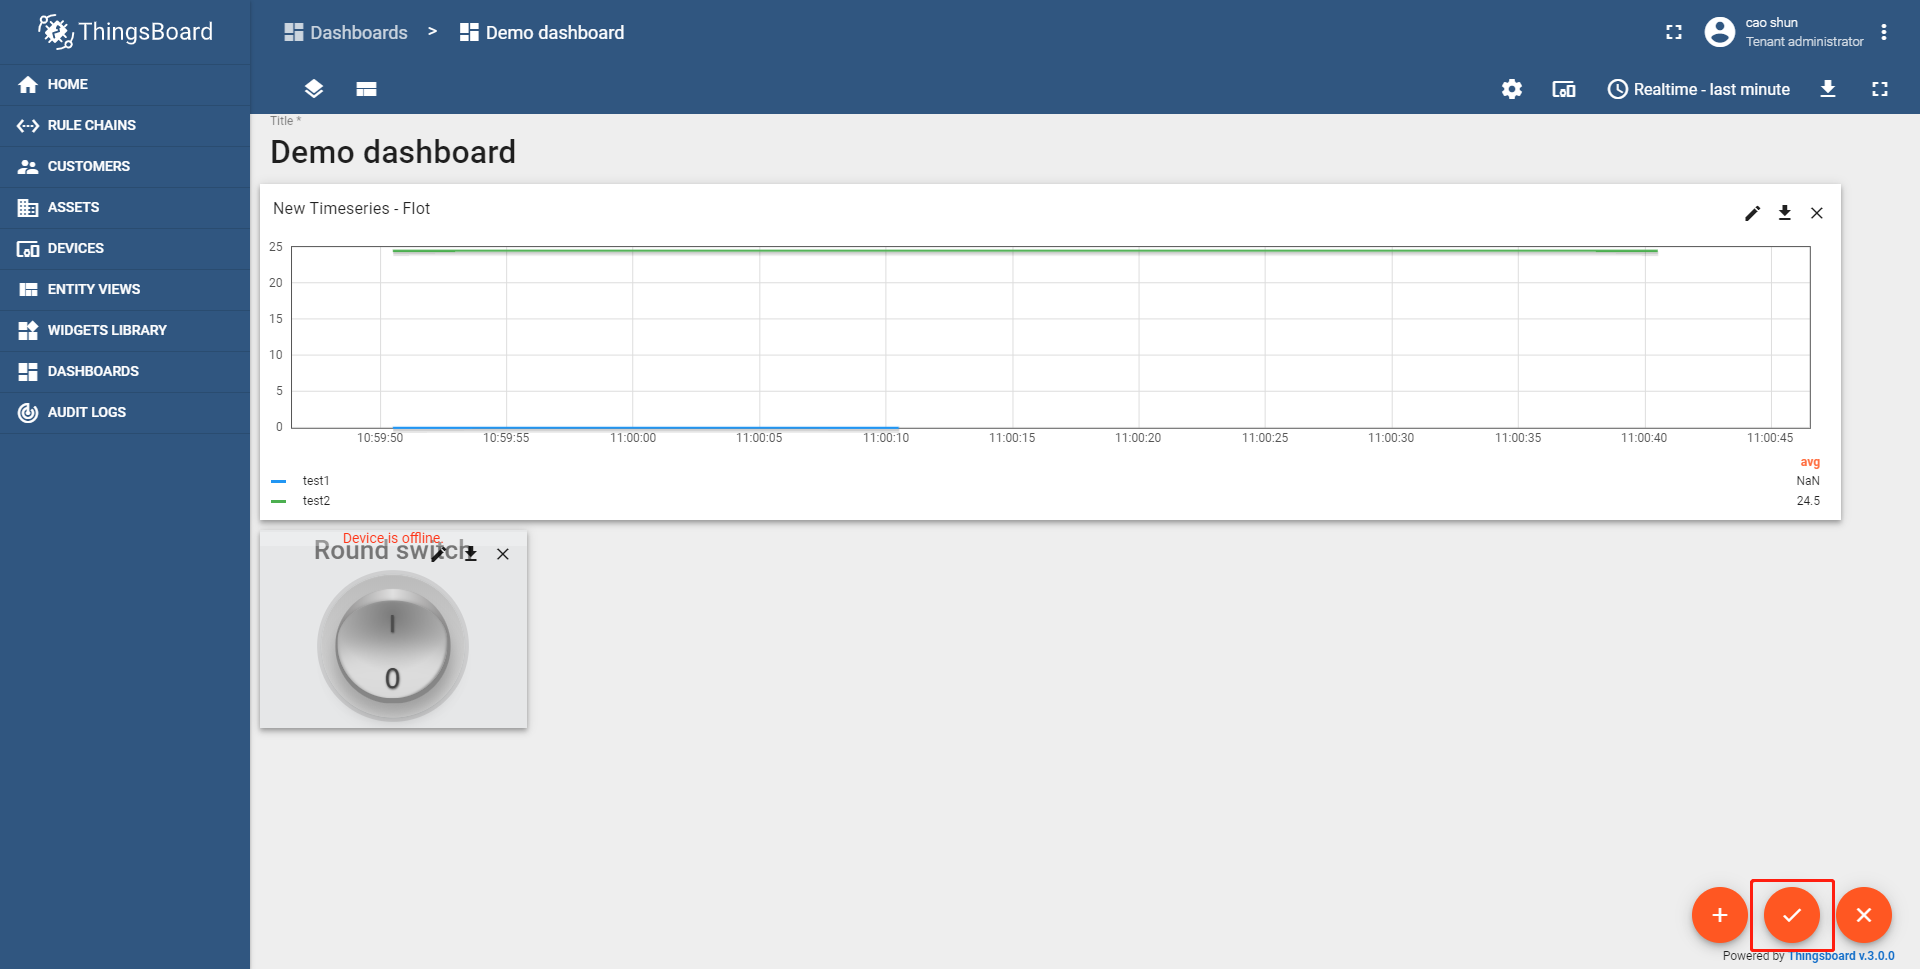
Then, you can use the switch to deliver control commands and view data trends through the trend charts.
FAQ
- Check whether the cloud service script is correct
- Check whether the App’s cloud service output is correct
Check whether the cloud service script is correct
Open the log of Device Supervisor App Write the script and click OK. The Build module: <Main Function Name>, type: <publish/subscribe> information in the log shows whether the script is built successfully.
If the script is built successfully, the page is as follows:

If the script failed to build, the page is as follows:

Check whether the App’s cloud service output is correct
You can use logger and logging to output important logs. In the following figure, the logging.info method is added in the sixth line of the script. You can search for <string> 6 in the log to check whether the output results meet the expectation.
